Got questions? Leave your message here or Schedule a quick call with our manager now
Got questions? Leave your message here or Schedule a quick call with our manager now
Download the guide "How to Integrate with Multiple eCommerce Platforms in Less than a Month" and find more how to connect your B2B SaaS system with various shopping platforms quickly!
Return (RMA, Return Merchandise Authorization) - return of low-quality or defective goods for repair, replacement, refund, etc. Only shipped goods can be returned.
The return process may vary depending on the specific eCommerce platform. However, the return procedure usually includes the following:
First of all, you need to check in the API2Cart API Documentation whether there are methods for working with returns for your chosen eCommerce platform:
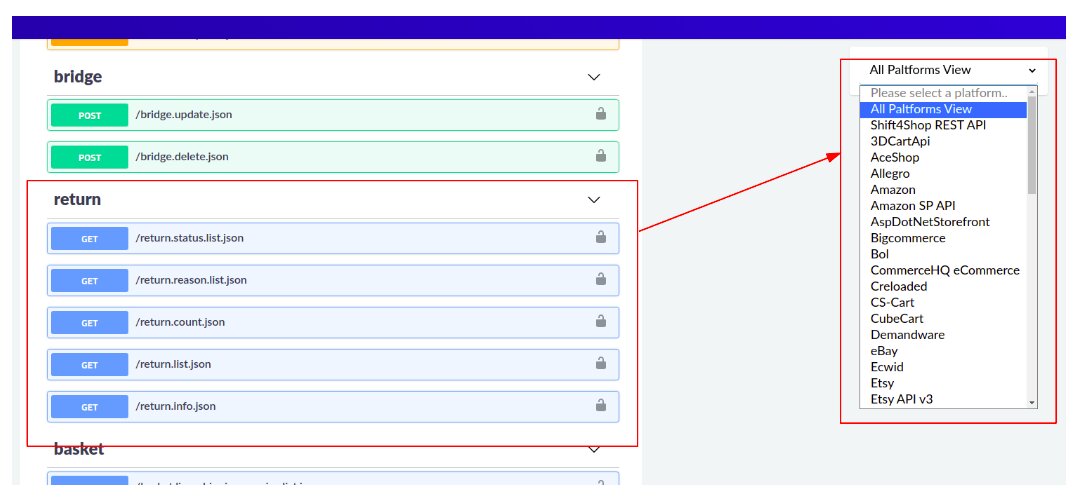
You should also read the method description to know which options are supported and required for a particular eCommerce platform.
Or you can use this link.
Returns are closely related to orders. Methods for importing (creating and updating) returns are in the order section. For greater filtering capabilities, methods for exporting returns are placed in a separate return section.
To create a return, you need to use the order.return.add method.
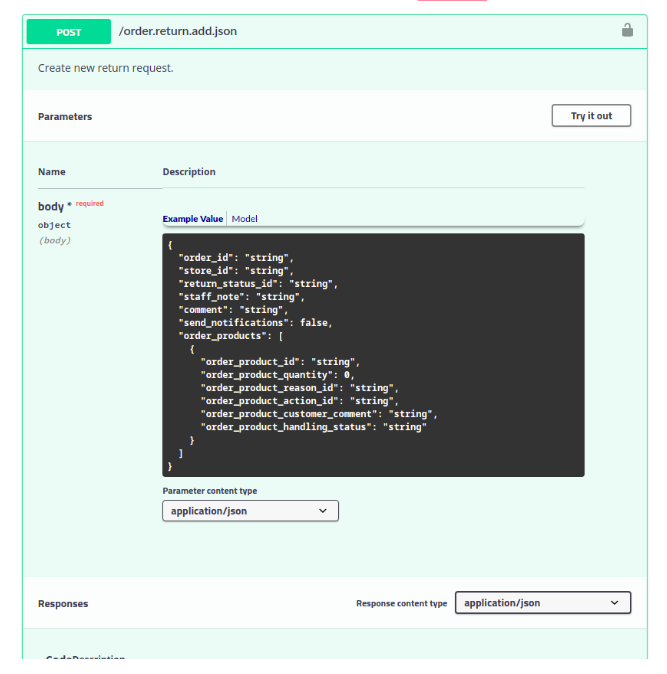
For all platforms, order_id and order_products must be specified. That is, which order and which products in the order will be returned.
In order_products, you need to specify the following:
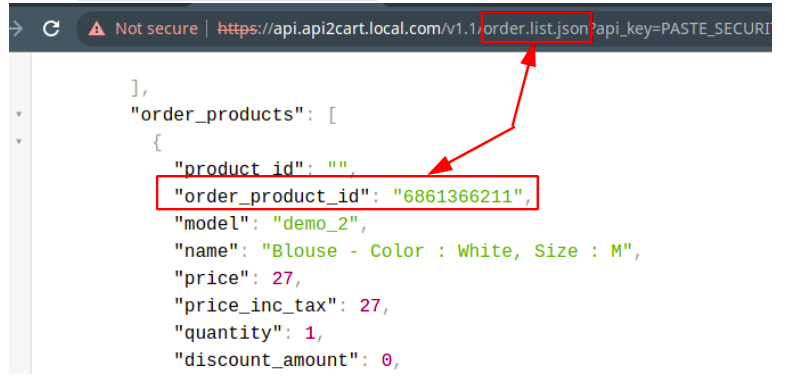
Depending on the eCommerce platform, you must also specify:
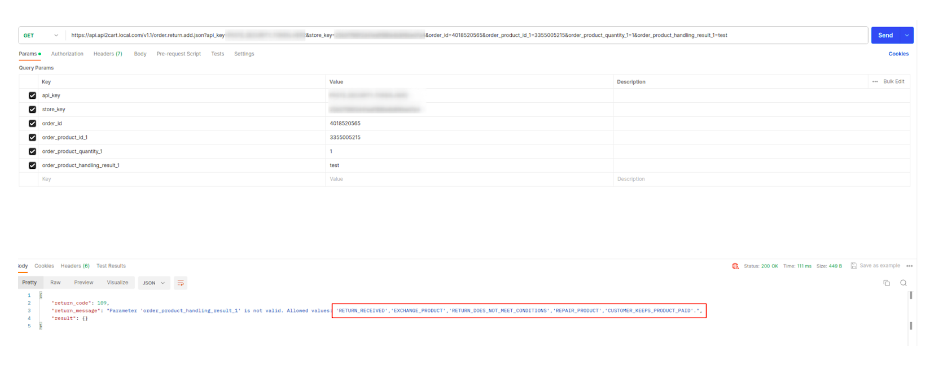
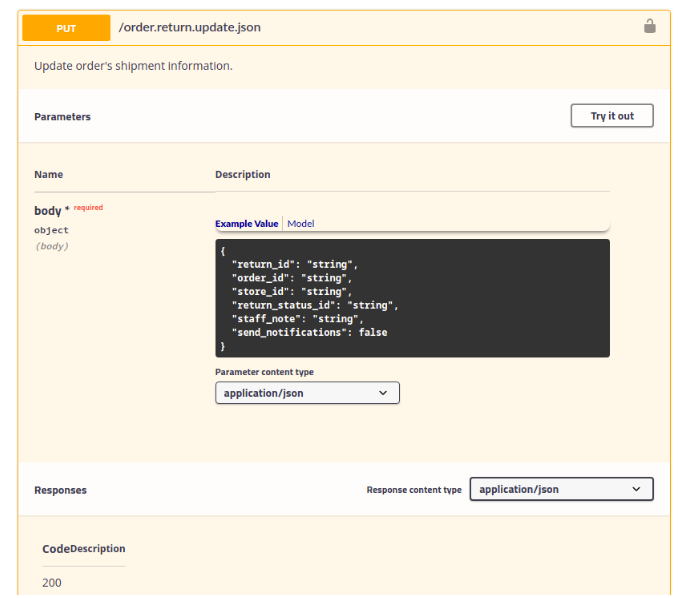
The return status can be updated using the order.return.update method.
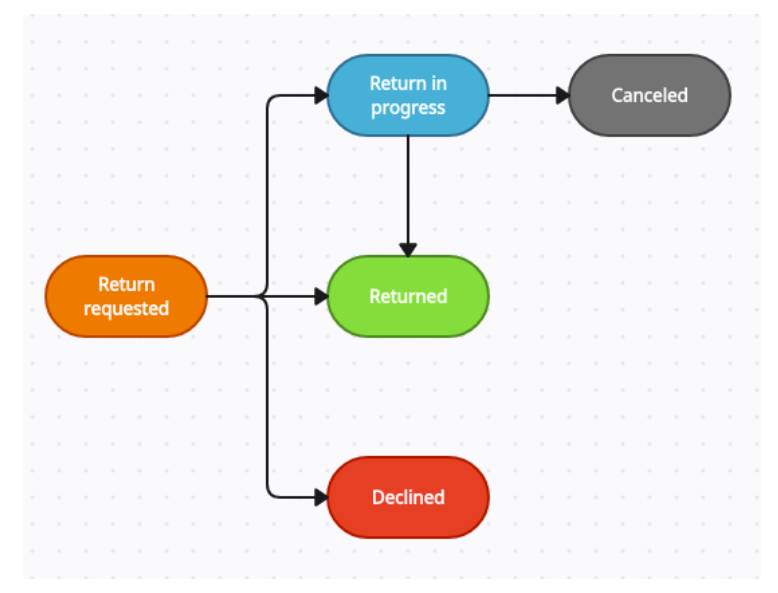
You can't specify any return status on Shopify. Shopify has a clear return workflow. Follow this chart to find out which status you can upgrade to.
A list of all returns can be obtained with the help of return.list method.
For Shopify, you must specify the order_id or order_ids parameter. That is, on Shopify, you can only issue returns for a specific order.
In order to find out for which orders there are returns, you need to select the value from the export orders field additional_fields -> return_status.
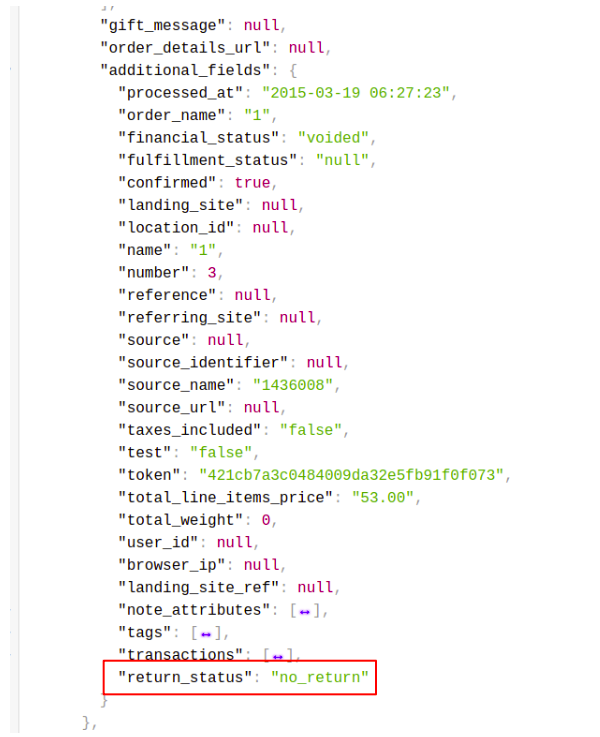
If the value is no_return, then no return request was created for such an order. Accordingly, return.list will not return anything for such an order. If the status is any other, then in this case, a return will be displayed for the order.
For Shopify, there is a return_status filter in the order.list method that allows you to filter orders for which there is a return.
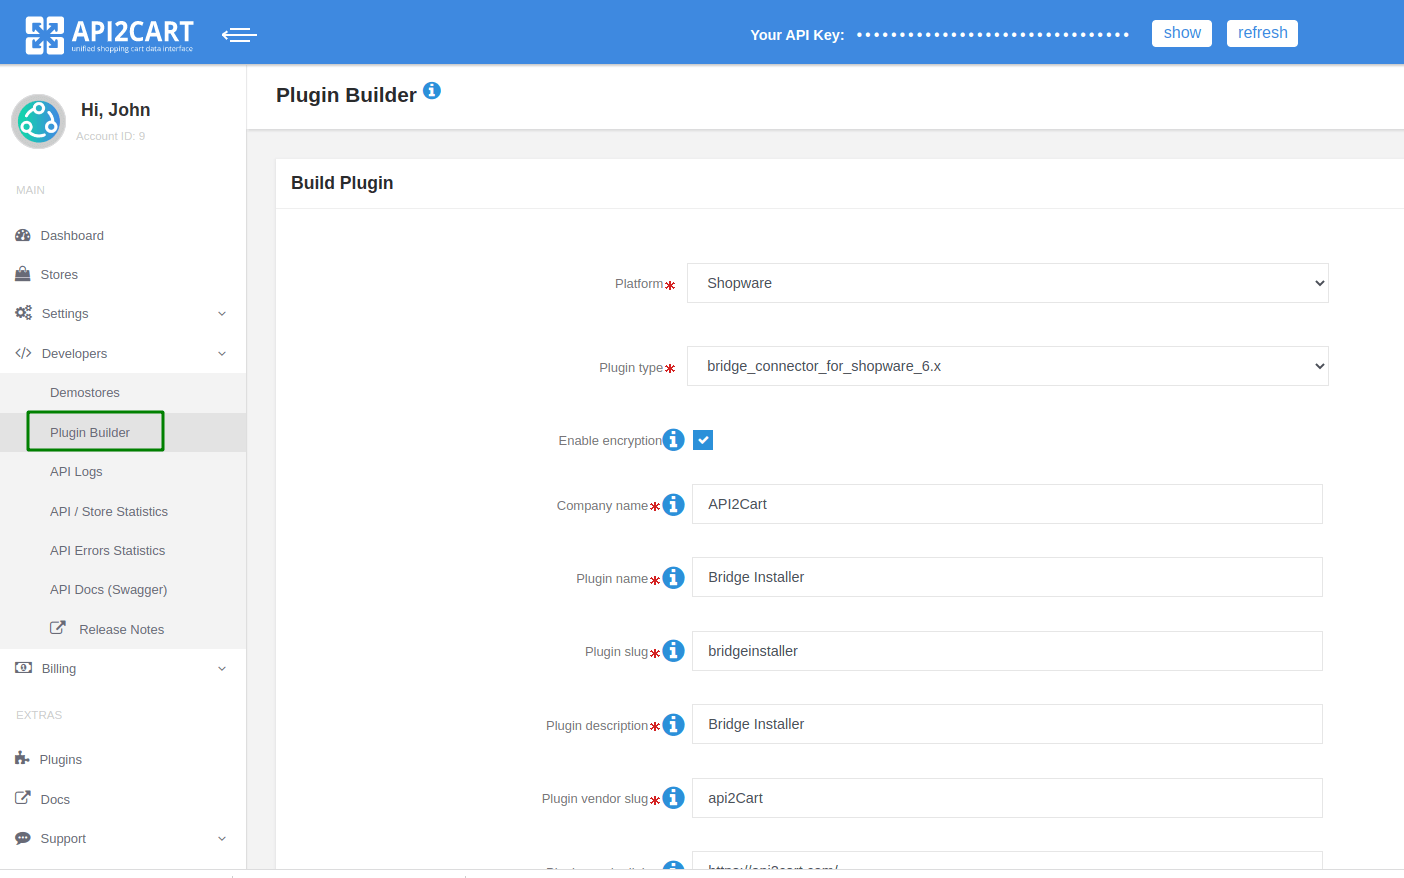
The Plugin Builder allows you to build the Bridge Connector plugin, which is used to connect the store to API2Cart, for different shopping platforms. The following platforms are currently supported:
If the “Plugin builder” feature is available in the account plan, the plugin can be customized to your needs, for example, you can specify the plugin's name, company, description, and logo. Also, you can enable or disable encryption on the bridge, configure the callback URL, etc. When this feature is unavailable in the plan, the values for the plugin are set by default.
Also, the possibility of asymmetric data encryption has been added to the Plugin Builder. Data is encrypted using the OAEP (Optimal Asymmetric Encryption Padding) protocol, which provides a reliable level of security and resistance to attacks. More details.
Callback URL and Public Key allow you to generate a plugin. After installing it and clicking the “Connect” button, a webhook will be sent to the URL that was specified in the Callback URL field with encrypted store credentials that can be used when adding it to APICart. Namely: store_url, store_key, store_root, bridge_url. Data is encrypted with an RSA key. You can insert your own public key or generate a pair of 2048-bit keys.
The data sent to the callback is encrypted according to the following principle:
The callback will receive a webhook with encrypted data in the "data" field.
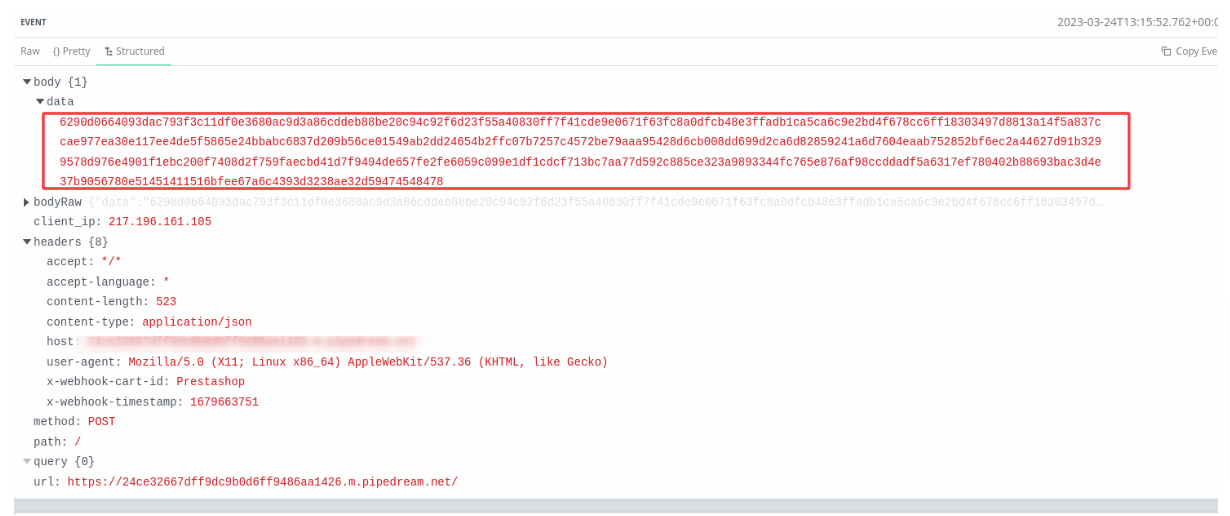
The x-webhook-cart-id and x-webhook-timestamp headers are also available.
To decrypt the data, you need to perform actions with the received data in the reverse direction:
Here's an example of PHP code:
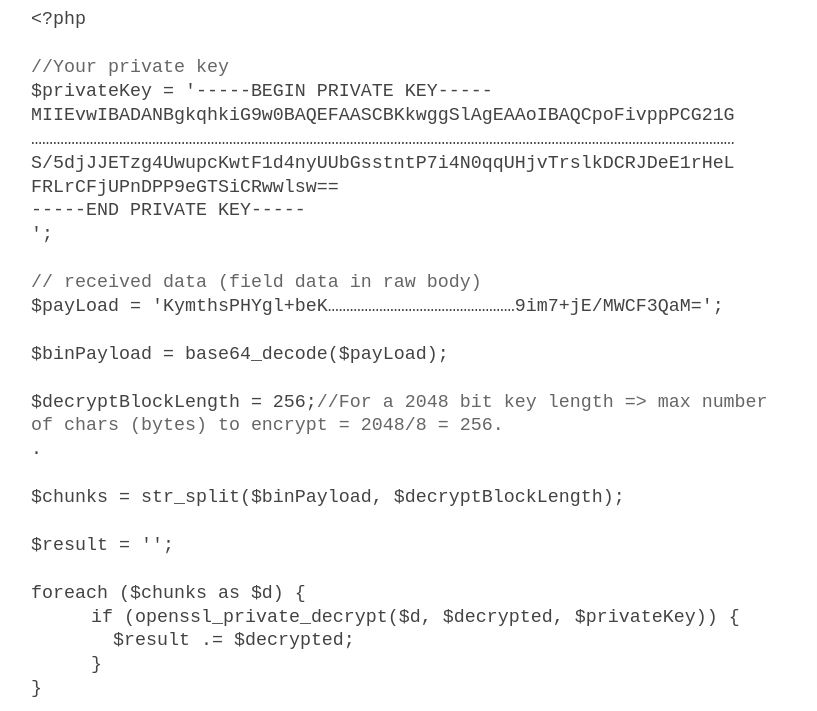
As a result, you will receive data that can be used in the account.cart.add method to add a store.

Some fields in the Pplugin Builder are validated, and an error will be displayed if incorrect data is entered. Also, next to each field is a hint with a brief description of what this field is for.
After successfully building the plugin, the downloaded archive with the plugin can be installed on the page of the selected platform.
Asymmetric data encryption has been added in version 141 of the bridge as well as plugins that can be built using the plugin builder. Data is encrypted using the OAEP (Optimal Asymmetric Encryption Padding) protocol, which provides reliable security and resistance to attacks.
When exchanging data between API2Cart and the server on which the bridge or plugin is installed, there is a risk of interception of this data. Especially if the data is not transmitted over a secure HTTP protocol, an attacker can gain unauthorized access to the database. In addition, if the attacker somehow learns the store_key, he can directly interact with the store through the bridge, bypassing API2Cart. To prevent this from happening, we implemented asymmetric data encryption.
Here's how it works:
This algorithm does not lead to significant delays in the execution of requests or additional load on the server and is a reliable tool for protecting confidential data during its exchange between parties.
Its main advantages:
The main difference between the Enterprise On-Premise solution and the other plans provided by API2Cart is that no one except your team will have access to the service resources (as it will be on your chosen server). Enterprise On-Premise solution guarantees you the highest level of data security that can be provided by API2Cart.
You can take sole control of who can manage your API2Cart server infrastructure by using the functionality provided by Amazon Web Service (AWS), Microsoft Azure, Hetzner Cloud, and Google Cloud Platform. Also, you can use API2Cart service on your own server.
All requests will be made over HTTPS protocol.
With the Enterprise On-Premise solution, you will be able to manipulate the data from as many of your clients’ stores as needed with no limits.
Also, Enterprise On-Premise solution includes webhooks, escrow service, WhiteLabel, and plugin builder.
Enterprise On-Premise solution is perfect for high-volume enterprises with a high number of clients.
To test API2Cart Enterprise On-Premise solution you will need to:
The usage of API2Cart Enterprise On-Premise solution includes continuous support by our dedicated tech specialists.
Yes, API2Cart supports the following shopping carts plugins:
You can also download some plugins in the "Plugins" section of your API2Cart account.
We return Live Shipping Rates on Shopify, Magento, Magento 2, and WooCommerce for now (November 2021)
Methods:
/basket.live_shipping_service.list.json
/basket.live_shipping_service.create.json
/basket.live_shipping_service.delete.json
How it works?
Create new shipping service on the store
/basket.live_shipping_service.create.json
On WooCommerce stores there can be an unlimited amount of services, but on Shopify you can create only one sevice (Shopify limit).
To create the service you’ll have to specify the name of the service and callback url, that will return us shipping rates. We validate the callback when it is being created by sending test request to it. Test requests contain header X-Shipping-Service: 1.
To check it the request was really sent by API2Cart, compare header signature X-Shipping-Service-Signature
The signature is built based on all headers that start with X-Shipping-Service, except for X-Shipping-Service-Signature.
Video tutorial:
The algorithm:
1. Create array of headers, let the header name be its key, its value - the header value string.
2. Sort the headers by the name.
3. Create the string for signature, that is made of headers. For that, encode the array of headers in JSON and concatenate from request body.
4. Calculate sha256 signature in binary format
5. Convert the binary signature to base64
Php example:
$headersToSign = [
'X-Shipping-Service-Test-Request' => '1',
'X-Shipping-Service-Request-Timestamp' => '1553177278'
];
ksort($headersToSign);
$headersJson = json_encode($headers);
$sign = base64_encode(hash_hmac('sha256', $headersJson . $body, $signingKey, true));
Test request example (from API2Cart)
REQUEST: POST /rates.php
Host: www.stores.local
Connection: close
User-Agent: Zend_Http_Client
accept-encoding: identity
content-type: application/json
accept: application/json
X-Shipping-Service-Signature: Q4jaFbiUKJW2gjTHqvlRrWMUOx65CaepT0BaKFiw6a0=
X-Shipping-Service-Test-Request: 1
X-Shipping-Service-Request-Timestamp: 1553609265
Content-Length: 1880
{
"packages": [
{
"id": "1",
"currency_code": "USD",
"origin": {
"first_name": null,
"last_name": null,
"postcode": "35004",
"address1": "Test, 1\/1",
"address2": "",
"phone": "",
"city": "Moody",
"country": {
"code2": "US",
"code3": "USA",
"name": "United States of America"
},
"state": {
"code": "AL",
"name": "Alabama"
},
"company": null
},
"destination": {
"first_name": null,
"last_name": null,
"postcode": "35005",
"address1": "Test, 1\/1",
"address2": "",
"phone": "",
"city": "Adamsville",
"country": {
"code2": "US",
"code3": "USA",
"name": "United States of America"
},
"state": {
"code": "AL",
"name": "Alabama"
},
"company": null
},
"items": [
{
"product_id": "1",
"model": "t1",
"name": "Test Product 1",
"price": 100.99,
"quantity": 5.5,
"discount_amount": null,
"total_price": 555.45,
"tax_percent": 21,
"tax_value": 116.64,
"variant_id": null,
"weight_unit": "kg",
"weight": 5.5
}
]
},
{
"id": "2",
"currency_code": "USD",
"origin": {
"first_name": null,
"last_name": null,
"postcode": "35004",
"address1": "Test, 1\/1",
"address2": "",
"phone": "",
"city": "Moody",
"country": {
"code2": "US",
"code3": "USA",
"name": "United States of America"
},
"state": {
"code": "AL",
"name": "Alabama"
},
"company": null
},
"destination": {
"first_name": null,
"last_name": null,
"postcode": "35005",
"address1": "Test address",
"address2": "",
"phone": "",
"city": "Adamsville",
"country": {
"code2": "US",
"code3": "USA",
"name": "United States of America"
},
"state": {
"code": "AL",
"name": "Alabama"
},
"company": null
},
"items": [
{
"product_id": "1",
"model": "t1",
"name": "Test Product 1",
"price": 100.99,
"quantity": 5.5,
"discount_amount": null,
"total_price": 555.45,
"tax_percent": 21,
"tax_value": 116.64,
"variant_id": null,
"weight_unit": "kg",
"weight": 5.5
},
{
"product_id": "1",
"model": "t2",
"name": "Test product 2",
"price": 100.99,
"quantity": 5.5,
"discount_amount": null,
"total_price": 555.45,
"tax_percent": 21,
"tax_value": 116.64,
"variant_id": null,
"weight_unit": "kg",
"weight": 5.5,
"additional_fields": {
"dimensions_unit": "cm",
"height": 3.5,
"width": 2.15,
"length": 10.36
}
}
]
}
]
}
Once you get test request, your endpoint have to respond in JSON format
The response will differ for different shopping carts
For instance, from Shopify response structure will look like the following:
{
"packages_rates":[
{
"package_id":"1",
"rates":[
{
"name":"Some name",
"description":"Tax included an duties",
"code":"some_name",
"currency":"USD",
"total_cost":10.56
},
{
"name":"Some name 2",
"description":"Tax included an duties",
"code":"some_name2",
"currency":"USD",
"total_cost":20.59,
"min_delivery_timestamp":1558177278,
"max_delivery_timestamp":1559177278
}
]
}
]
}
For WooCommerce the response structure will look like that:
{
"packages_rates":[
{
"package_id":"1",
"rates":[
{
"name": "Some name",
"code": "some_name",
"total_cost": 10.56,
"taxable" : true,
"tax_value": 2.12/*pass tax value*/
},
{
"name": "Some name",
"code": "some_name",
"total_cost": 10.56,
"taxable" : false/*disable tax*/
},
{
"name": "Some name",
"code": "some_name",
"total_cost": 10.56,
"taxable" : true /*tax calculated using store tax rates*/
},
...
]
}
]
}
When we send a certain amount of packages, we expect to get the same amount of packages_rates objects. The property rates can be empty, which means there can be no rates for a certain package.
If the structure is not valid, we return an error. For example, you will get error when you pass a string in total_cost.
{
"return_code": 109,
"return_message": "Bad Response. Field \"rates->0->total_cost\" has wrong type. It must be decimal",
"result": {}
}
If the callback returns 404 error code, we will not try again
If the callback returns 200 error code, we will check response validity and then return it to the store in the format that fits the store.
If the store returns 200 error code, butwith empty or incorrect response, we will wait 2 seconds and will try again.
If the callback don’t respond in 15 seconds, we will throw an error and will not try again.
{
"return_code": 109,
"return_message": "Callback https://www.stores.local/rates.php did not respond within 15 sec",
"result": {}
}
If everything is ok, the new service will be created.
2) When the store requests rates, we unify the request and send it to callback specified when the service was created. Also, we send X-Shipping-Service-Id header.
If the response is not valid or the callback didn’t answer, we will log the error and increment error count of the shipping service by 1. If the next request will be successful, the count will be reduced to zero. Soon we will add the functionality that will turn off the service when the error limit is exceeded.
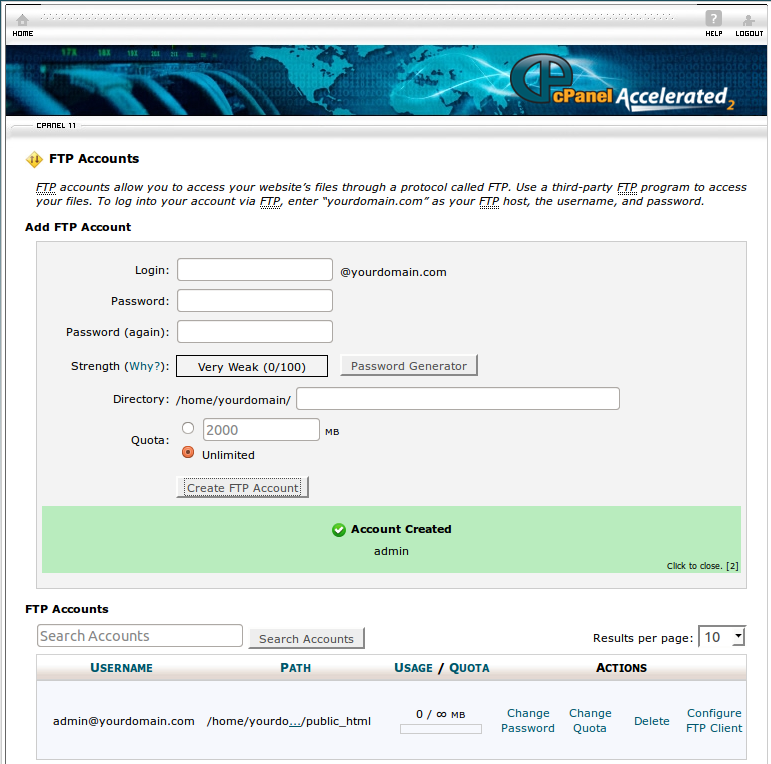
1. Open cPanel and find the FTP Accounts icon.
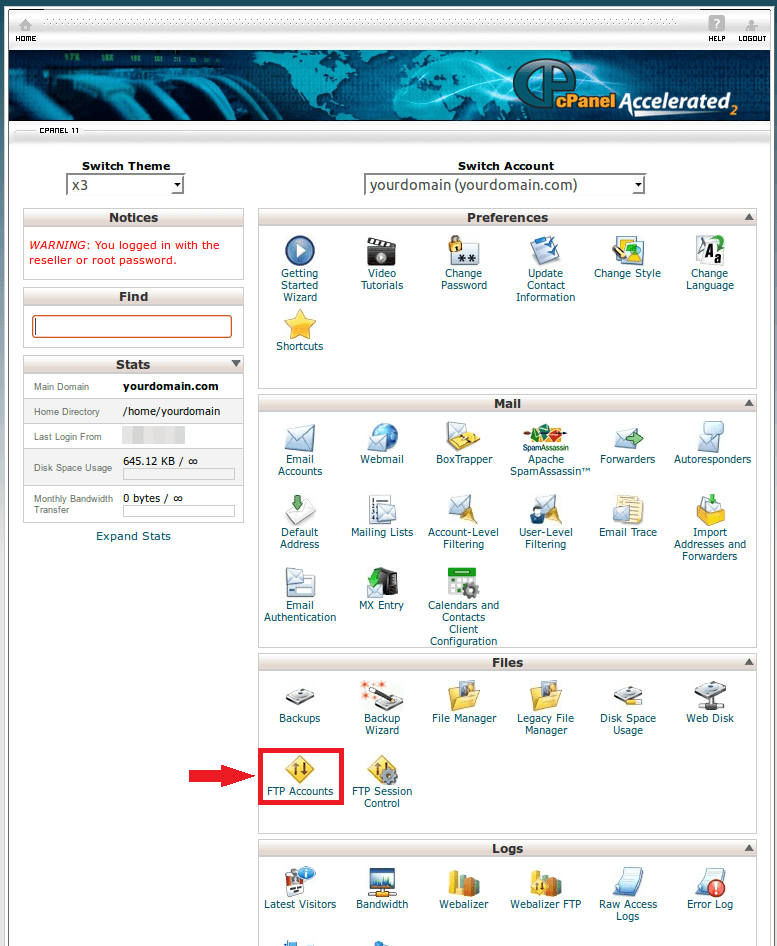
2. Add an account to allow access to your server via FTP.

Fill in the following fields:

It is recommended to use strong passwords. The system will show you whether your password is strong enough.
After you have filled in all the information necessary, you get something like this:
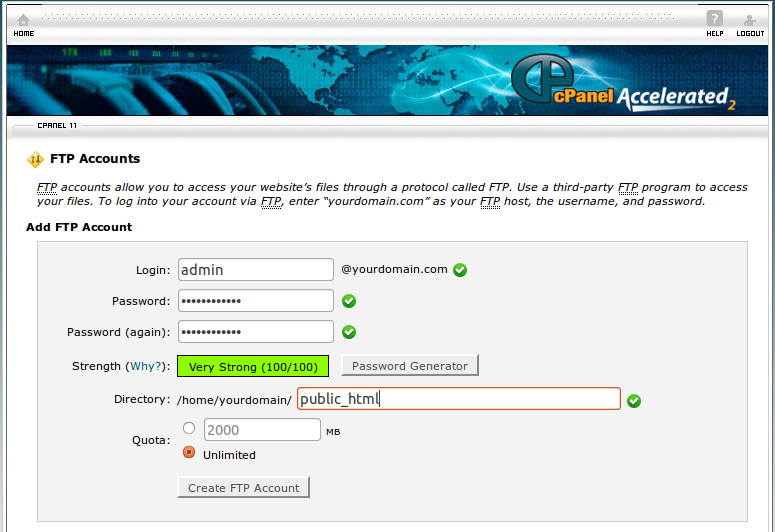
3. Click on Create FTP Account and have your account created.
Lately announced, all WooCommerce users are able to upgrade their stores to the new 4.0 version. However, there are profound changes considering orders.
Make sure you have performed WooCommerce upgrade correctly to allow WooCommerce and API2Cart work with your orders properly.
There are two ways to establish WooCommerce upgrade:
Notice that only after that, database version is updated. Otherwise, you won’t be able to view the previously placed orders in WooCommerce itself. And API2Cart will not be able to detect new WooCommerce version, thus work with new orders.
It all depends on the speed of connection and your shopping cart server, as well as the type of shopping cart. For example, the requests for Magento take more time than for the shopping cart like osCommerce. While retrieving data from shopping cart specify the necessary fields in the parameters. This will speed up the process. Do not specify the unnecessary fields, because for some fields additional requests may be sent, which increases the time of data retrieving.
Our developers are constantly improving the service to provide its fast and reliable performance.
Check the following steps to add API2Cart IPs to whitelist and prevent accidental blocking.
Instruction for WHM (Web Host Manager)
1. Login to WHM (Web Host Manager)

2. Go to Security Center and then Host Access Control.
3. Add IP addresses over the ALL deny line in Host Access.

4. To ensure the IPs won’t be banned by cPHulk, add them to the white list.

5. If there is the CSF plug-in installed, do not forget to add СSF IP to the white list as well.

Instruction for Plesk user:
The list of IPs you need to add:
You can use the parameter force_all (for example, product.list?api_key=<your_api_key>&store_key=<your_store_key>&start=0&count=10¶ms=force_all.) or use the response_fields parameter, which will contain the result field (for example, order.list?api_key=<your_api_key>&store_key=<your_store_key>&start=0&count=10&response_fields={return_code,return_message,pagination,result}).
For more information go to API2Cart Documentation.
Connection Bridge file is what helps API2Cart users connect stores which are based on open-source shopping platforms like Magento, WooCommerce, PrestaShop, and CS-Cart. API2Cart API works directly with databases of such types of shopping platforms via a bridge file. Read more.
We use the minimum amount of code in our bridge files. Running SQL queries allows us to retrieve the data directly without running all the shopping cart code. What is more, the bridge allows us to work with the data that is not available via the platform’s API.
Benefits of the Connection Bridge:
- Speed
- Low server load, because all data is processed on our side.
- Flexibility, as we can add new methods without updating the bridge.
This special access gateway is secured by the unique signature and encryption for safe data processing. To add a store to your API2Cart account you have to set up Connection Bridge to enable data interaction.
There are three ways you can connect Bridge file:
1. Manually download the Bridge to your computer. It will be stored in a zip file named “bridge.zip”. Extract the file. It will contain the “bridge2cart” folder. Upload it to the store’s root folder via FTP client (WinSCP, FileFTP, FileZilla, CuteFTP, etc.)
If needed, the bridge file can be stored in any folder on the server, but in that case you’ll need to use parameters bridge_url (the full http url for a bridge) and store_root (absolute server path to the store root folder).
If the bridge folder is contained in the store root folder, then you don’t need to specify store_root parameter, only bridge_url.
After uploading the bridge, use account.cart.add method.
2. Automatically upload the Bridge via account.cart.add method. Use account.cart.add method specifying FTP credentials (Host, Port, Login, Password and Store Path) or use API2Cart admin panel.
3. Using plugins that can be built in the Plugin Builder section on your API2Cart account.
Plugin uploads the bridge and installs it to the store’s root folder. You can place the plugin on the platform app marketplace. Then, your clients will be able to install the bridge in one click.
To check if the Connection Bridge file has been installed correctly enter https://[yourstore url]/bridge2cart/bridge.php within your browser address line. If the bridge file is working correctly, you will see the following message:
“Version: xx
BRIDGE INSTALLED.”
Check the current bridge version here.
If not, please set the following permissions:
- 644 or 666 for "bridge.php", depending on your server configuration
- 755 or 777 for "/bridge2cart" folder, depending on your server configuration
Note! We strongly recommend turning off your website redirects to ensure proper functioning of the Connection Bridge file.
If you have any questions during the process of bridge installation, please read this article or contact us by email ([email protected]).
API2Cart uses Customer.list API method that help to retrieve following data:
This method also includes the fields that were created in the shopping cart backend (admin section) and the specific fields, which are set for this shopping cart by default.
API2Cart constantly improves its services, so we expect to deliver you all the required methods in the near future. Please contact us in order to request necessary functionality.
Many shopping carts have an entity limit in one request. Even if it is said that there is no limitation, you should be careful and not to include too many entities in a single API request since it may negatively affect your system and client’s store performance. It is better to extract data in smaller chunks (4-50 items), what guarantees a correct result.
Notice that:
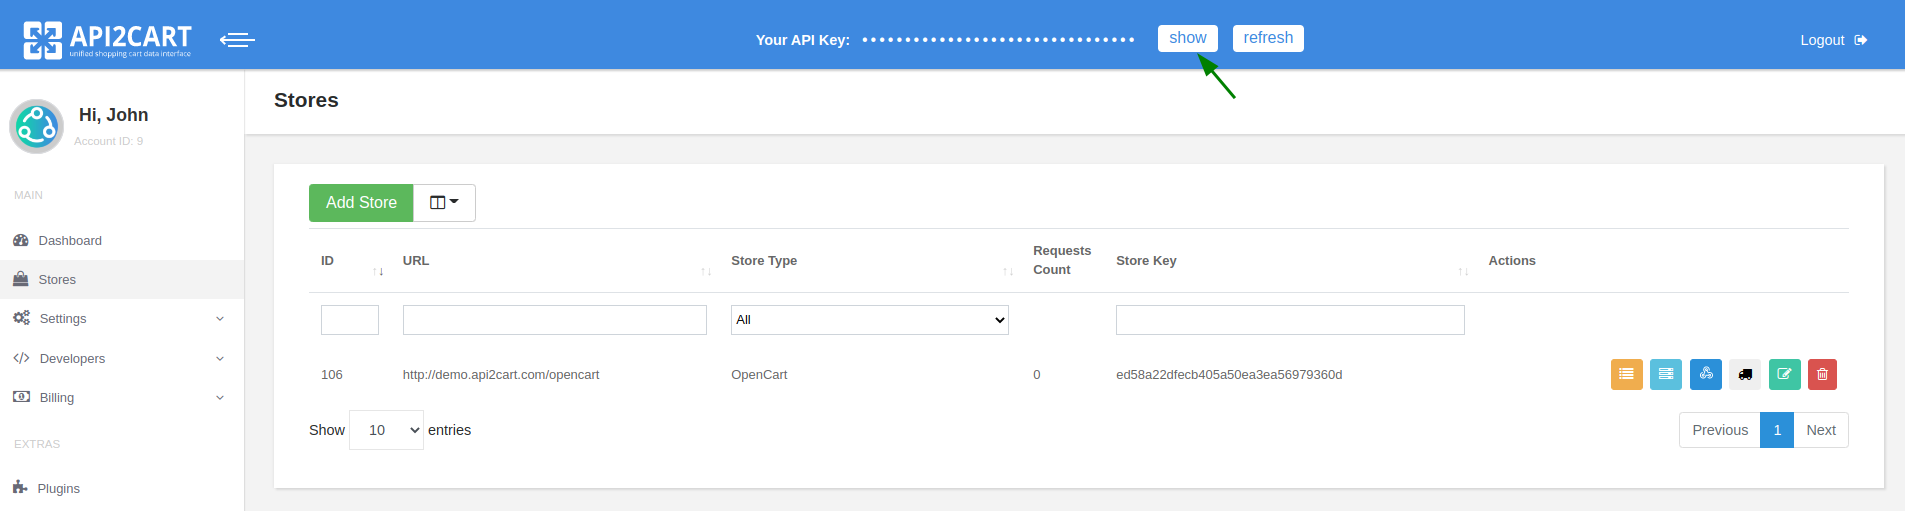
When the registration is completed, you are automatically redirected to your API2Cart account. In the “My Stores List” section you will find OpenCart demo store which is available for testing service’s functionality.
You can also add demo stores that can be created in the "Demostores" section of your API2Cart account. More details at Demo store in API integration
We provide a unified API to work with multiple shopping carts and marketplaces. By integrating with our API, you can integrate with different e-Commerce platforms such as Magento, PrestaShop, Bigcommerce, Shopify, OpenCart, Volusion, etc. at the same time, without any need to develop separate integration solutions for each shopping cart.
The integration works the following way - you already have your business logic module which is integrated with API2Cart. Thus, you receive a complex solution which can work with numerous platforms - hosted and self-hosted. You will have to establish connection via connection bridge or provide store access details - and you'll be able to retrieve necessary data and process it with your solution. So, API2Cart is a universal programming interface which will help you optimize eCommerce integration process.
Event takes place when a user or an owner interacts with the shopping cart for some purpose. For example, events may be considered as user registration, product adding/updating or some other changes on the store.
API2Cart cannot establish real-time synchronization with the store. However, it is feasible to sync with the store periodically (e.g. every 3 minutes) and retrieve all the necessary data in the shortest time possible.
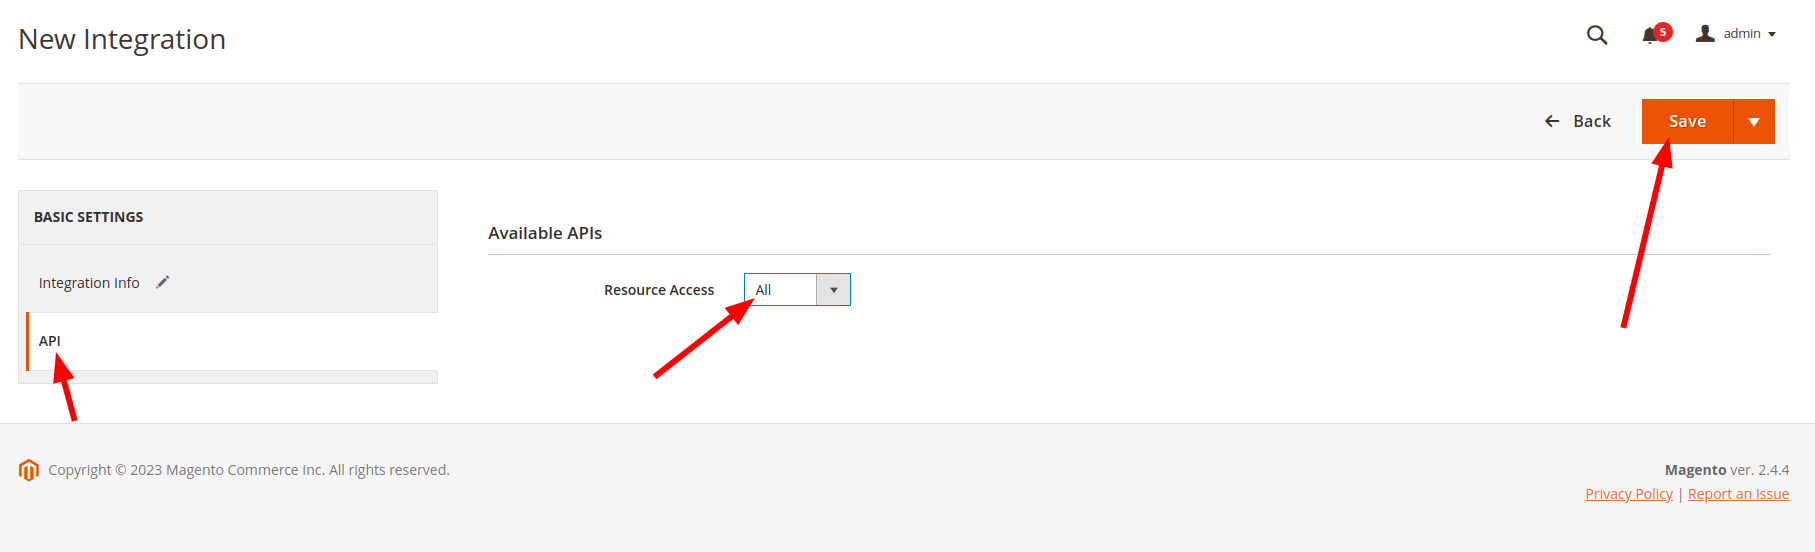
Specify the callback URL and select the necessary scopes. We recommend you select all because you will need to perform all the actions again.

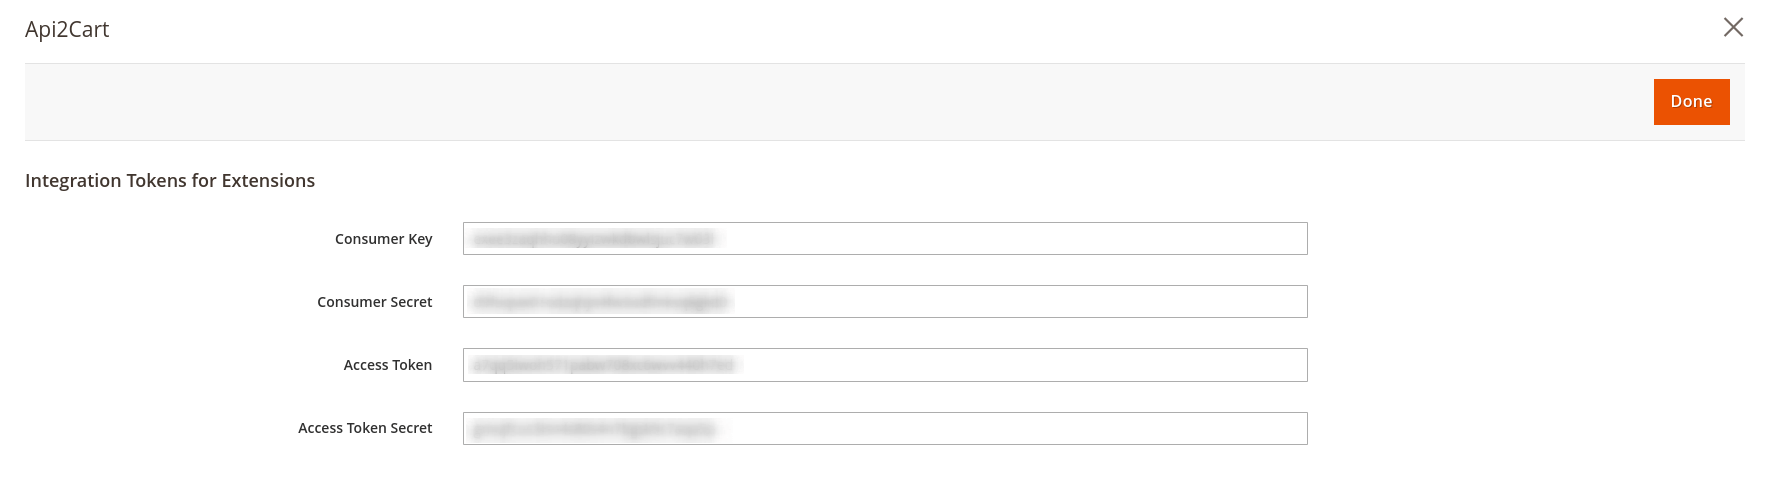
After creating an application, you will receive an App ID and a Secret Key.
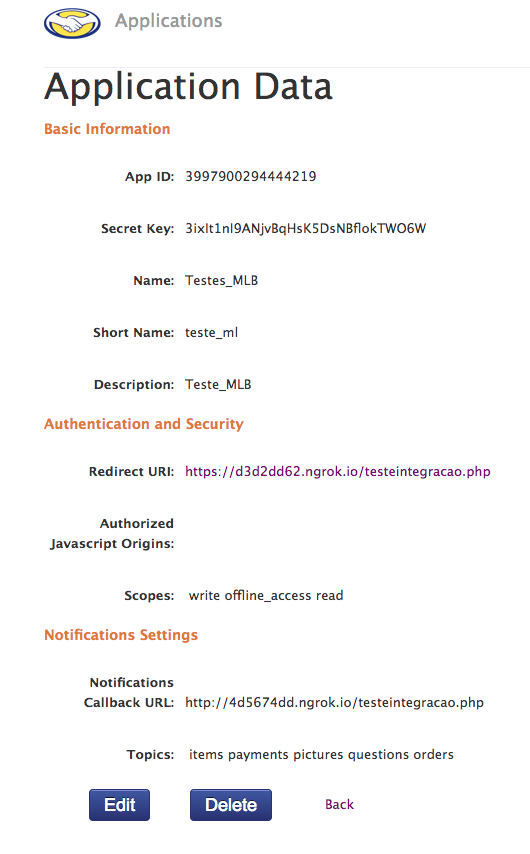
Then you need to create a link
https://auth.mercadolibre.com.co/authorization?response_type=code&client_id=$APP_ID&redirect_uri=$YOUR_URL
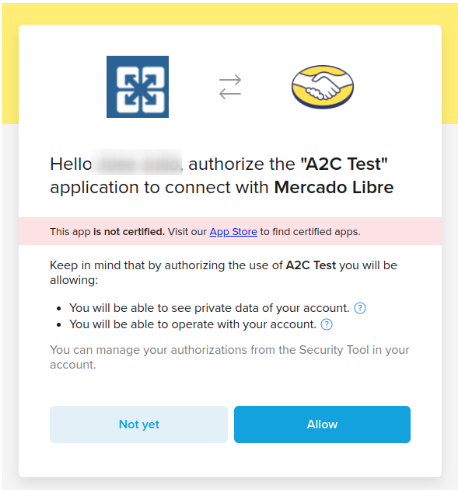
In the end, you need to add the domain of the country for which the account is registered. If you go to the link in the browser, there will be a window where you need to grant access to the application.
After that, a redirect will be to the page whose URL should contain the code

Which should be used in the next query
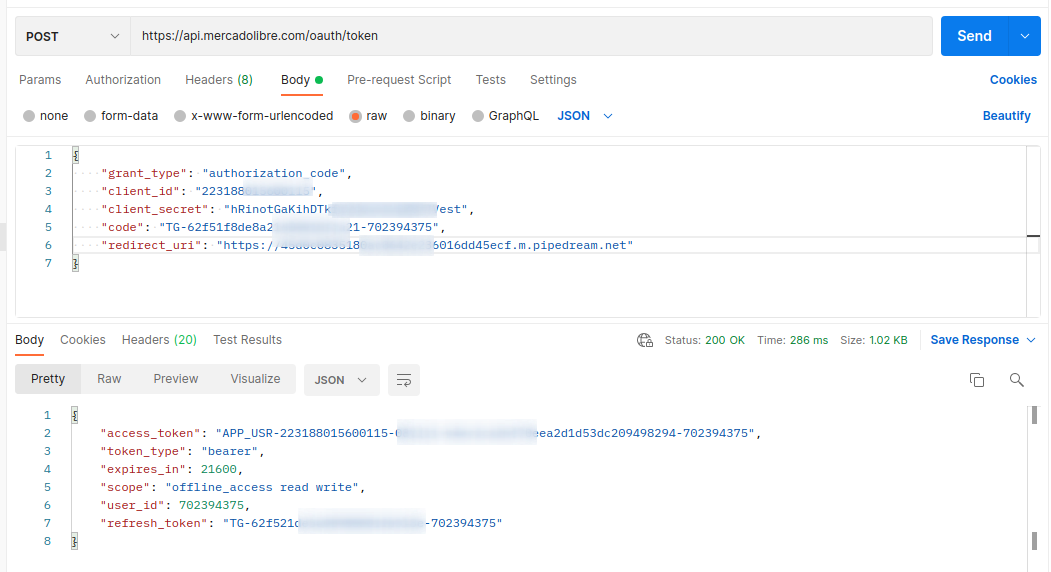
where client_id - App ID, client_secret - Secret Key
As a result, you will receive access_token and refresh_token
To add a page to API2Cart, you need to specify refresh_token, App ID, and Secret Key

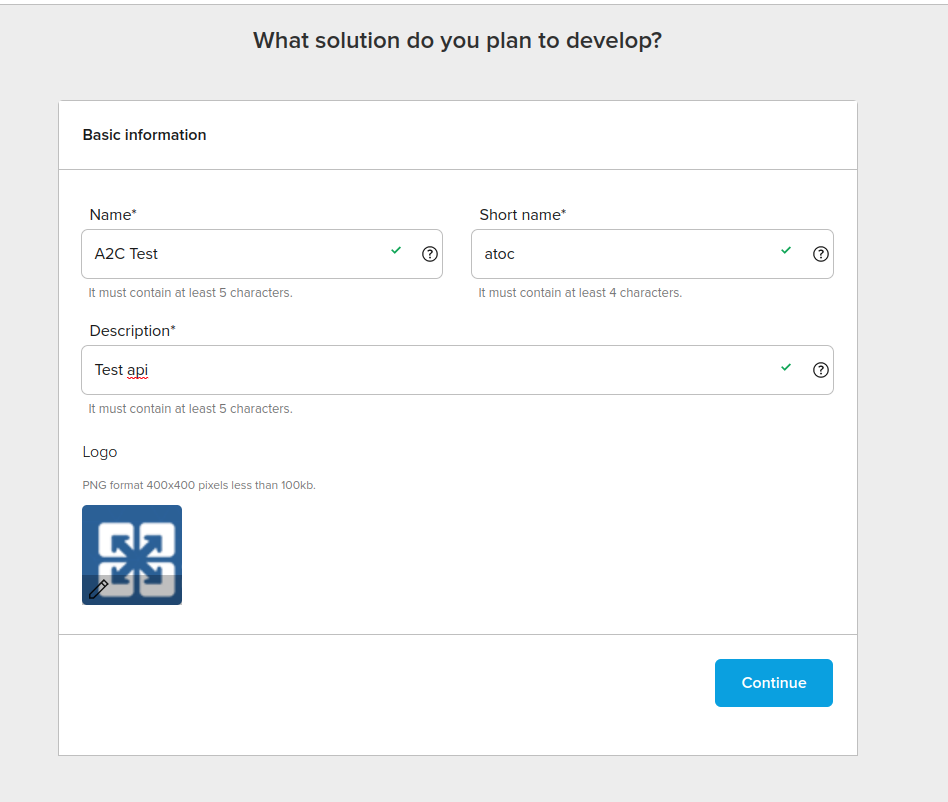
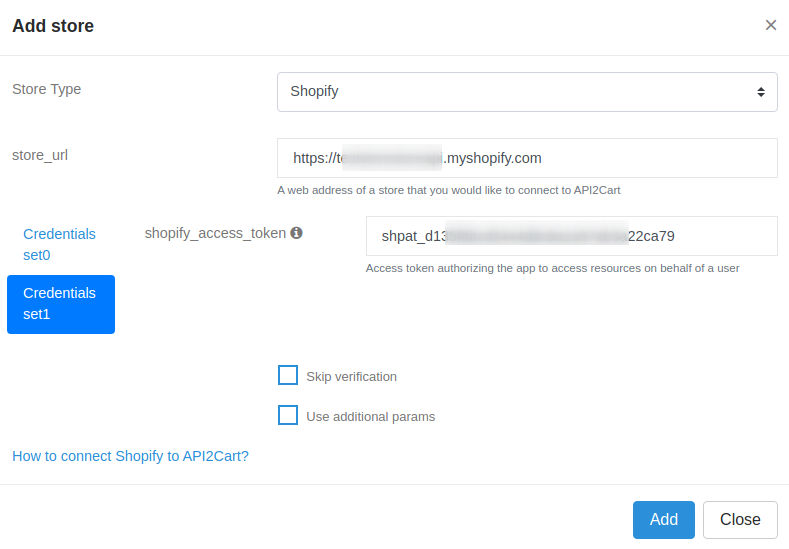
To integrate your customer's store with your business system via API2Cart, you will need to take the following steps:
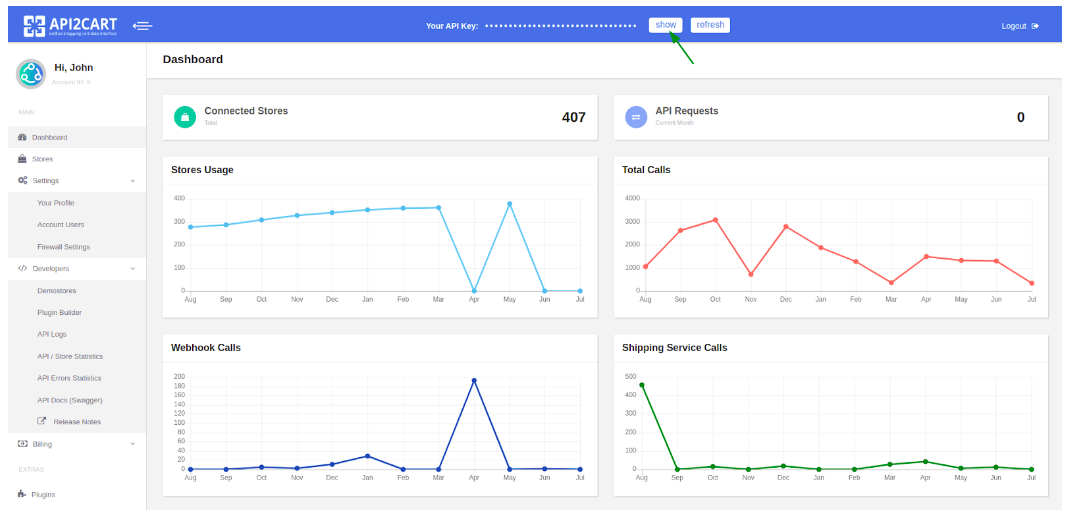
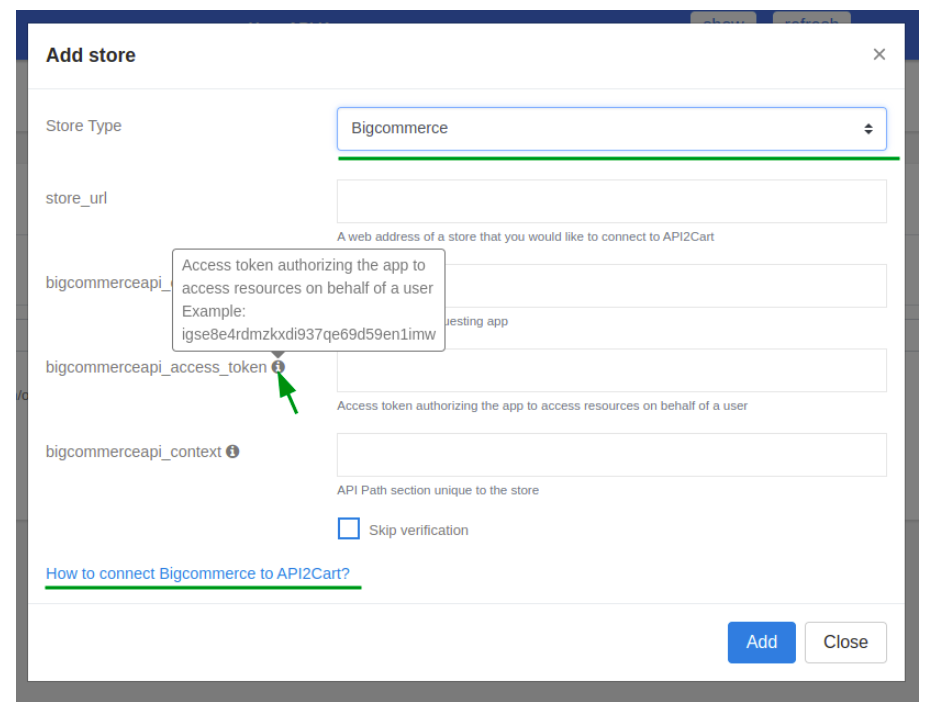
When adding a store through the dashboard, there will be prompts for the parameters that are required to be added, as well as a link to the documentation on how to get the necessary parameters for the selected platform:
To connect platforms (Magento, OpenCart, WooCommerce, and others), before they connect, you need to download and drop a bridge into the root of the site or install the “Bridge Connector” plugin for the corresponding platform. Also, in addition to the store URL, you need to specify the store_key parameter received after downloading or connecting the plugin. You can also set additional parameters for the connection.
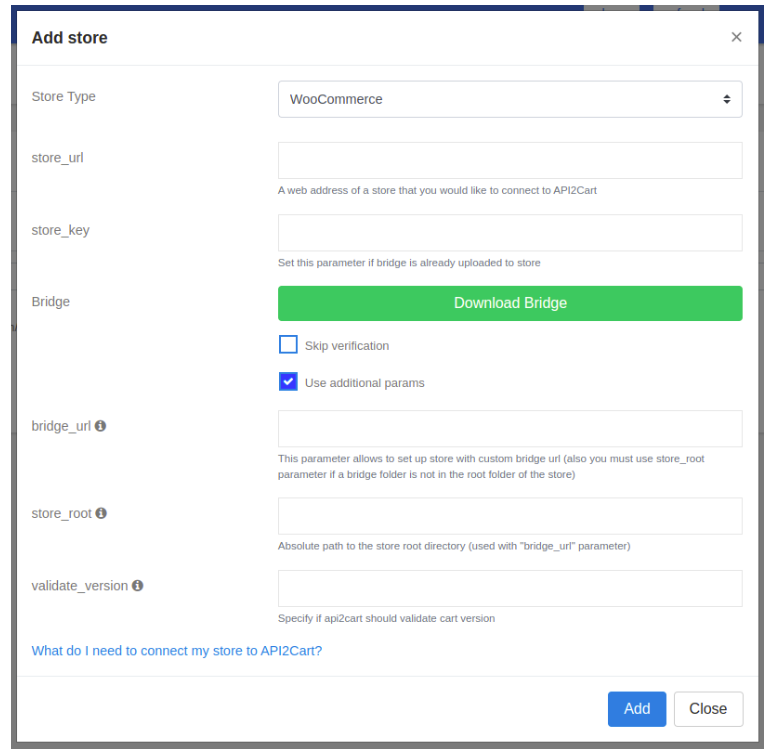
It is also possible to connect a store using the API2Cart API, having an API key and the necessary parameters to connect using the account.cart.add method This will establish a connection between the store and API2Cart.
Parameters supported in the product.add method for Amazon SP-API
asin, ean, gtin, upc parameters are identifiers that identify a product in the Amazon catalog. Every product that is in the Amazon catalog has a unique asin.
To add a product that already exists in the Amazon catalog, you only need to provide the SKU, the product identifier, and the price and quantity. The quantity can be zero. Only integer values are supported. After a while, the product will appear in the seller's catalog and will have the properties of the product that was assigned to the identifier (name, description, attributes, images, etc.) as well as the seller's offer (offer), which is determined by the price and quantity.
Adding a new product that does not exist in the Amazon catalog is a more complex process, as Amazon requires filling out a large number of attributes to create a new product with an indication of the category in which the product will be placed.
Therefore, when creating a product through product.add, if the product identifier that does not yet exist in the Amazon catalog is specified, one of the parameters must be specified: category_id or product_type
To work with Amazon categories, we have added support for the category.count\list\info\find methods.
In the response of the category.list\info methods, the product_types field is displayed in additional_fields. If it contains any data, the ID of this category can be passed in the category_id parameter. Instead of the category_id parameter, you can use the product_type parameter, specifying the value of the additional_fields.product_types field (if the additional_fields.product_types field contains several values, separated by commas, then one of them).
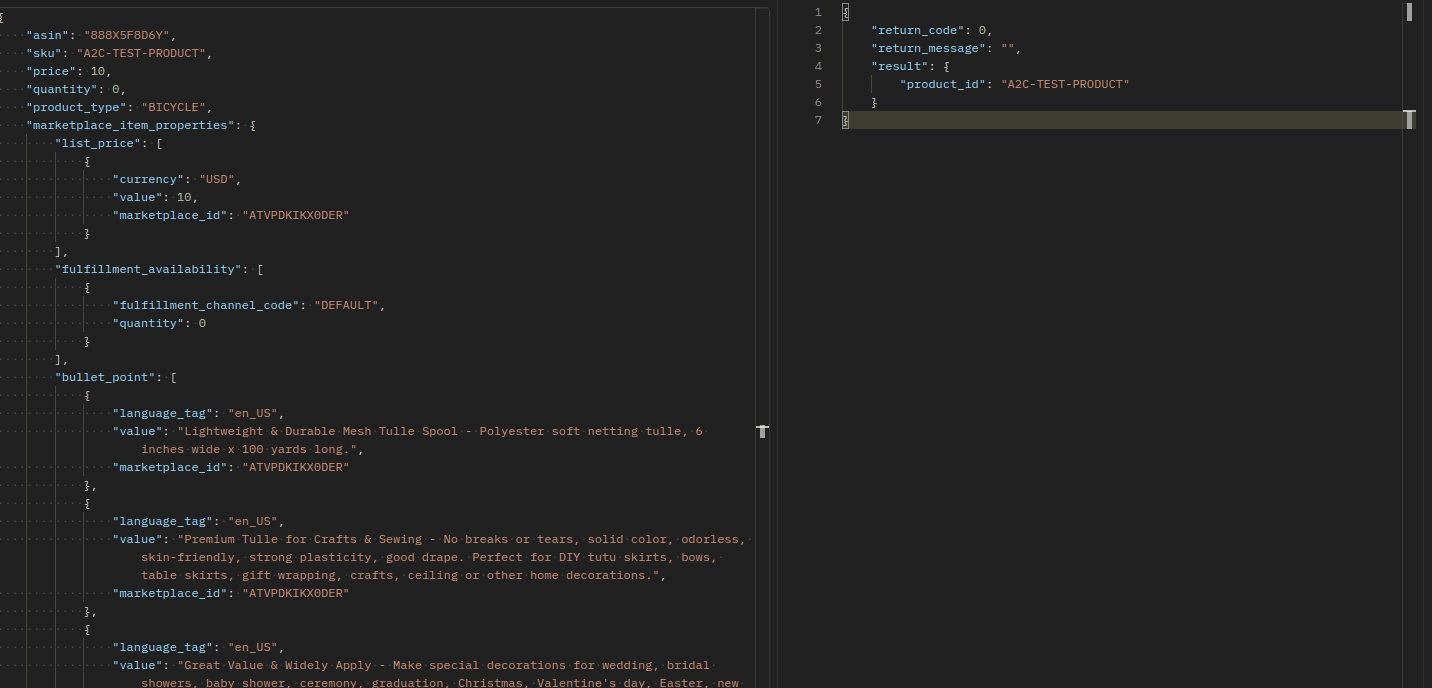
Once one of the category_id or product_type parameters has been defined, you need to pass the attributes of the new product that is being created in the Amazon catalog. For a list of mandatory requirements for a certain product type (product_type) in Amazon, there is a JSON-schema. This JSON-schema is displayed in the category.info method in the additional_fields.category_options field (category.list this field is not displayed to save requests to Amazon).
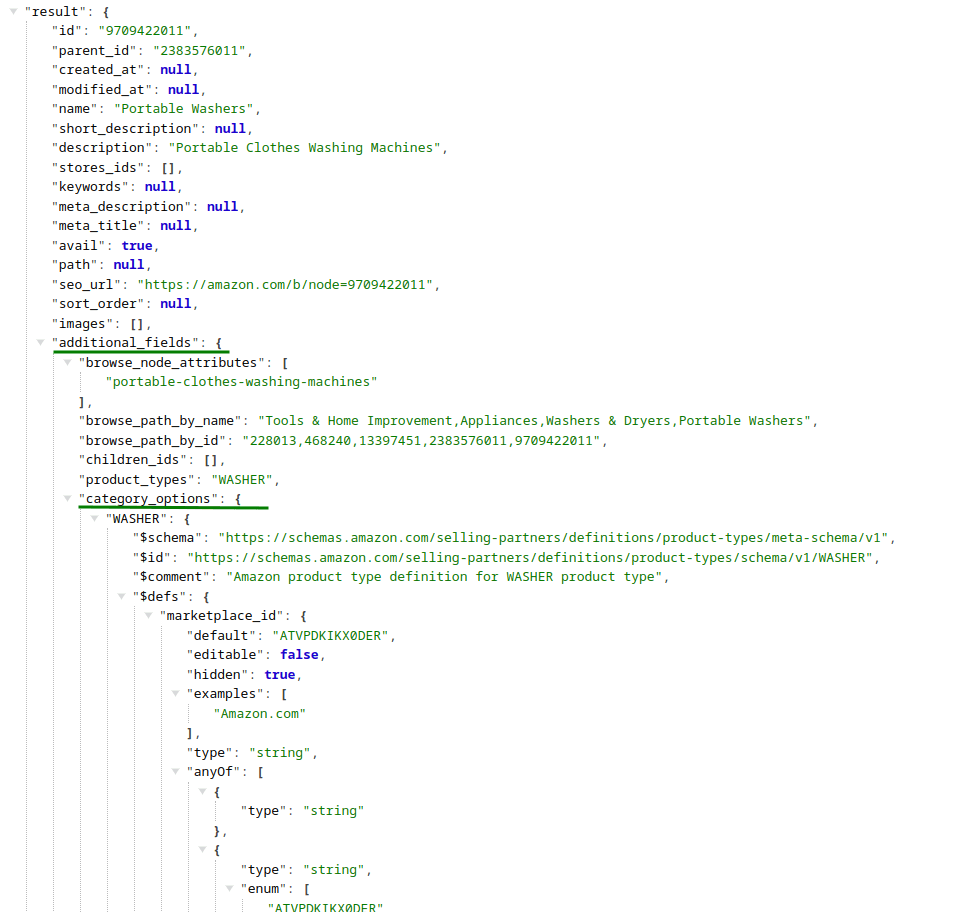
As you can see from the image, the additional_fields.category_options object contains a WASHER object with the corresponding JSON-schema. If additional_fields.product_types contains multiple values, then JSON-schemas for all product types will be displayed.
The data from the JSON-schema fields is passed in the marketplace_item_properties parameter. This parameter is validated both on the Api2Cart side
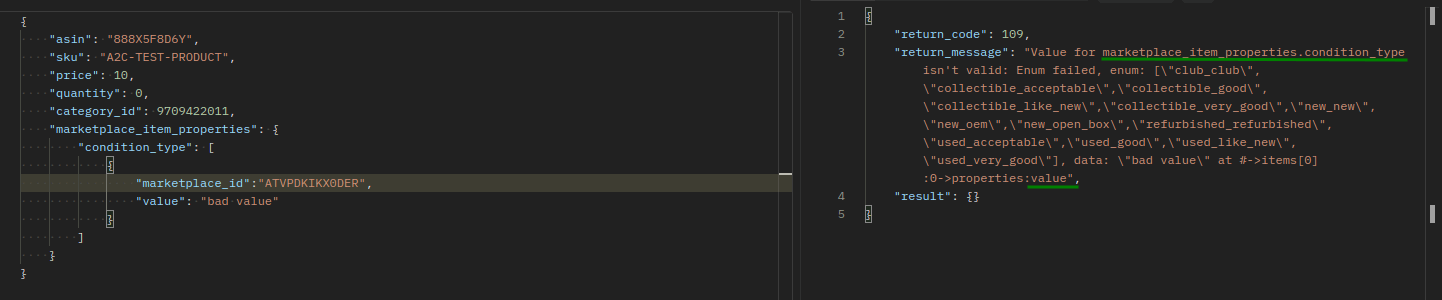
and on the Amazon side.
The corresponding errors that will be displayed in an unsuccessful attempt of the product.add method.
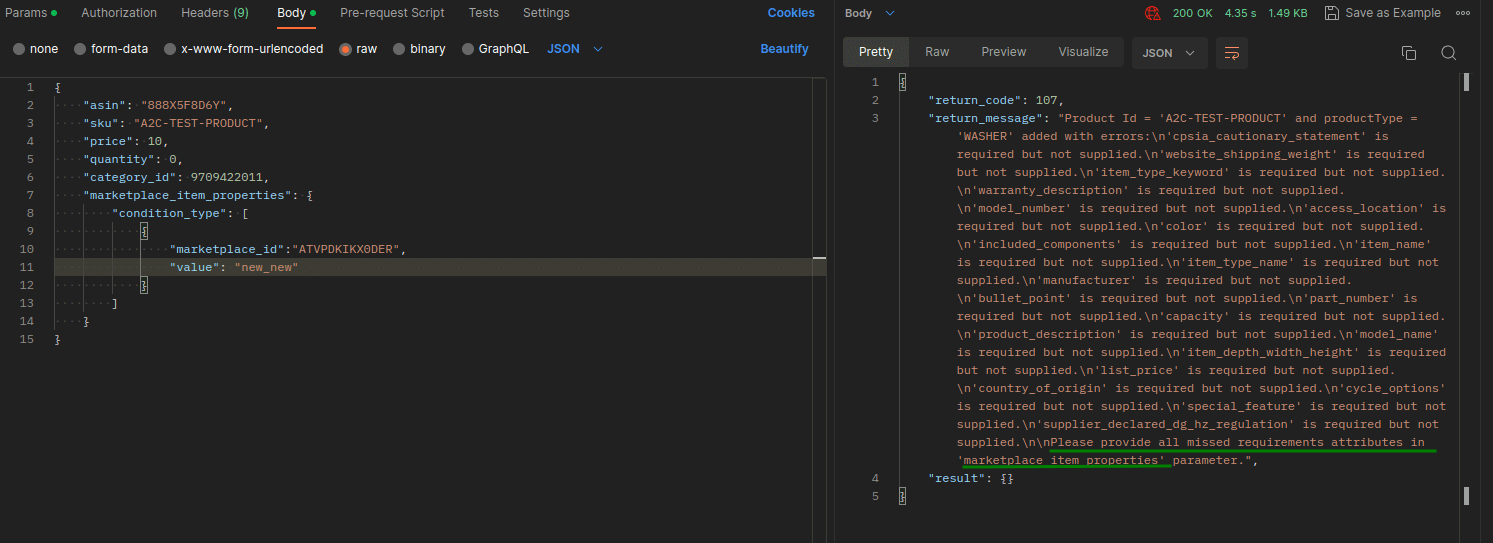
If all the required properties for a certain product type are passed, the product will be created in the Amazon catalog.
Even if we received a response with return_code: 0 for the product.add method on Amazon SP-API, this does not mean that Amazon will immediately place the product in its catalog and the seller's catalog among its offers. This product may require additional adjustments in the seller's admin panel. Such products are located in the Catalog > Complete Your Drafts menu section.

which will contain product drafts and Amazon's appropriate troubleshooting guidelines for their listing of these products.
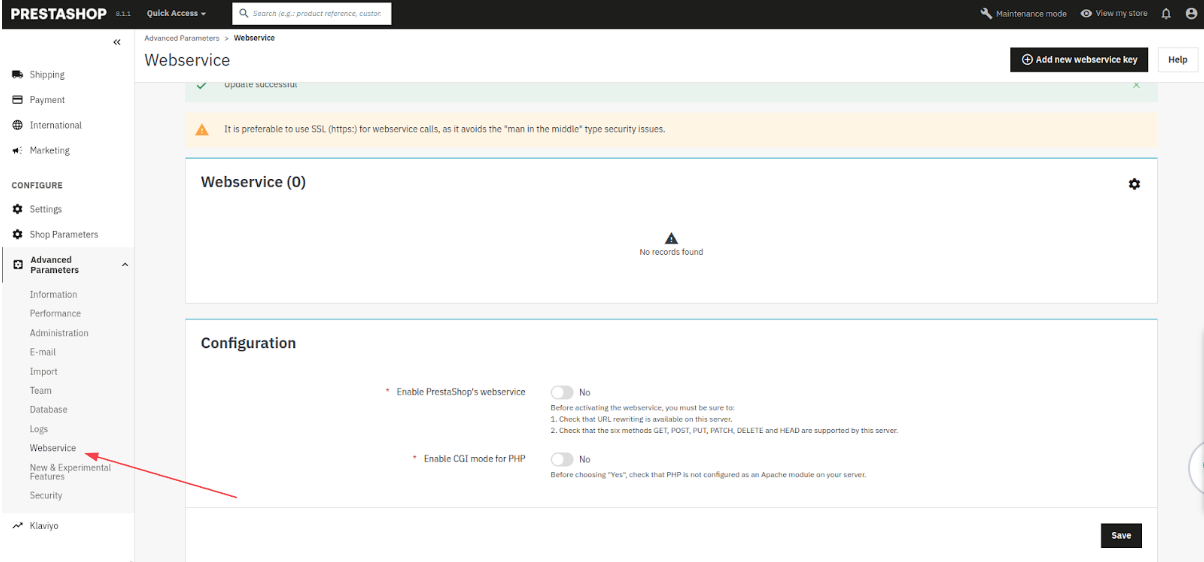
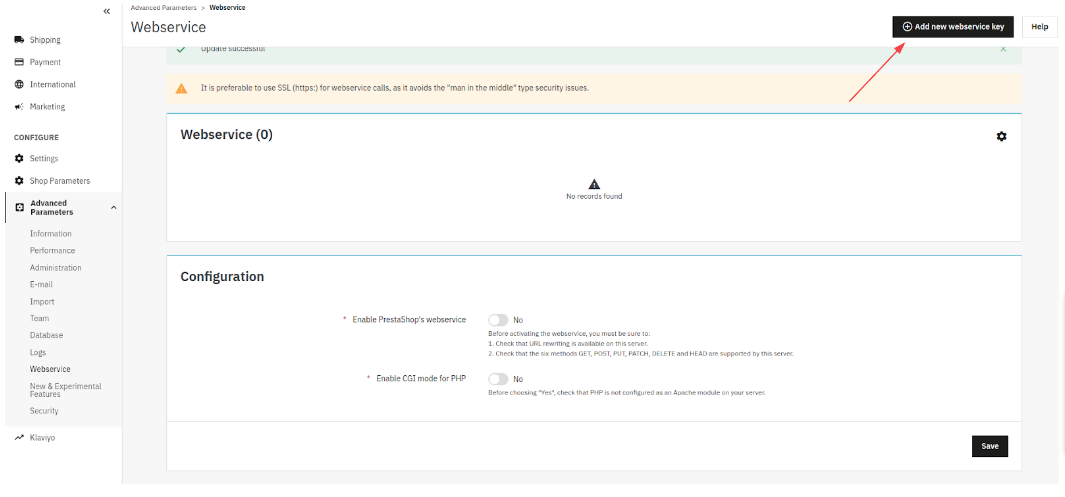
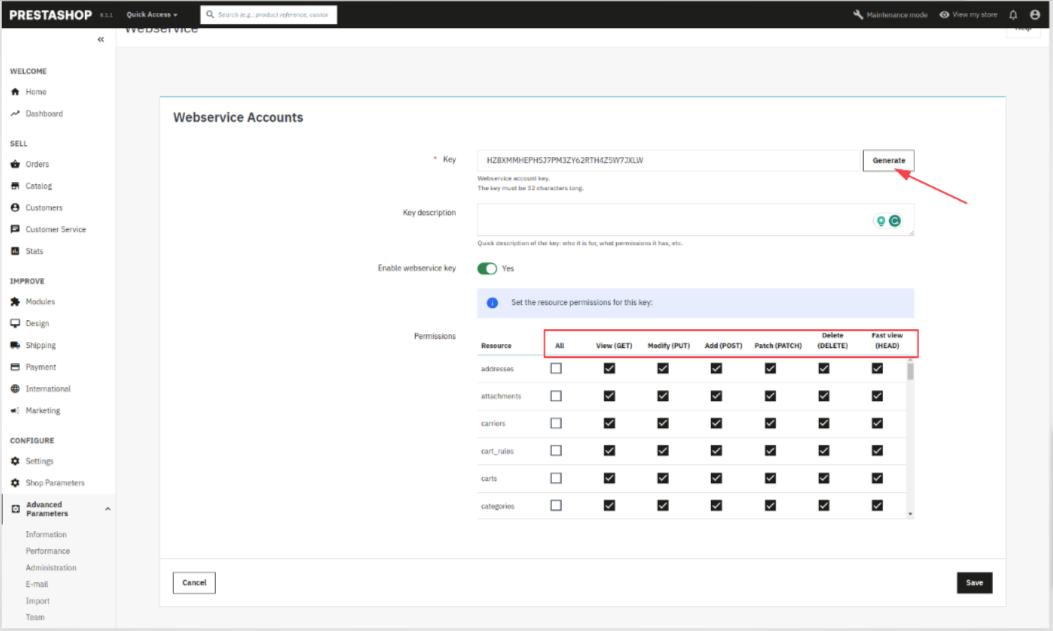
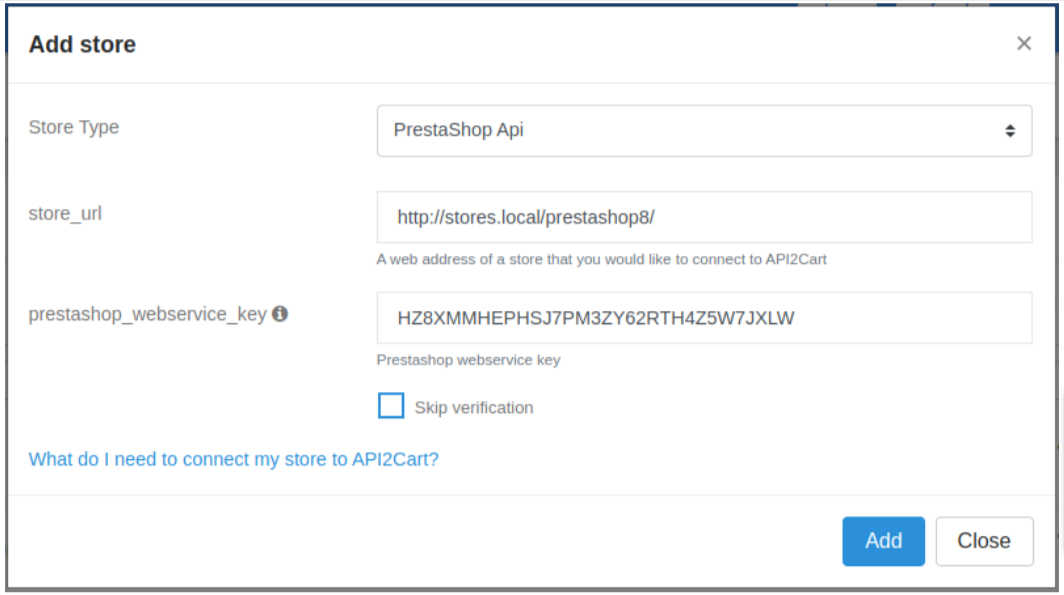
Follow these steps to connect PrestaShop API to API2Cart:
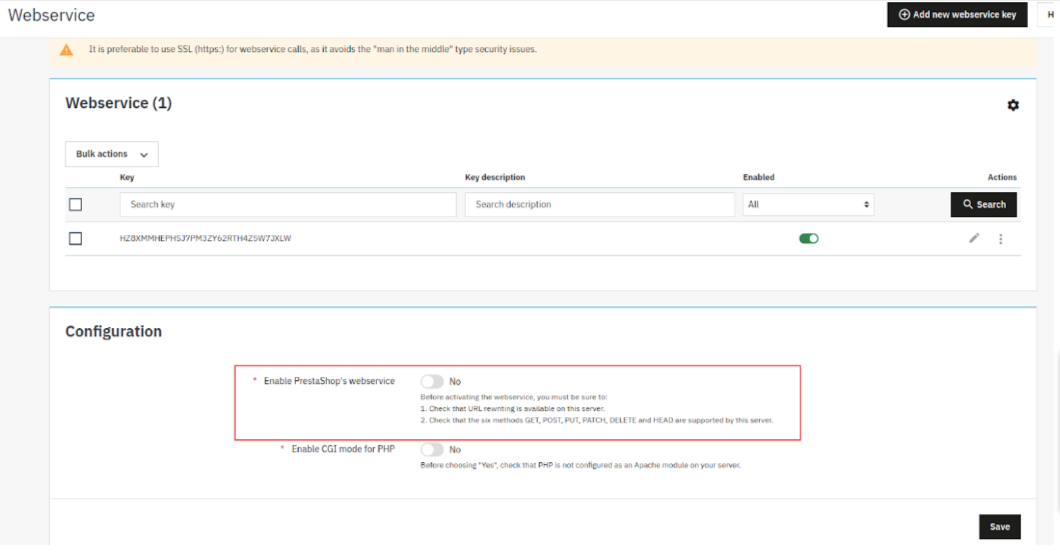
To add eBay to Api2Cart, the following parameters are required:
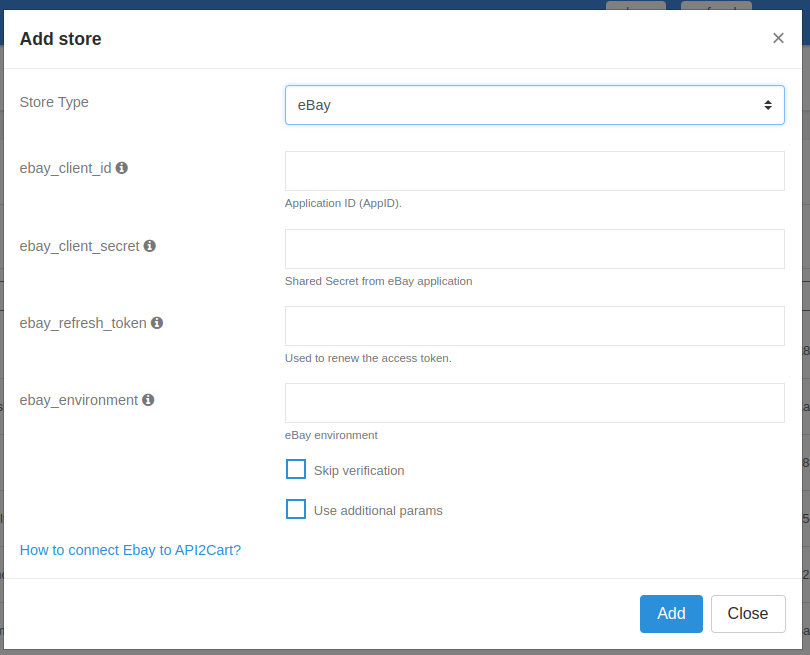
To obtain these parameters, you need to have a developer account on eBay.
To sign in or register, please visit the following page:
https://developer.ebay.com/signin
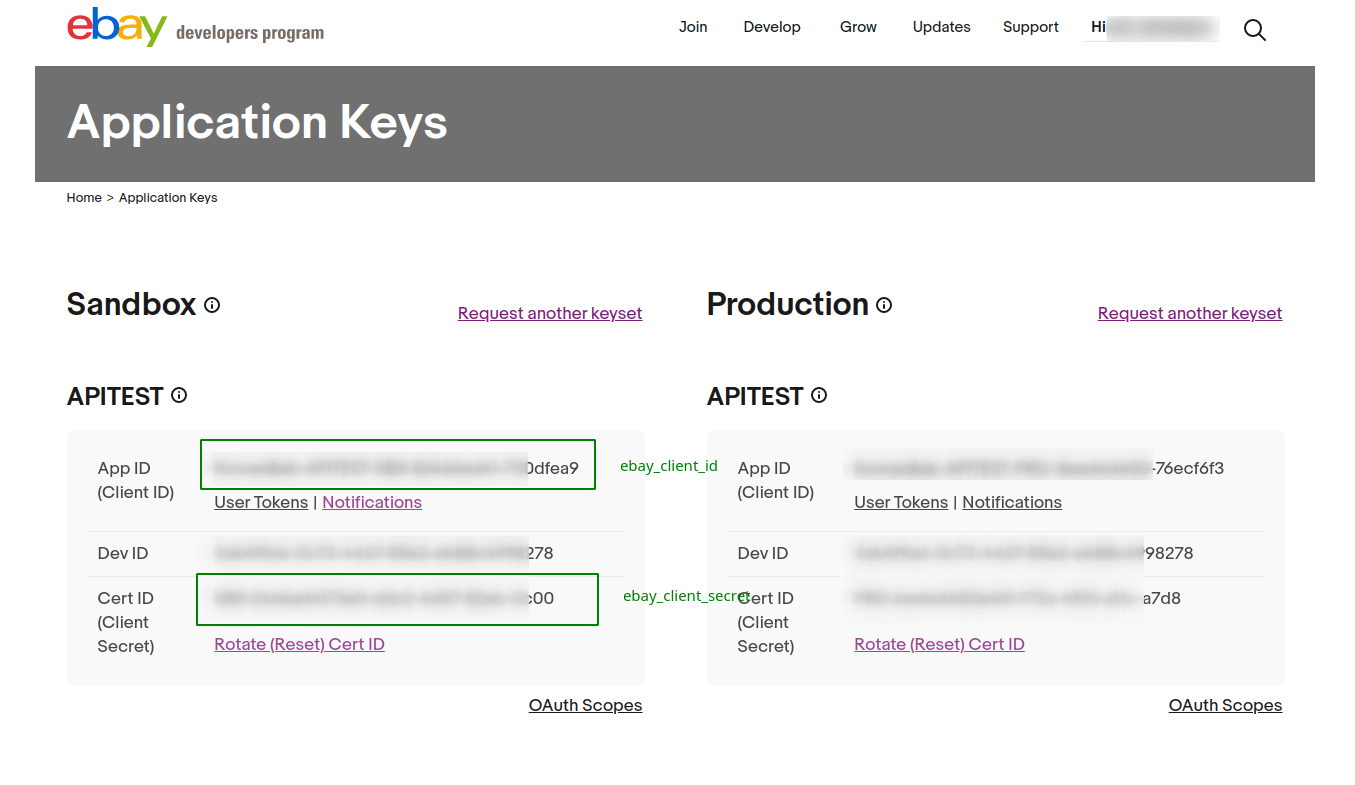
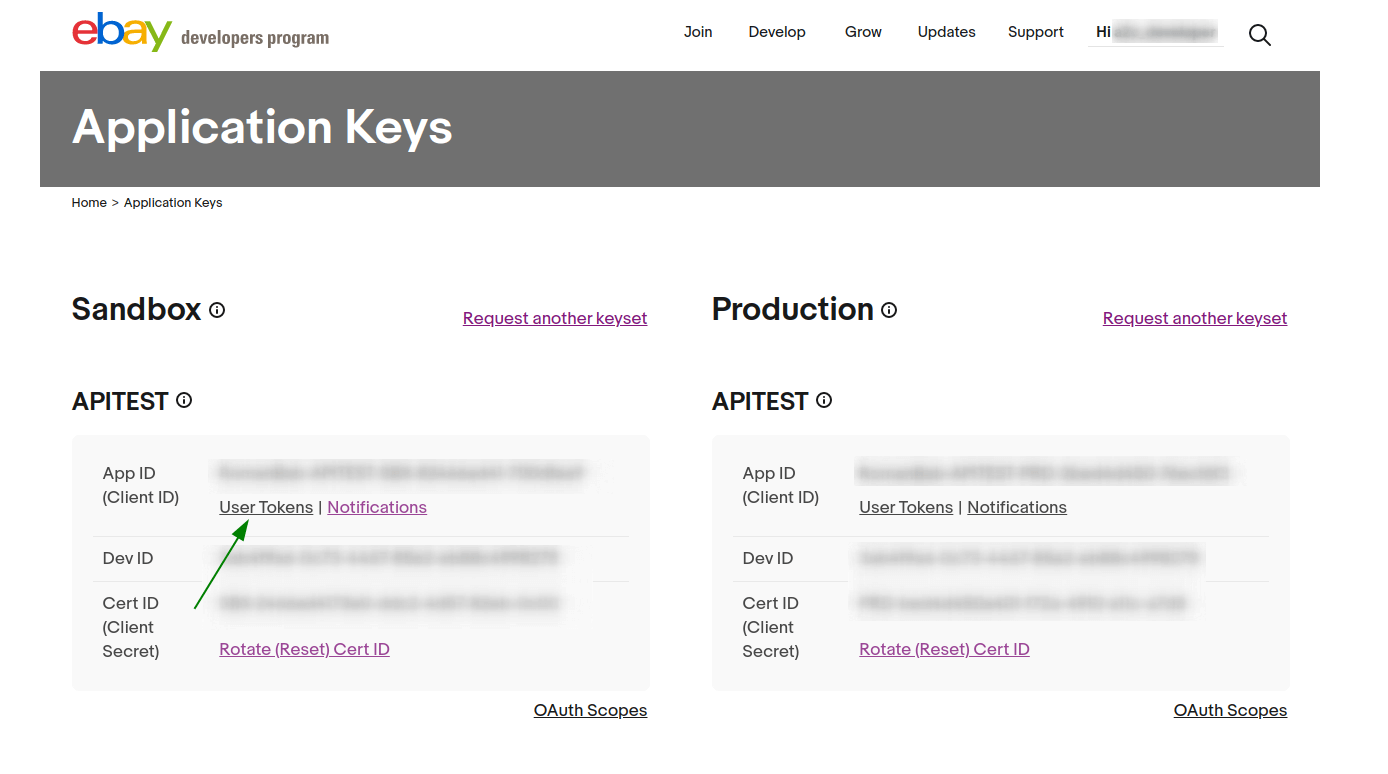
Application Keys are available on the following page:
https://developer.ebay.com/my/keys
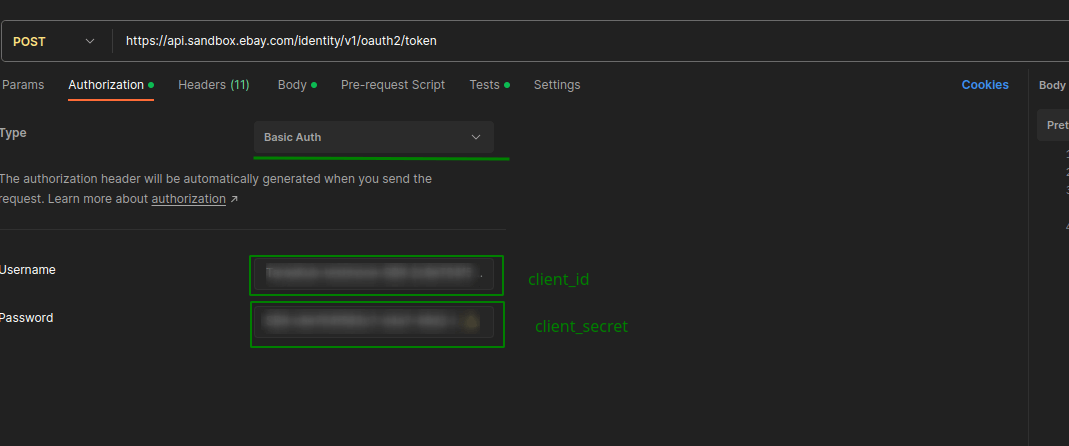
Depending on the environment (Sandbox or Production), you will need the App ID (ebay_client_id) and Cert ID (ebay_client_secret).
To obtain the ebay_refresh_token, select User Tokens on the page that opens.
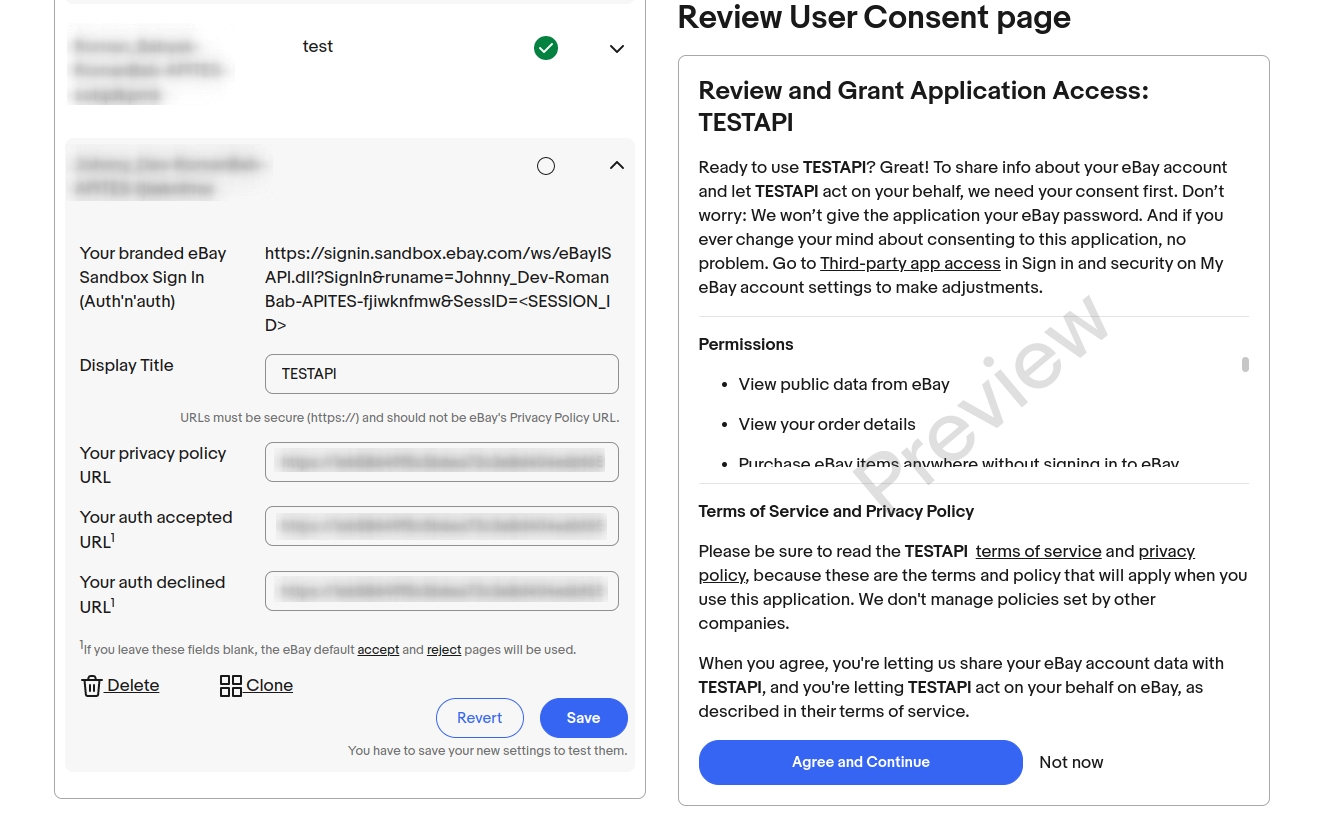
In the Get a Token from eBay via Your Application section, add the eBay Redirect URL.

Fill in the fields for the added eBay Redirect URL and click Save. Enable the OAuth Enabled checkbox for this eBay Redirect URL.
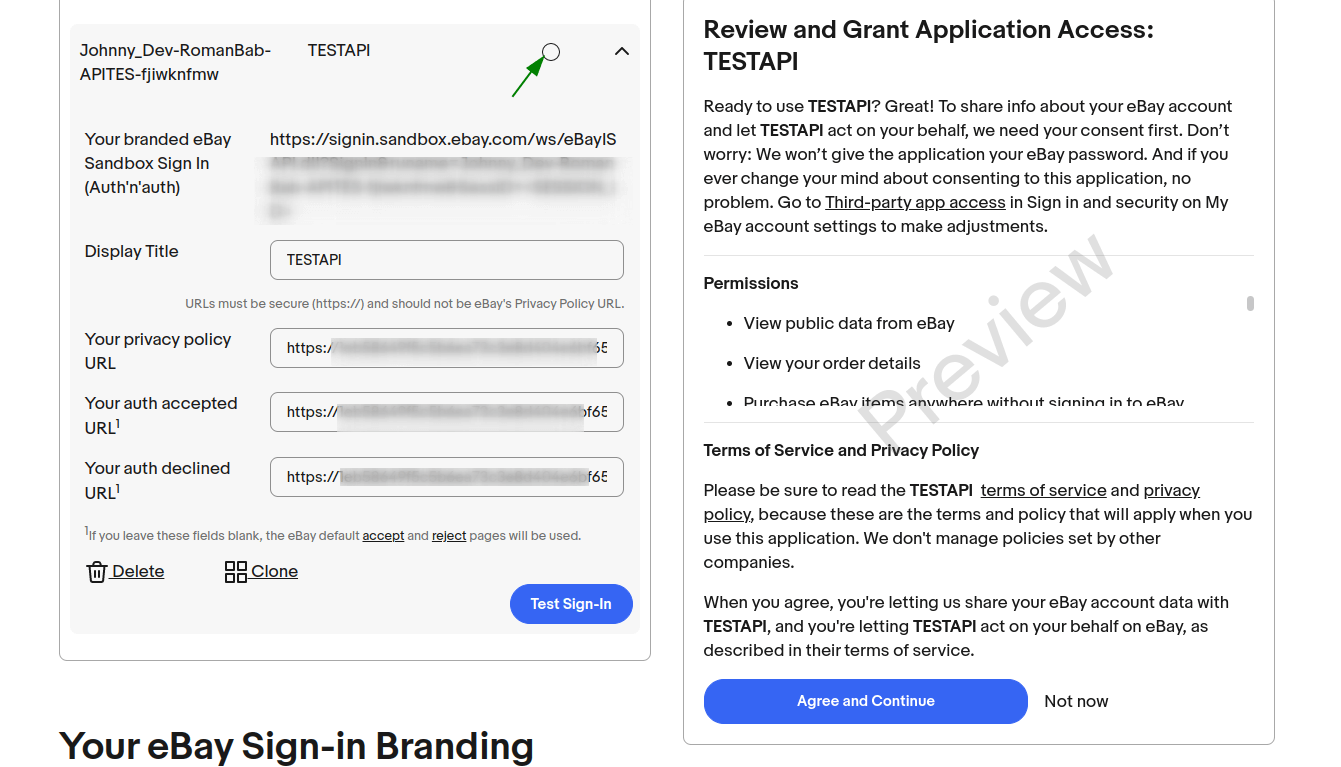
Then select OAuth and click Test Sign-In.
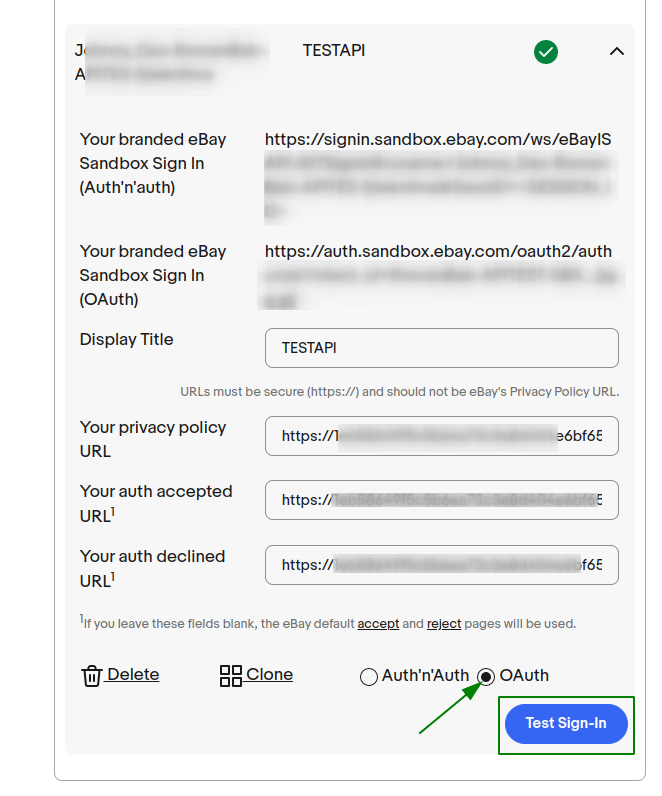
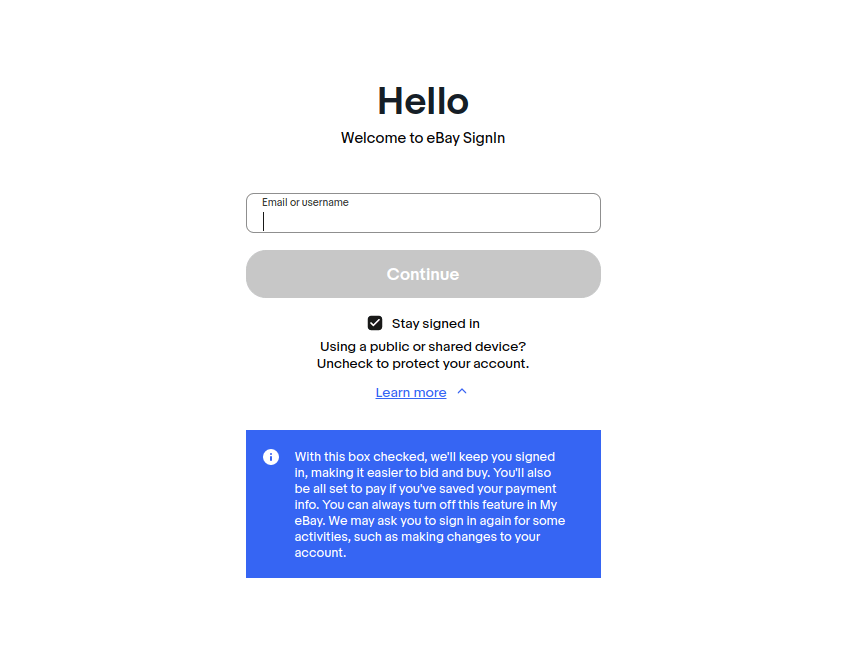
This will open a login page where you need to log in with your eBay seller account (for sandbox environment, you can register a test user at https://developer.ebay.com/sandbox/register).
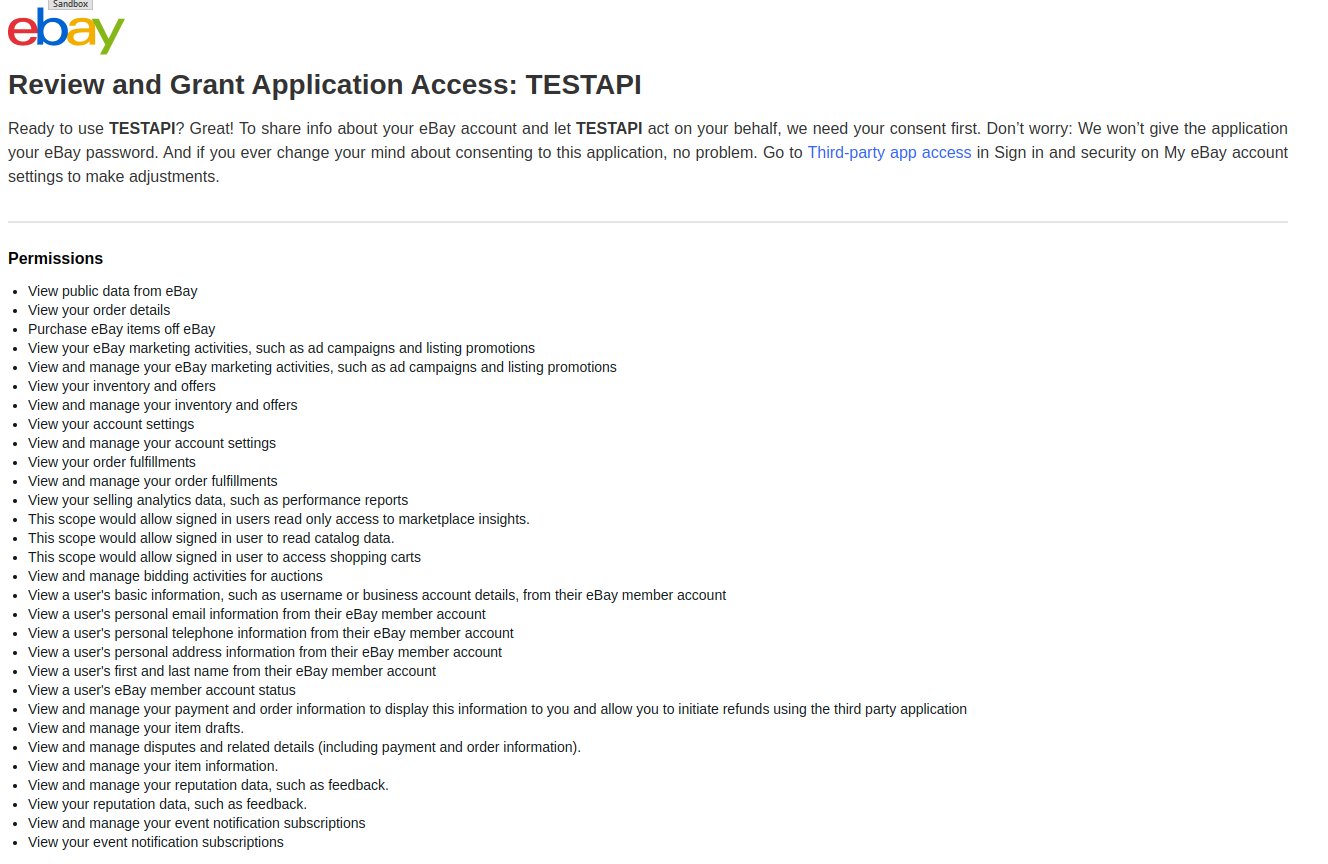
After successful login with the seller account and confirmation of the application access request, you will be redirected to the URL specified in the Your auth accepted URL field. The redirect URL will include a code parameter in the following format:
code:v^1.1#i^1#r^1#p^3#f^0#I^3#t^Ul41Xzg6MDM5RENGM0E3NEIxNTJDQkU5QTRfMV8xI0VeMTI4NA==
This code is required to obtain the refresh token. To get the refresh token, send a POST request to https://api.ebay.com/identity/v1/oauth2/token (for production) or https://api.sandbox.ebay.com/identity/v1/oauth2/token (for sandbox) with the following parameters:
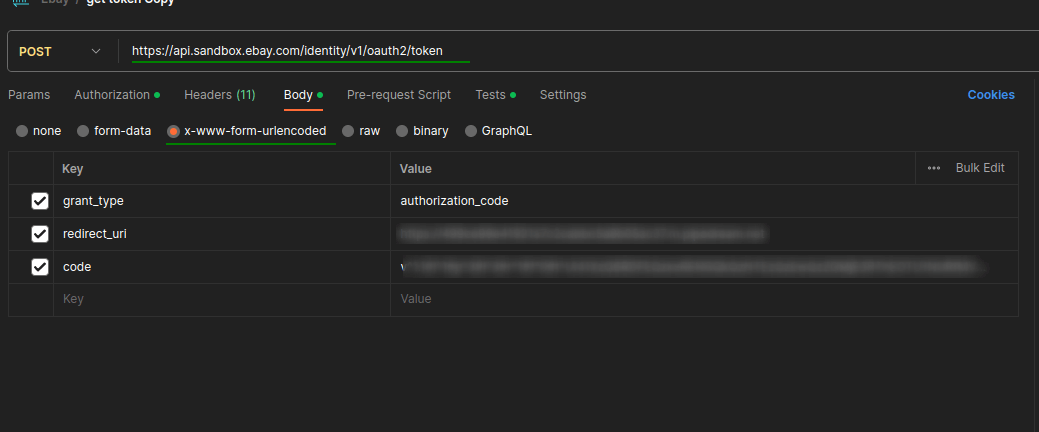
Upon successful execution of the request, you will receive the refresh token, which is used as the ebay_refresh_token parameter when adding the eBay store to Api2Cart.
The ebay_environment parameter can be either Sandbox or Production, depending on the use case.
The ebay_site_id parameter (default is 0) is used to identify the eBay Site ID. More information can be found at https://developer.ebay.com/devzone/merchandising/docs/concepts/siteidtoglobalid.html.
You should also pay attention to eBay Marketplace account deletion/closure. You need to subscribe to a webhook that will receive notifications about eBay Marketplace account deletions.
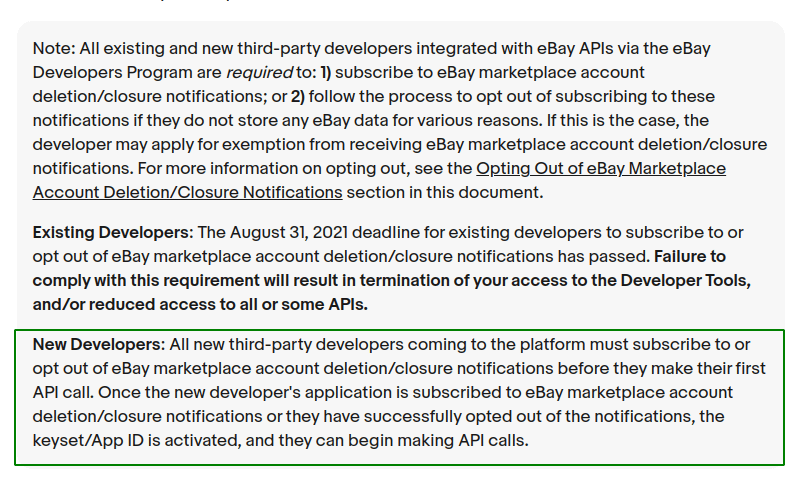
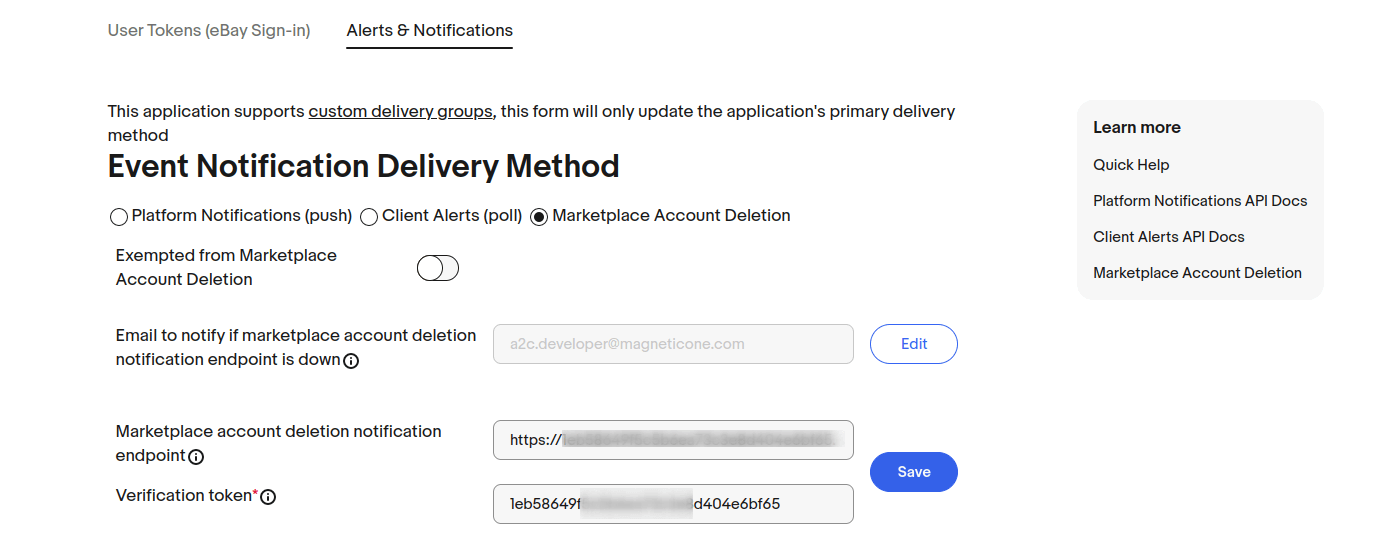
On the Alerts and Notifications page for the Production environment, select the Marketplace Account Deletion checkbox. You can choose to opt-out of receiving deletion notifications or subscribe to them.

To receive notifications, you need to prepare a callback that will respond with a specific response. Fill in the fields accordingly:
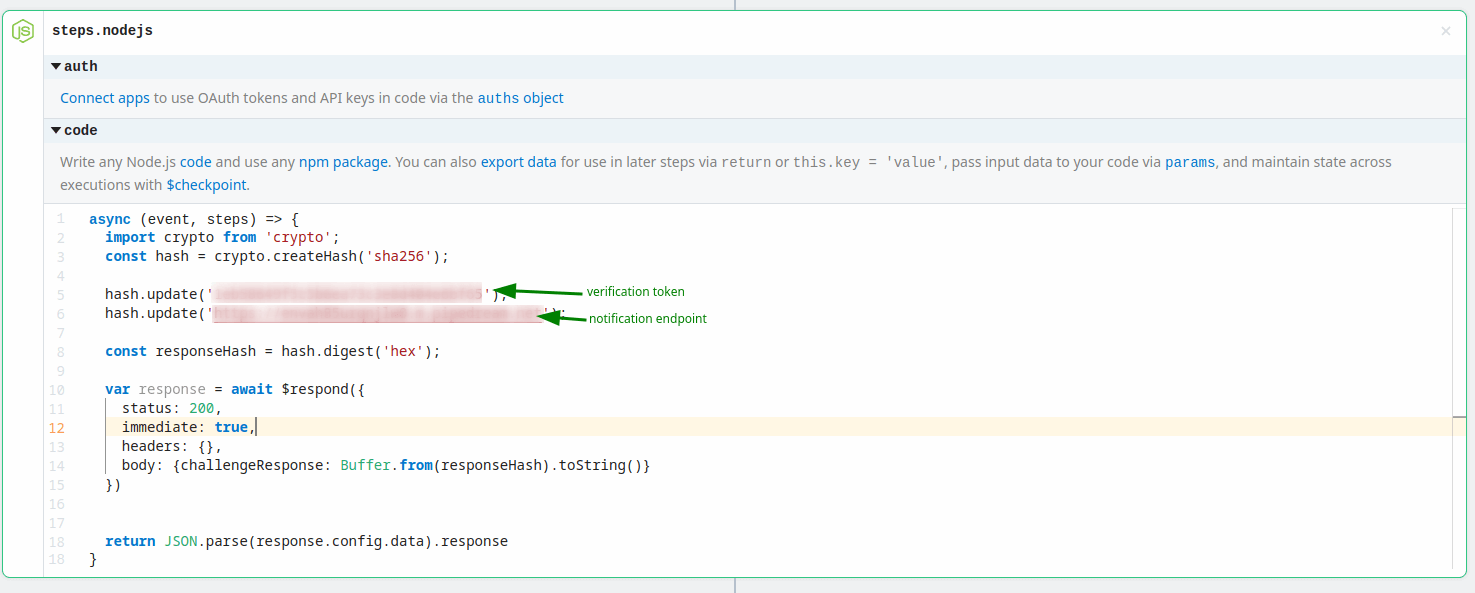
After clicking Save, eBay will send data that needs to be processed in a specific way and return a generated hash as a response.
Your callback endpoint should respond with the following JSON response:
    {
      "challengeResponse": "52161ff4651cb71888801b47bae62f44d7f6d0aab17e70d00f64fc84368ca38f"
    }
For an example, you can use a workflow on a service like https://pipedream.com/ with the appropriate code.
More details on how to do this can be found https://developer.ebay.com/marketplace-account-deletion.
After successful validation of the callback, the Send Test Notification button will become active.
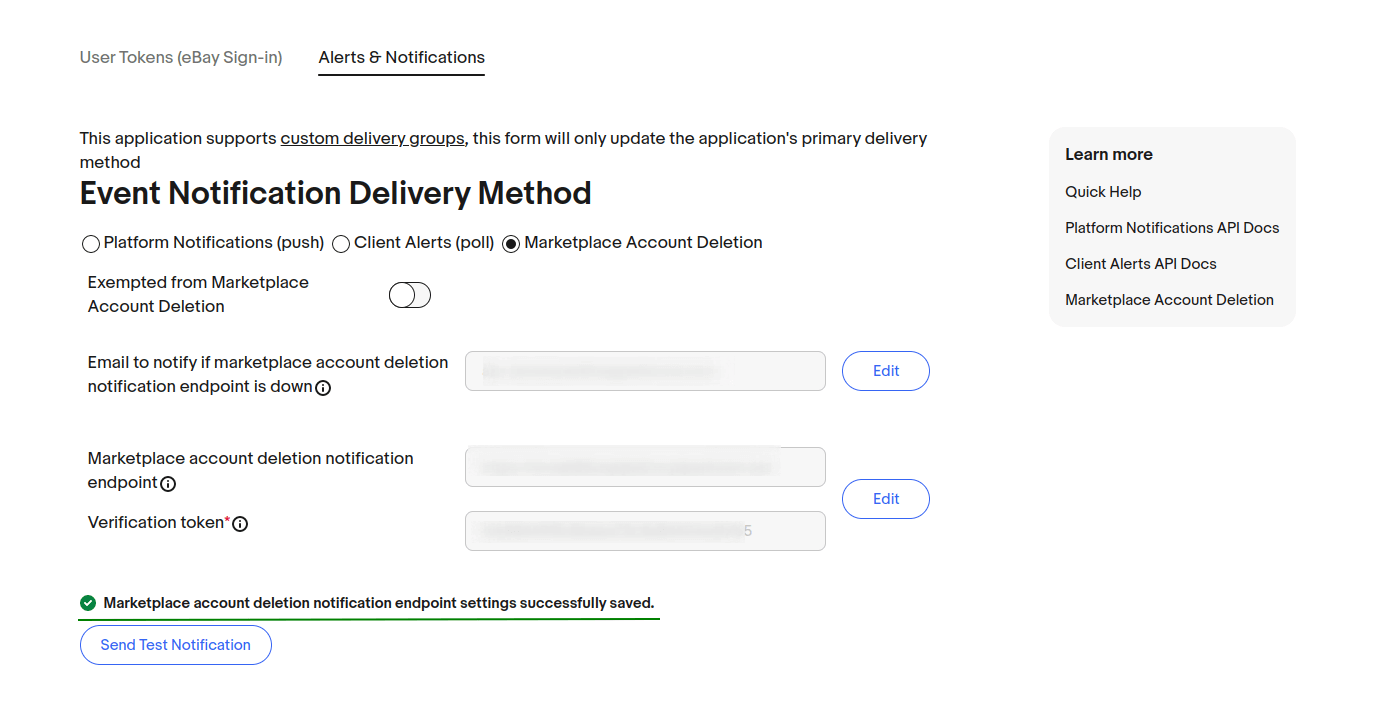
Once everything is set up, eBay will start sending deletion account notifications to the specified URL.
First, you must ensure that the WooCommerce REST API is working. The following conditions must be met:

Next, you need to create API keys:
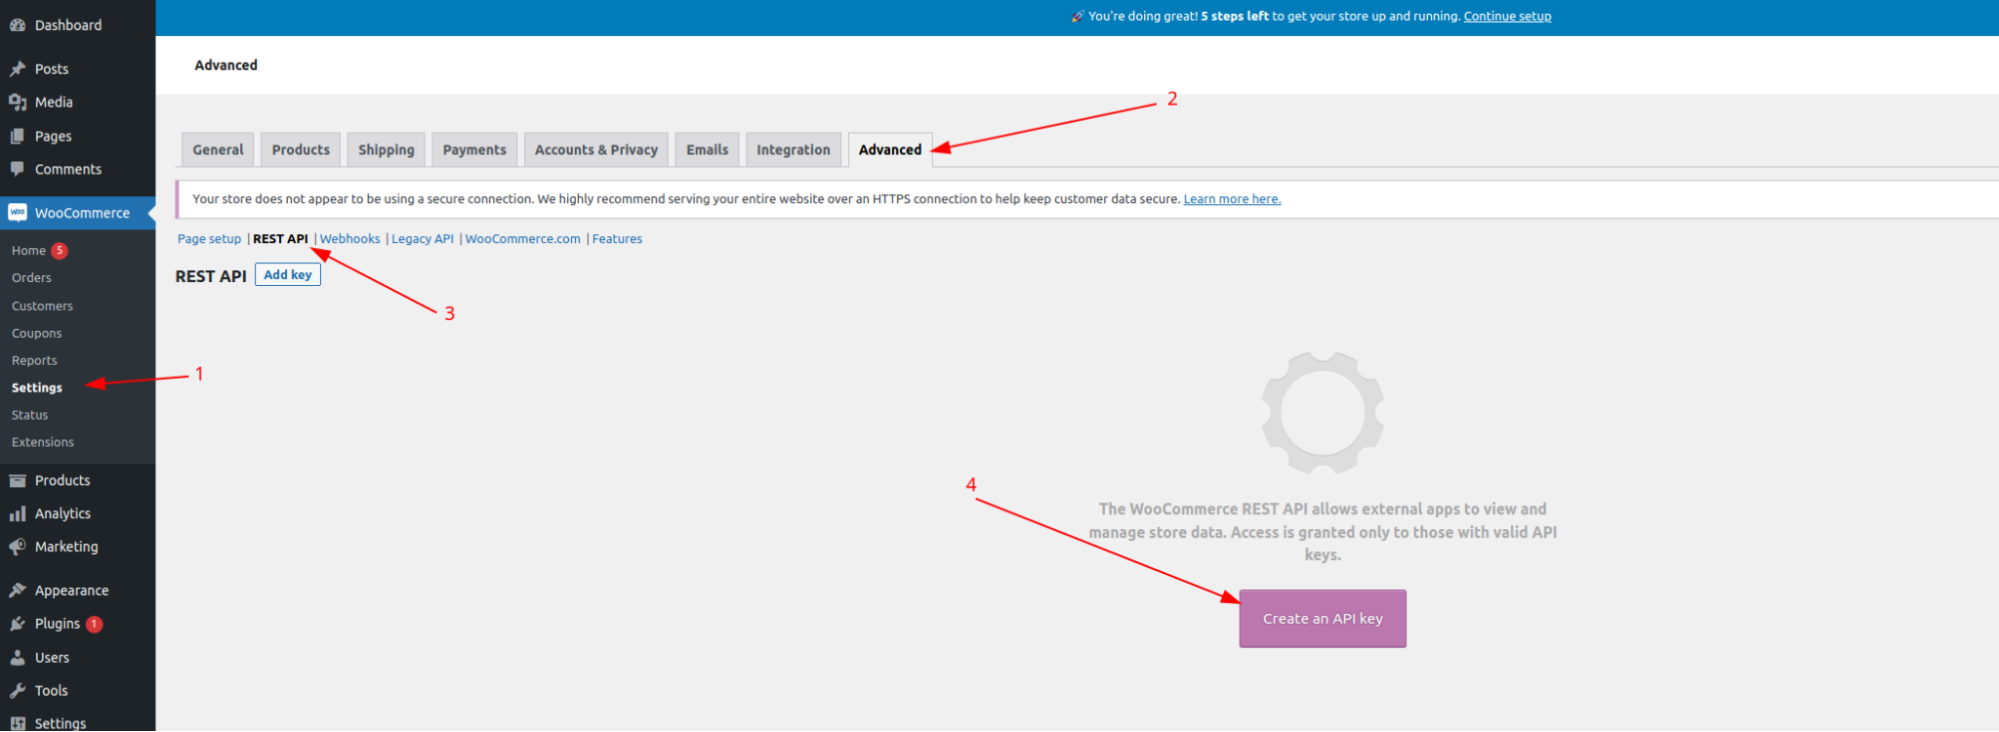
The following fields must be filled in:
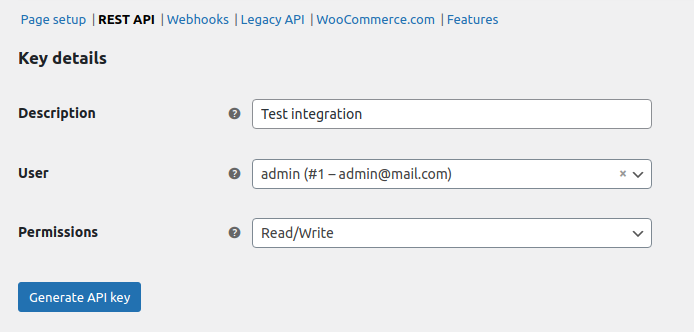
In the User field, you need to specify a user who has the Administrator role. The Permissions field must be Read/Write
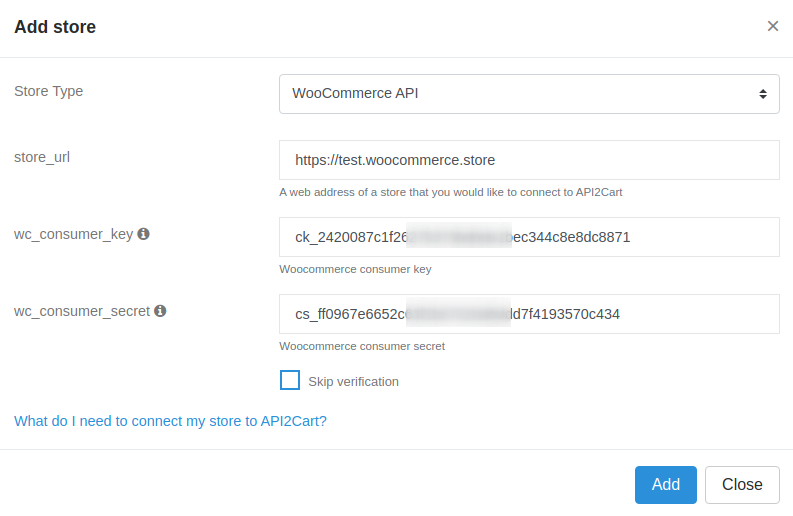
As a result, we will get Consumer key and Consumer secret, which are needed to add a store to the API2Cart:

To add a store in the API2Cart admin panel, fill in the fields as follows:
If you receive the following message while adding a store:
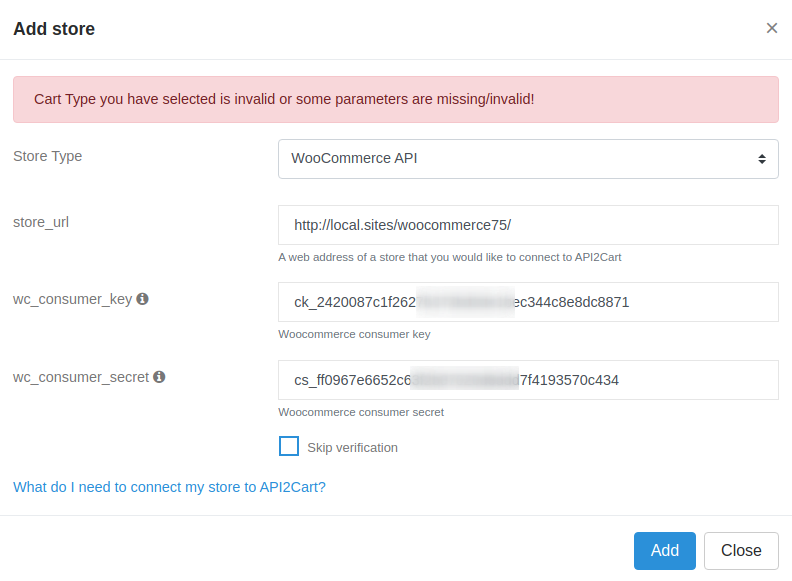
First of all, you need to check whether you have specified the correct store_url, wc_consumer_key and wc_consumer_secret.
If all the fields are correct, another reason can be that your server may be configured in such a way that it does not accept authorization tokens in request headers. You need to add the following line to the .htaccess file in the folder with the woocommerce project:
RewriteRule ^index\.php$ - [E=HTTP_AUTHORIZATION:%{HTTP:Authorization},L]
You can find additional information in the Woocommerce guide.
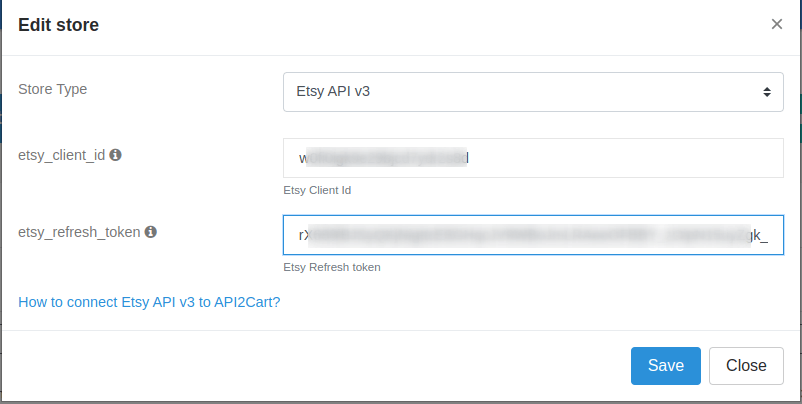
To add a store from Etsy APIv3, you need etsy_client_id і etsy_refresh_token

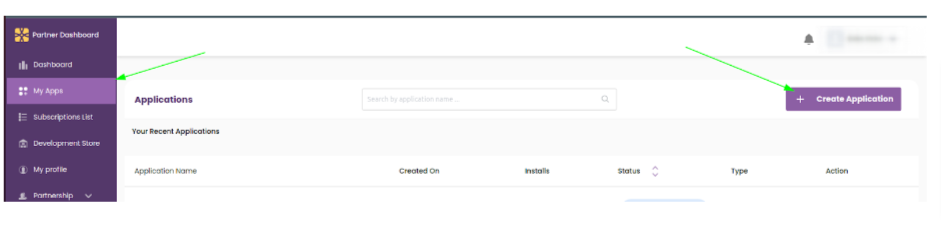
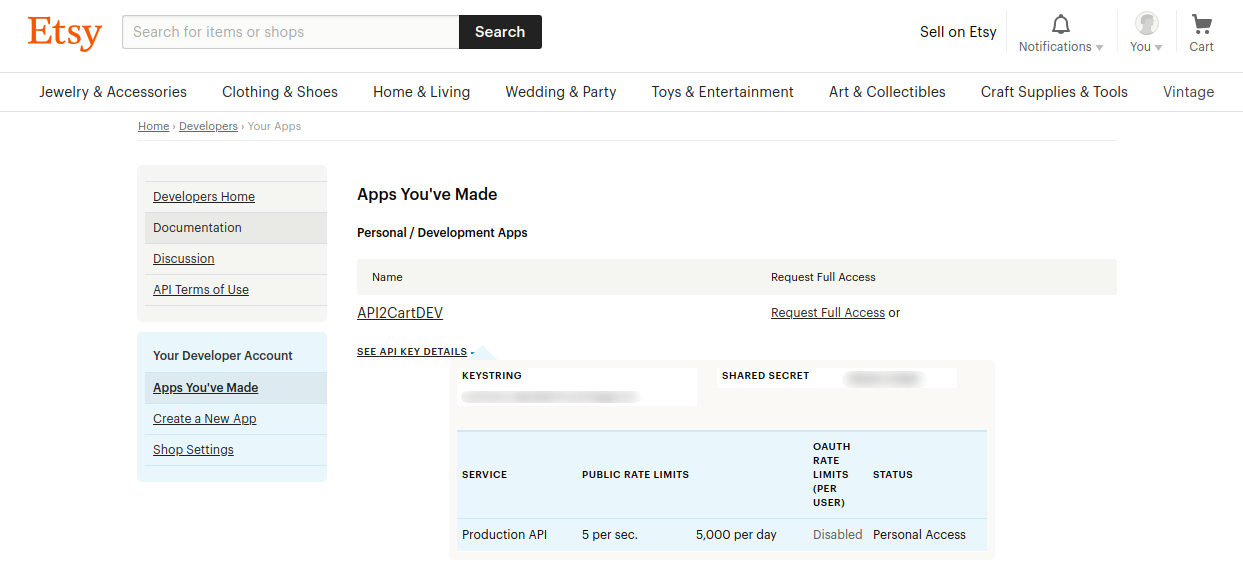
etsy_client_id is a keystring of the App created in Development Apps. To manage your apps, go to https://www.etsy.com/developers/your-apps and add a new application.
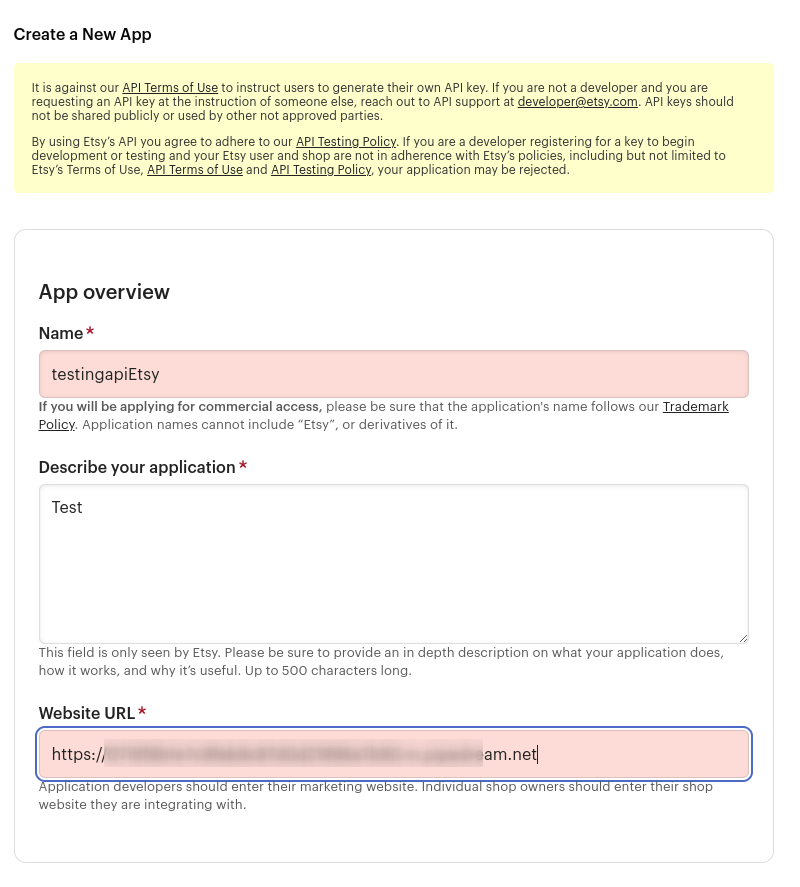
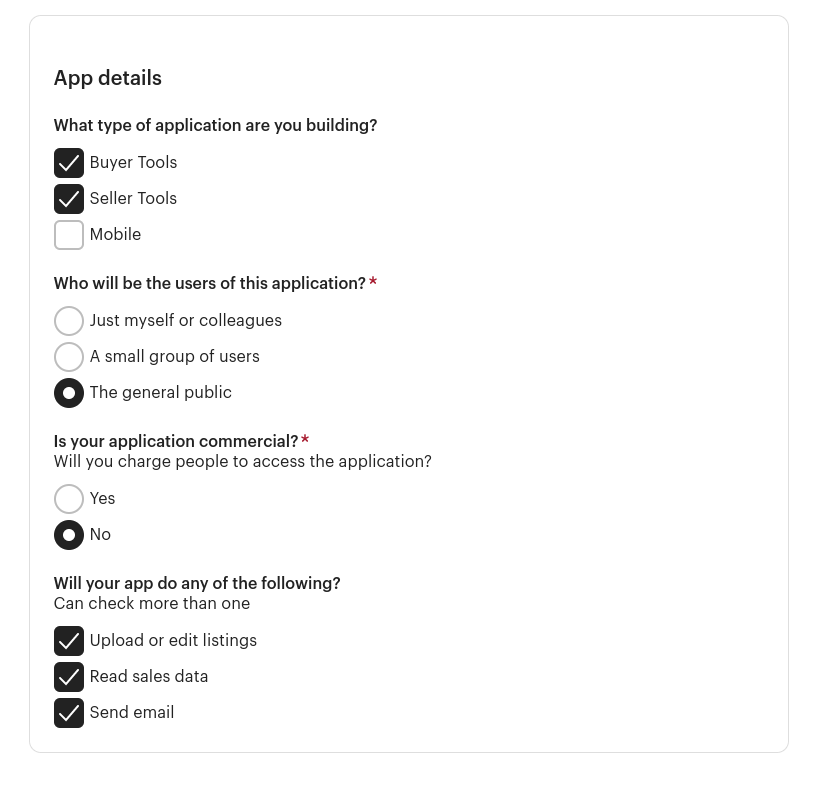
For successful registration of the application, the store registration must be fully completed (all supporting documents sent to Etsy, connected card for payment, etc.), otherwise there may be nuances with the registration of the application or its authorization with OAuth 2.0 for further work.

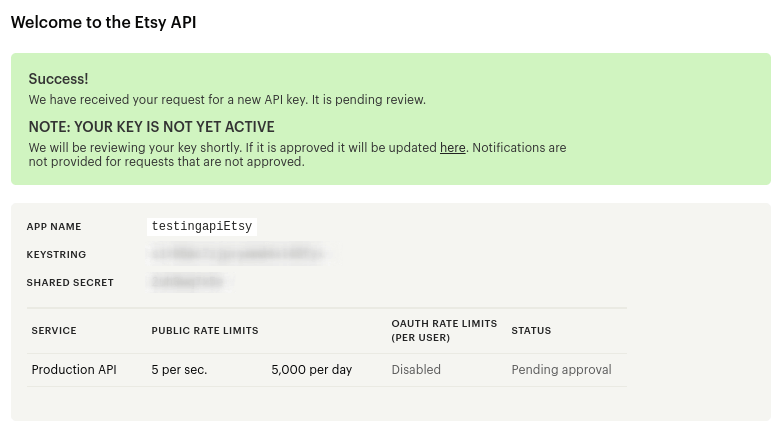
Once an app is registered, Etsy reviews and approves it. After the Etsy app is approved, you can authorize it via Oauth 2.0 and perform requests.
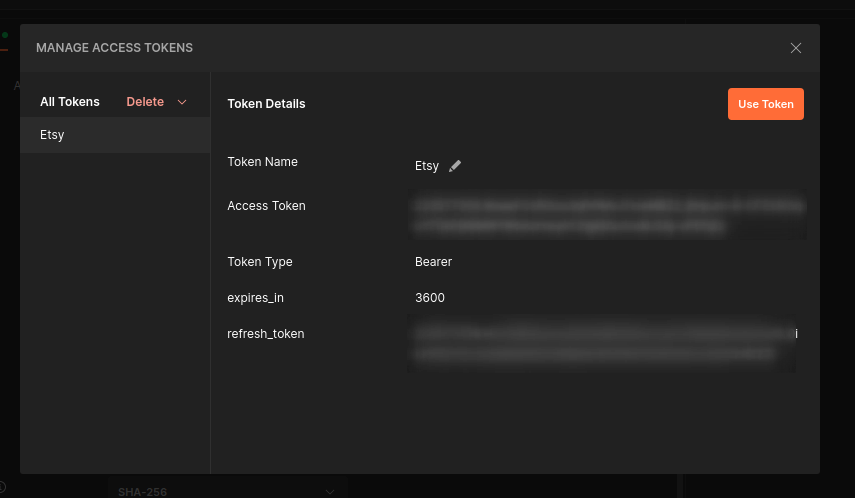
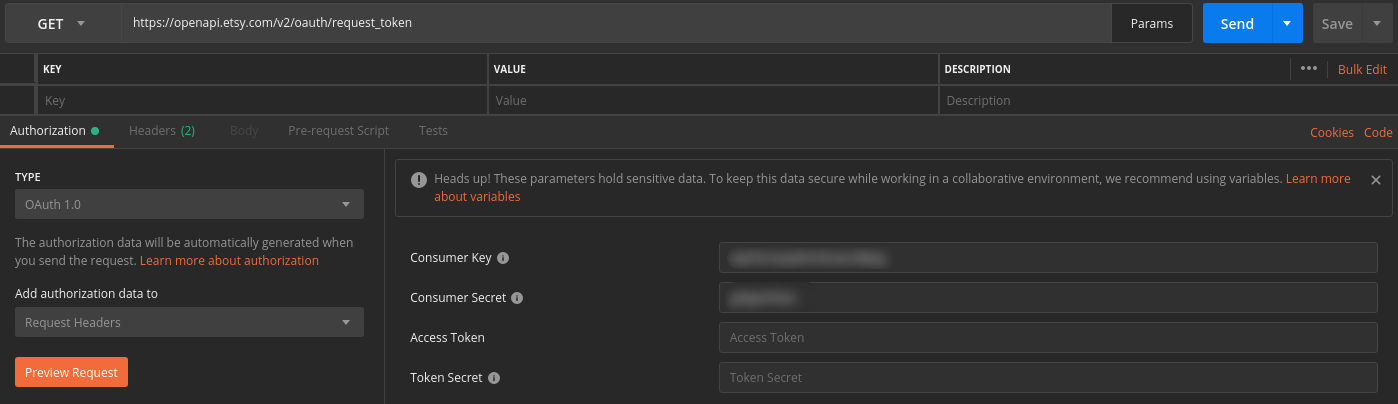
You can do it with the help of a postman. For this, you need to create a new request and select the Oauth2.0 authorization type on the Authorization tab.
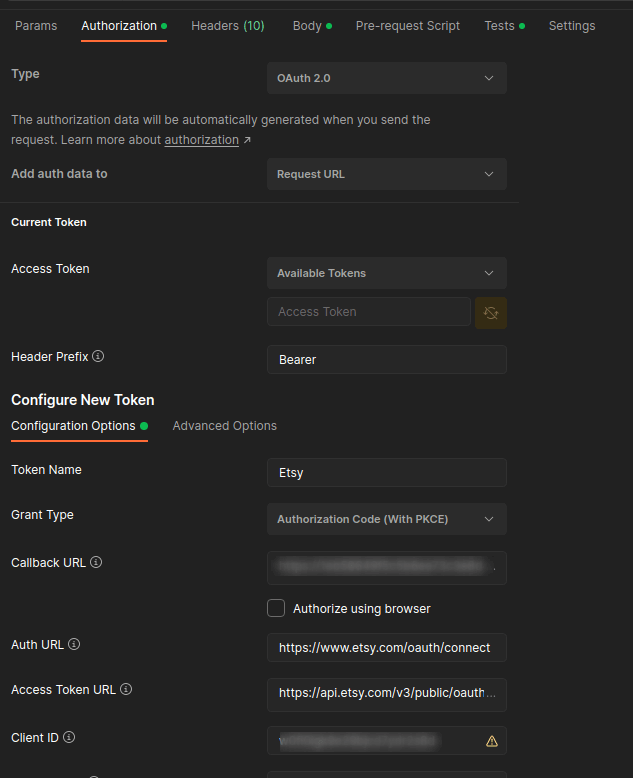

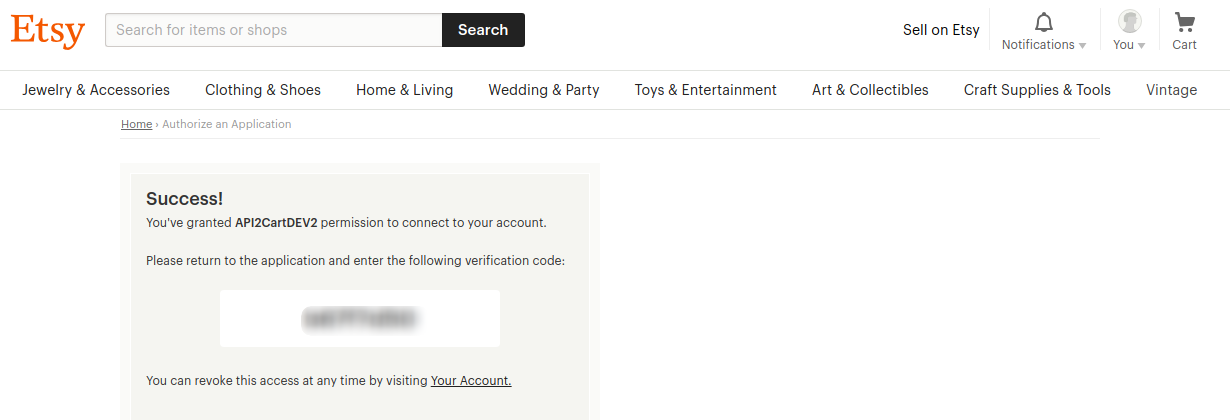
When receiving a token, you need to confirm access permission for the application.
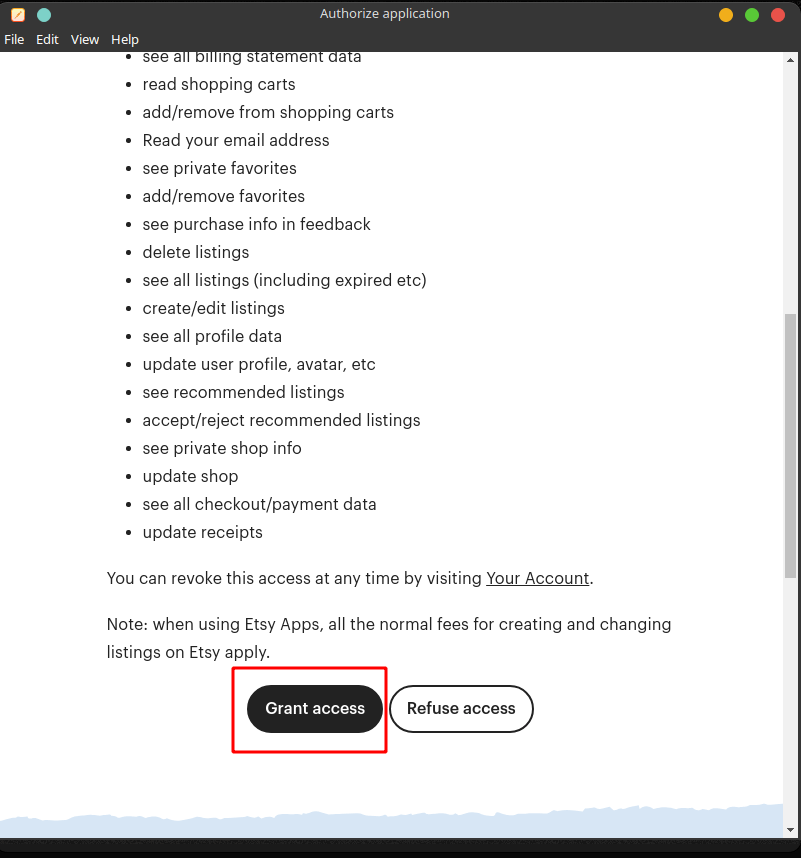
After successful authorization, we will receive a refresh_token, which can be used to add a store to the app.
Important! Please note that Etsy does not have a sandbox environment, and you must test your APP on a production store. Therefore, we advise you to read and strictly follow the API Testing Policy.
To integrate with Zid platform, you need to follow this instruction.
It is necessary to create an application.
All information can be filled in English and Arabic.
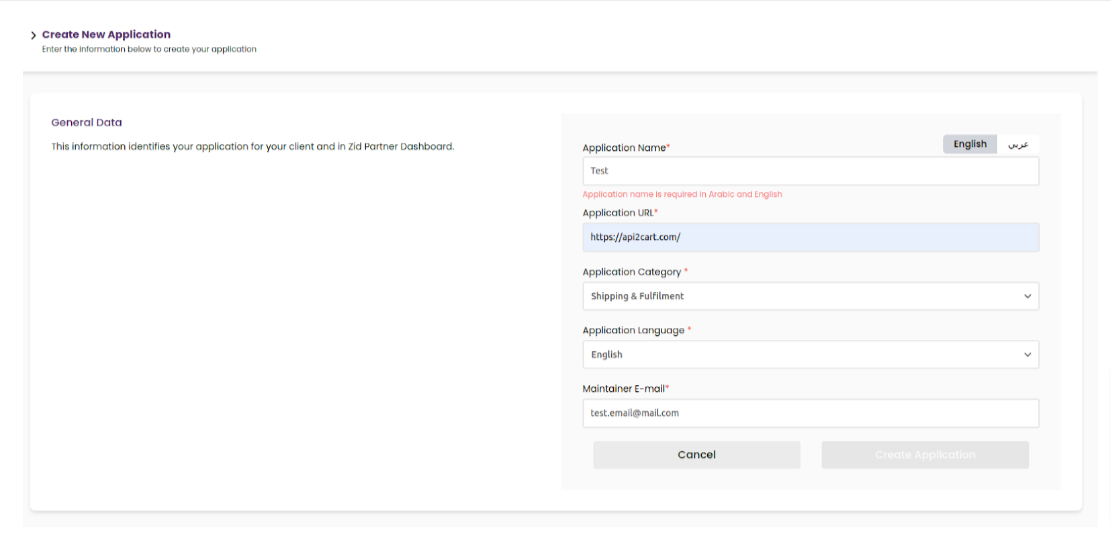
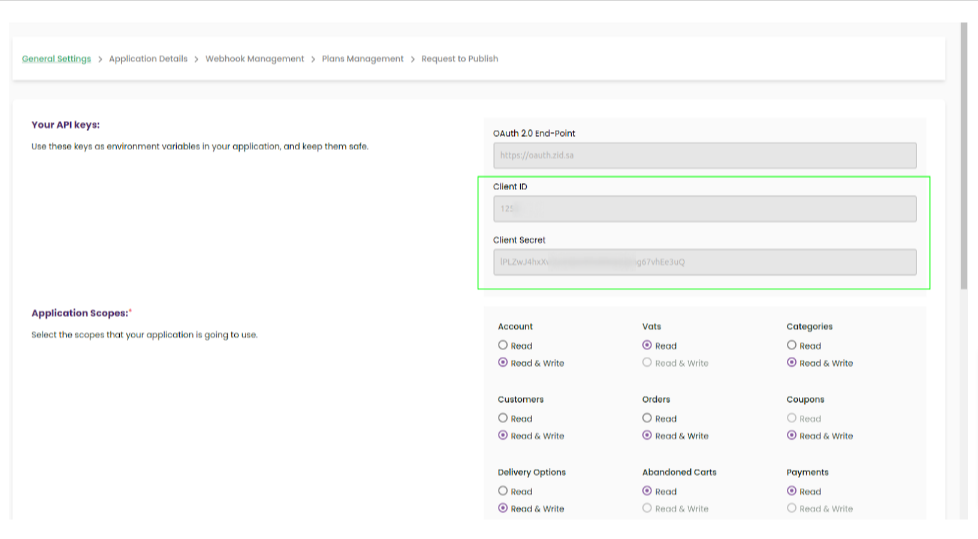
It is required to select the necessary scopes. It is recommended to select all permissions because, in case of their change, you will need to get all tokens again. The page below contains the Client ID and Client Secret that will be needed to receive the tokens.
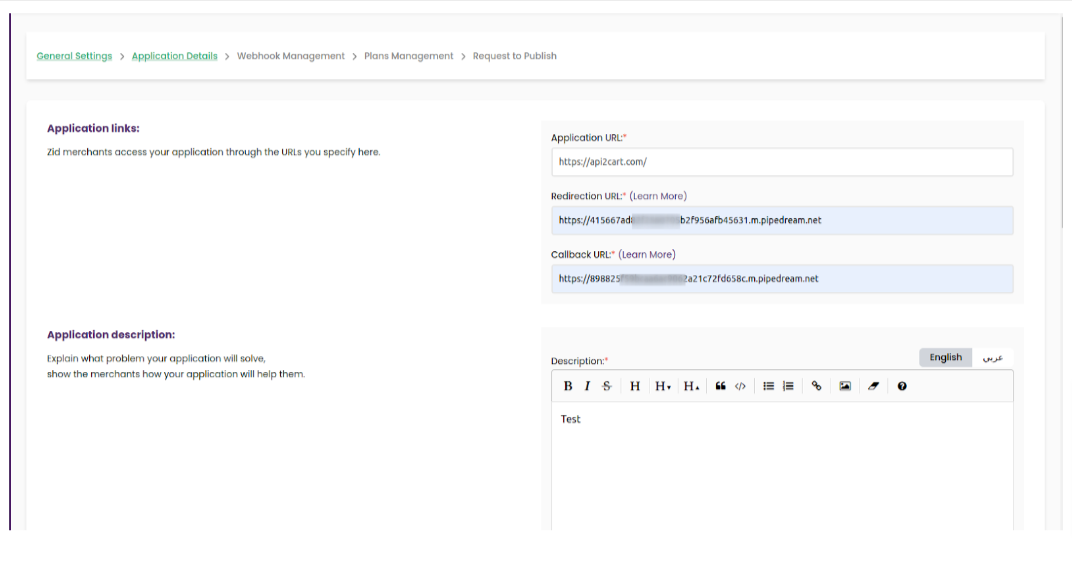
Next, you need to fill in detailed information about the application.
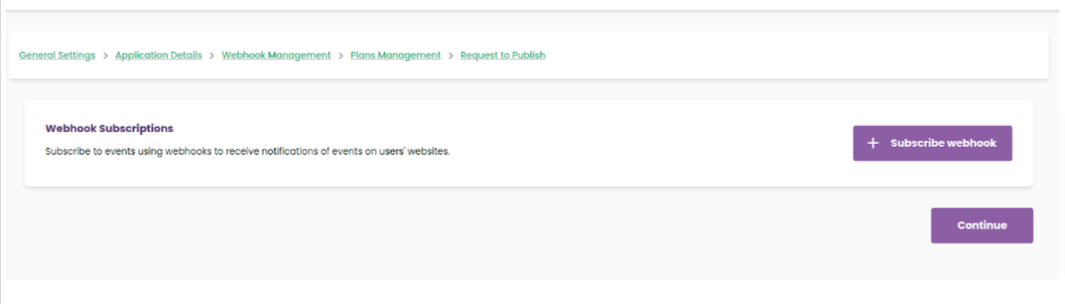
There is no need to fill in anything on the following page.
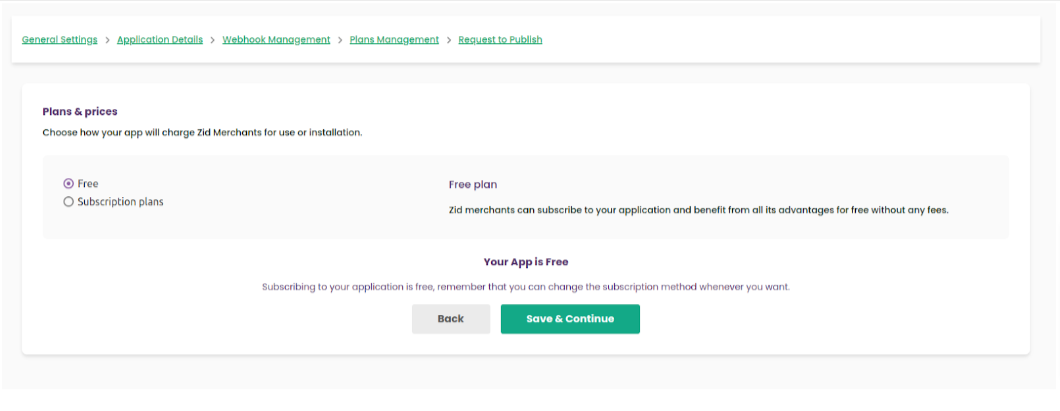
On this page, if necessary, you can set up a paid subscription to the application.
https://oauth.zid.sa/oauth/authorize?client_id=
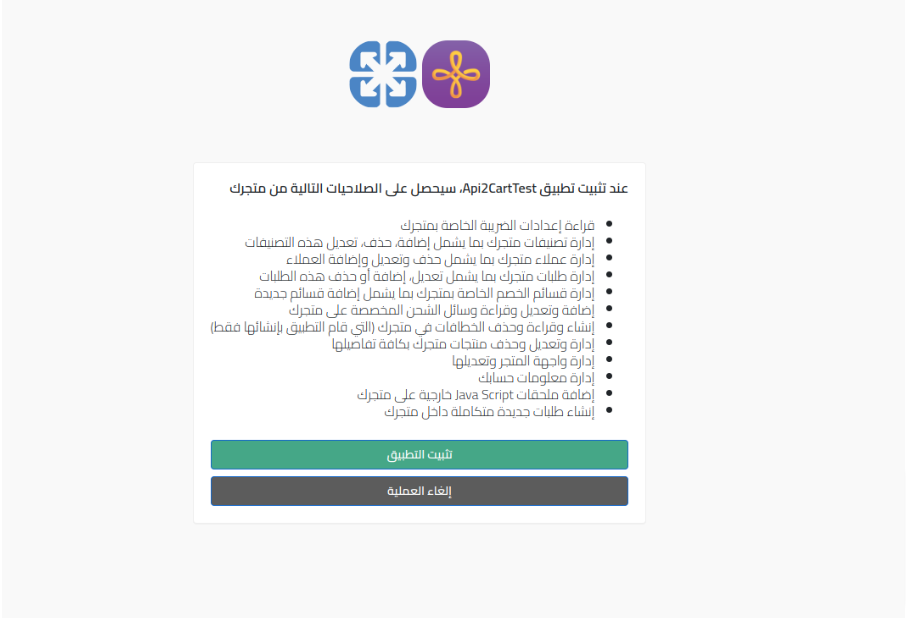
After that, you need to use the mentioned URL in the browser. It is necessary to provide the access requested by the application.
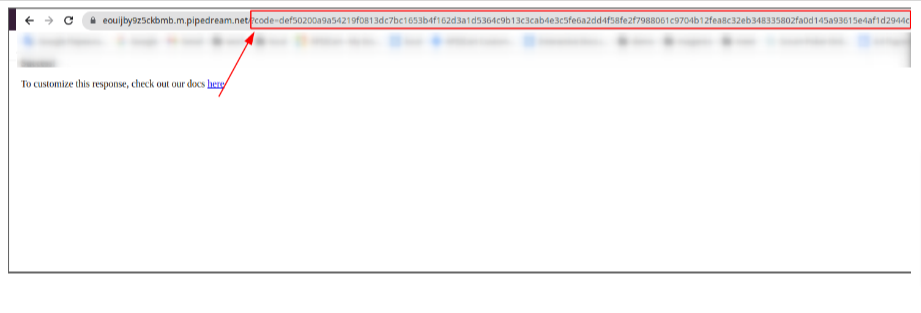
As a result, it should redirect to the Redirect URL. You will see the code in the browser line.
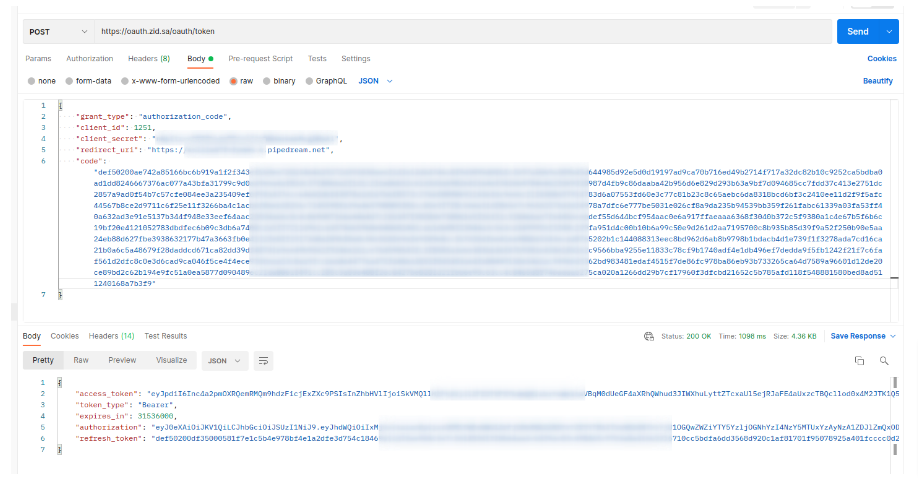
curl -X POST \
  https://oauth.zid.sa/oauth/token \
  -H 'Content-Type: application/json' \
  -d '{
    "grant_type": "authorization_code",
    "client_id": ,
    "client_secret": ,
    "redirect_uri": ,
    "code":
}'
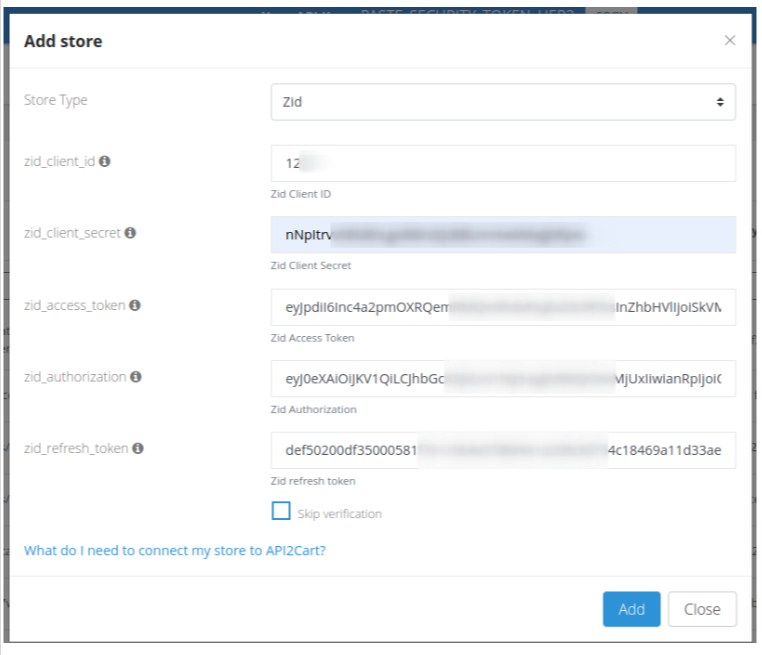
The result of the request will be access_token, authorization and refresh_token.
To add a Zid store to API2Cart, you need to fill in the appropriate fields.
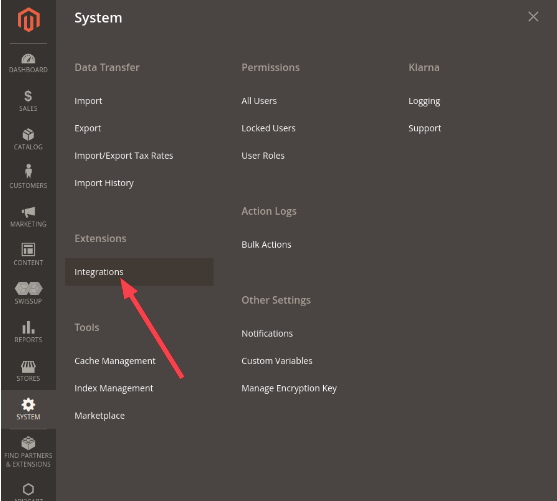
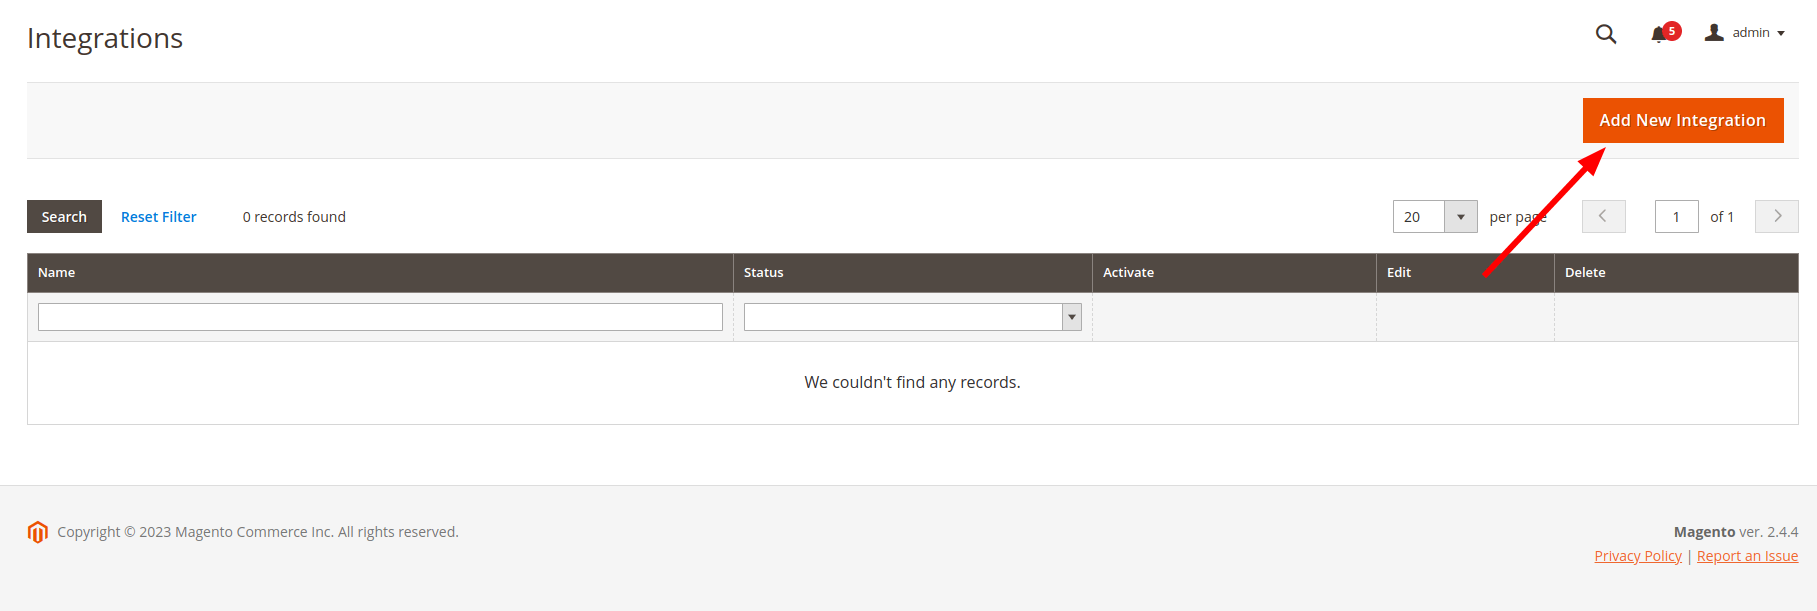
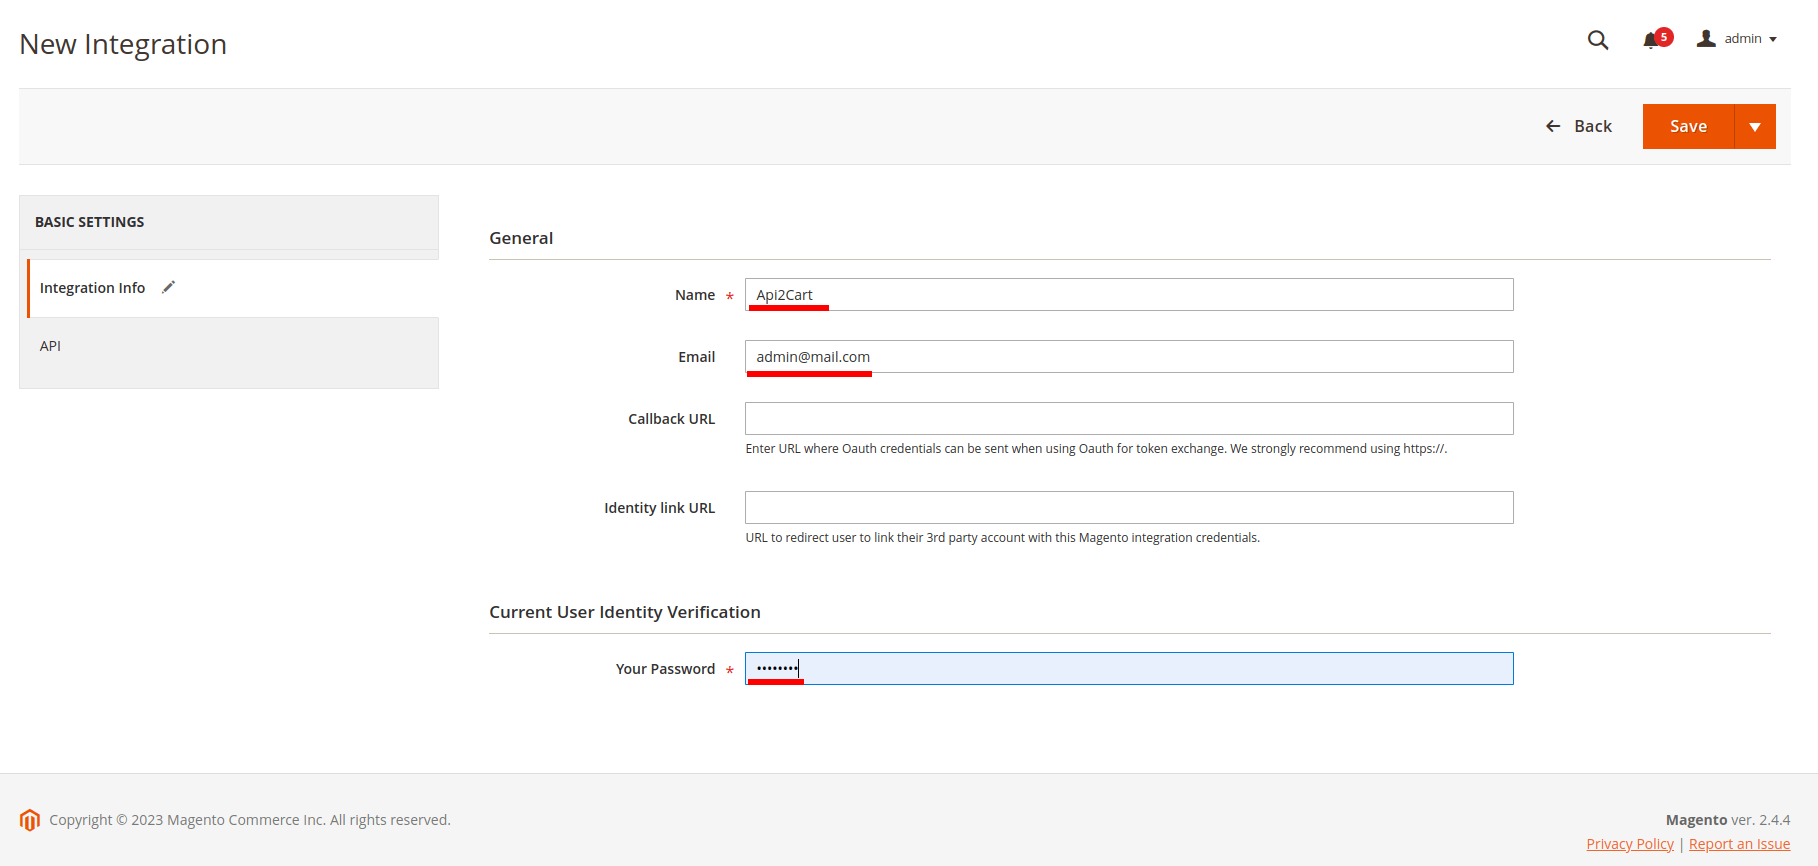
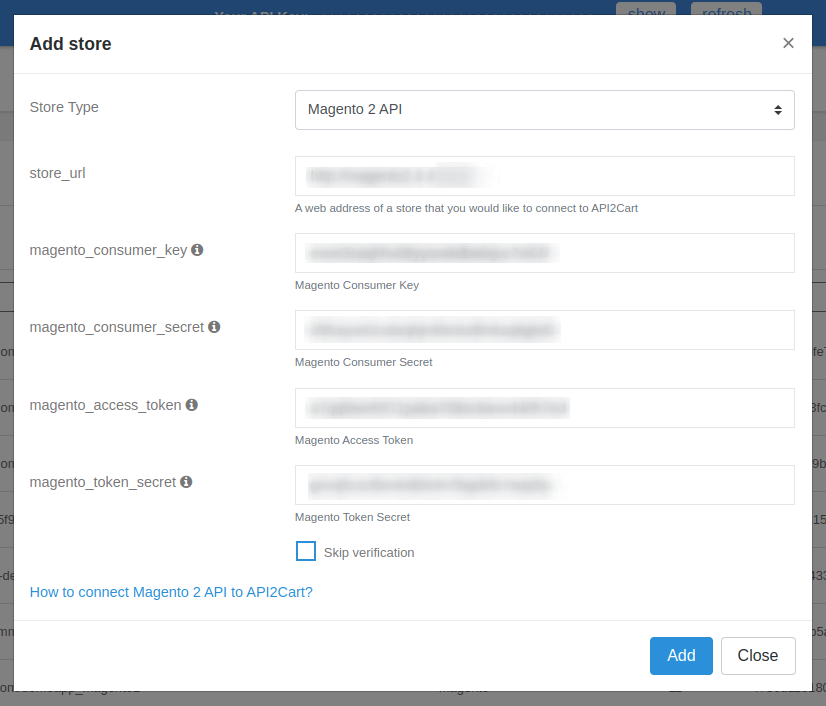
In order to connect Magento 2 API to API2Cart, you need to do the following:
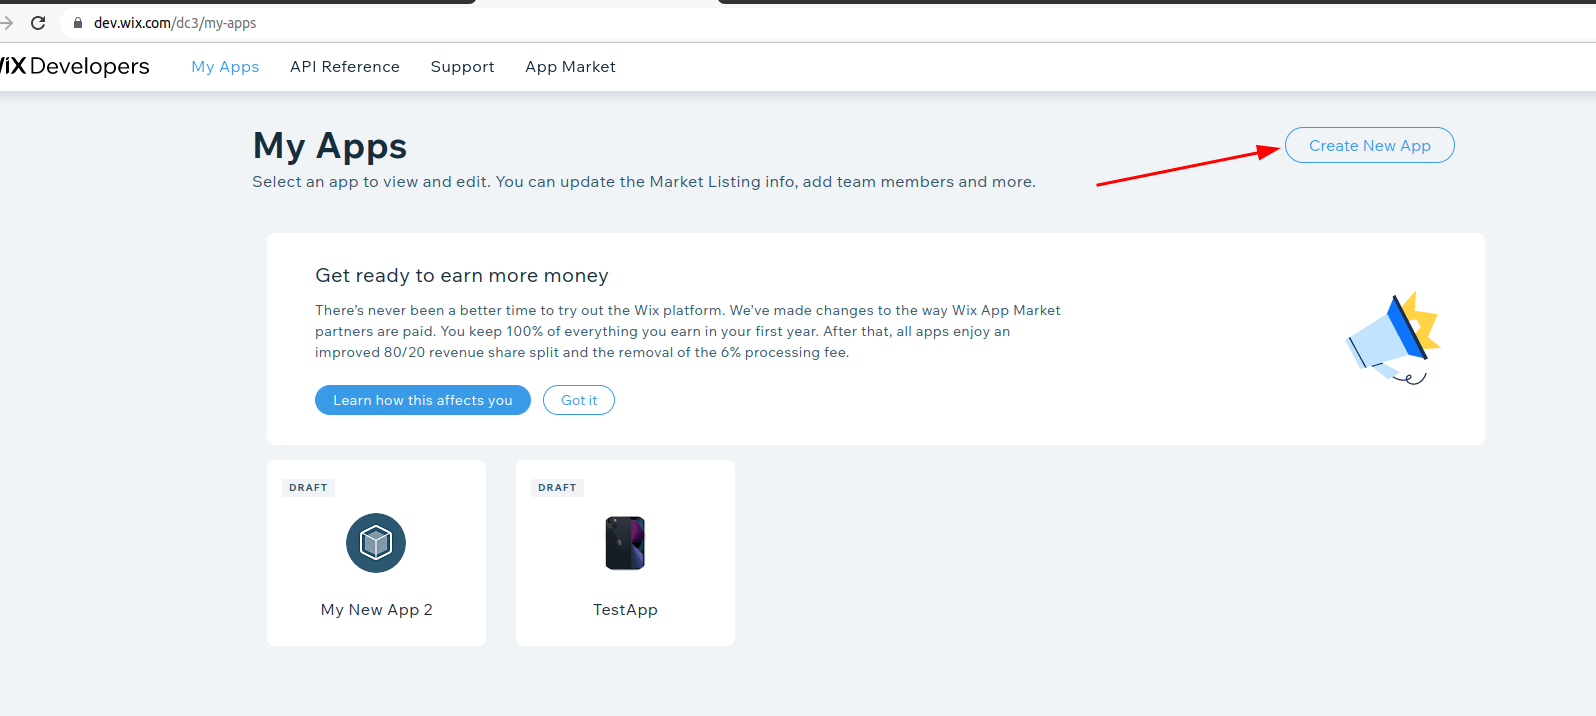
To integrate with Wix, you need to have a Wix developer account https://dev.wix.com/.
1. First of all, you need to create your own application.
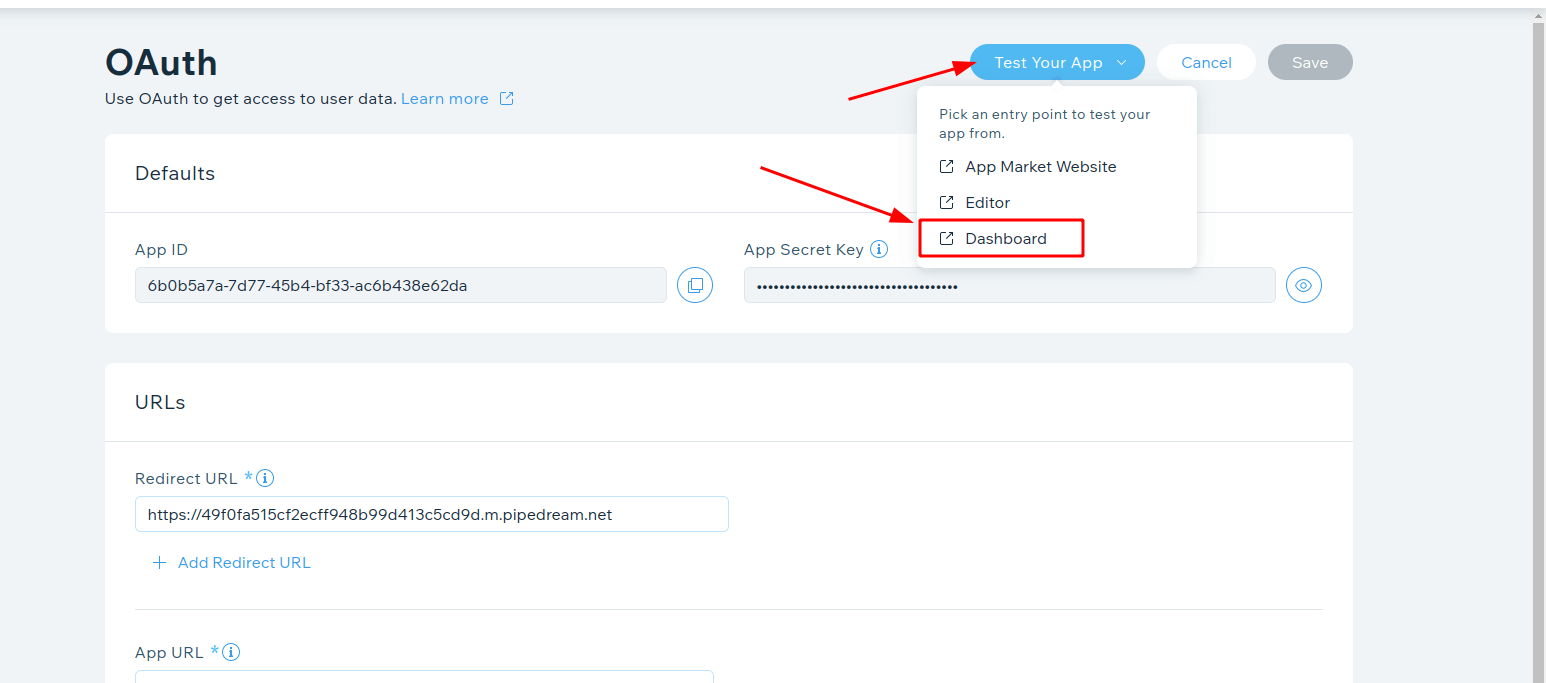
Specify Redirect URL and App URL.

On this page, you should copy App ID and Secret Key which will be needed in the next steps.

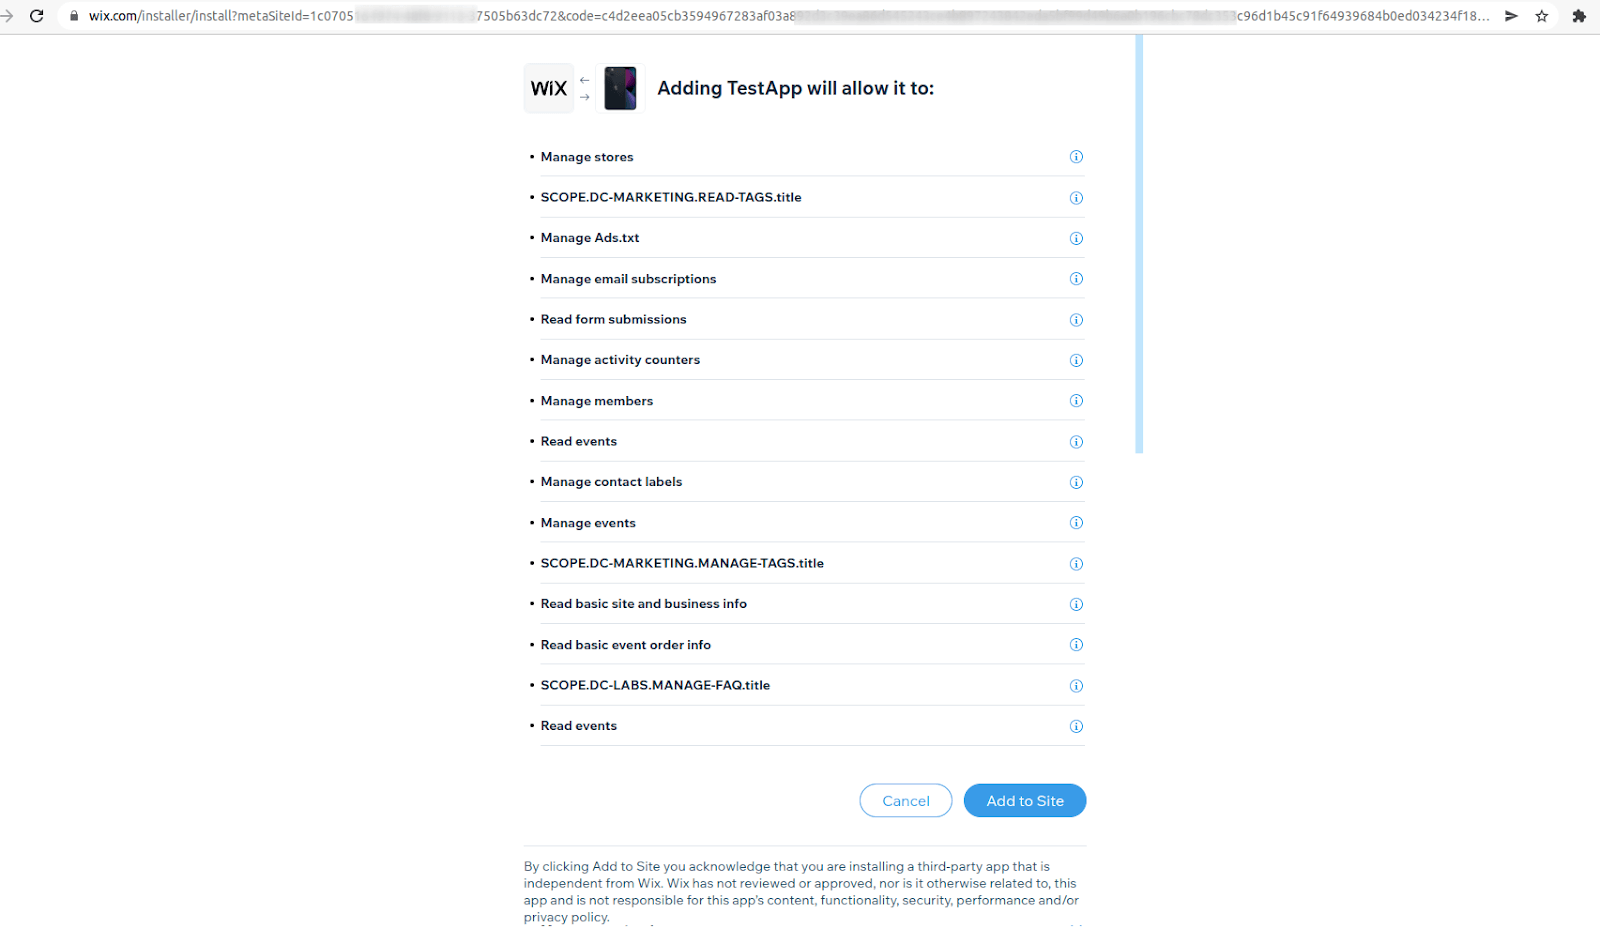
You also need to select the necessary permissions. The minimum required permissions to add a store to API2Cart are full access to Wix Stores -> Read Stores, Wix Developers -> Manage Your App and Business Info -> Manage Consent Policy.
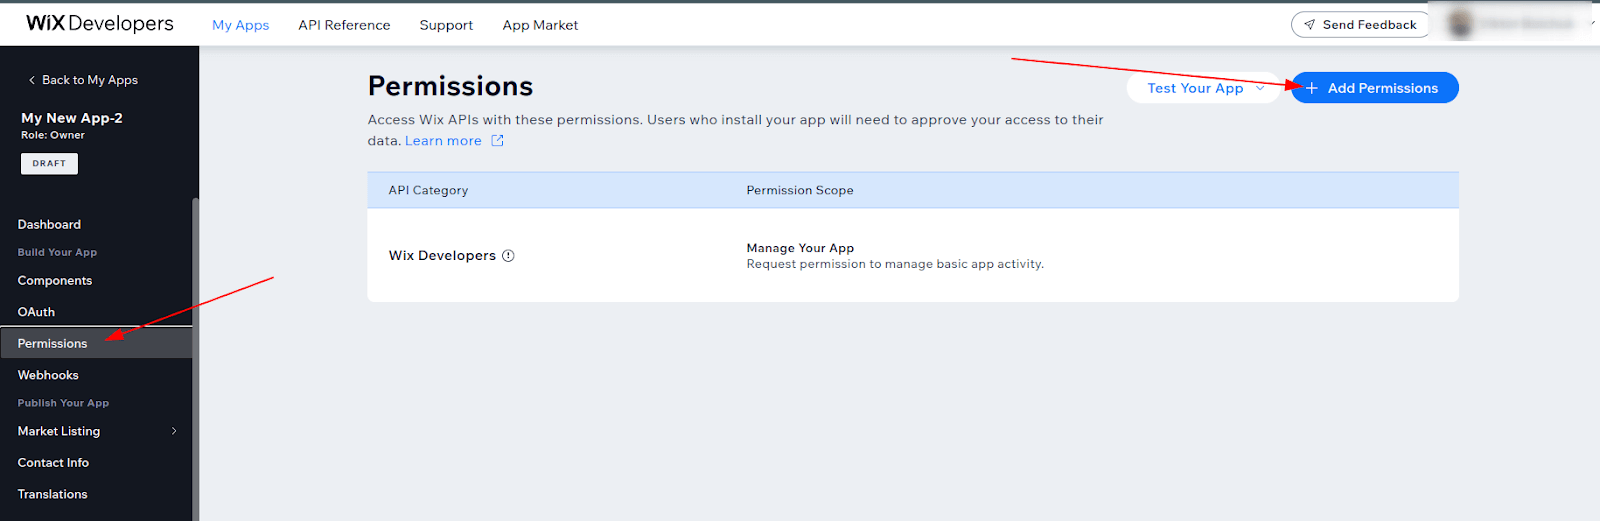
It is worth giving full access here. If you change permissions later, you will have to re-add the application to the store.
2. Next, you need to add an application to the store.
Here you should select added store or add the new one.

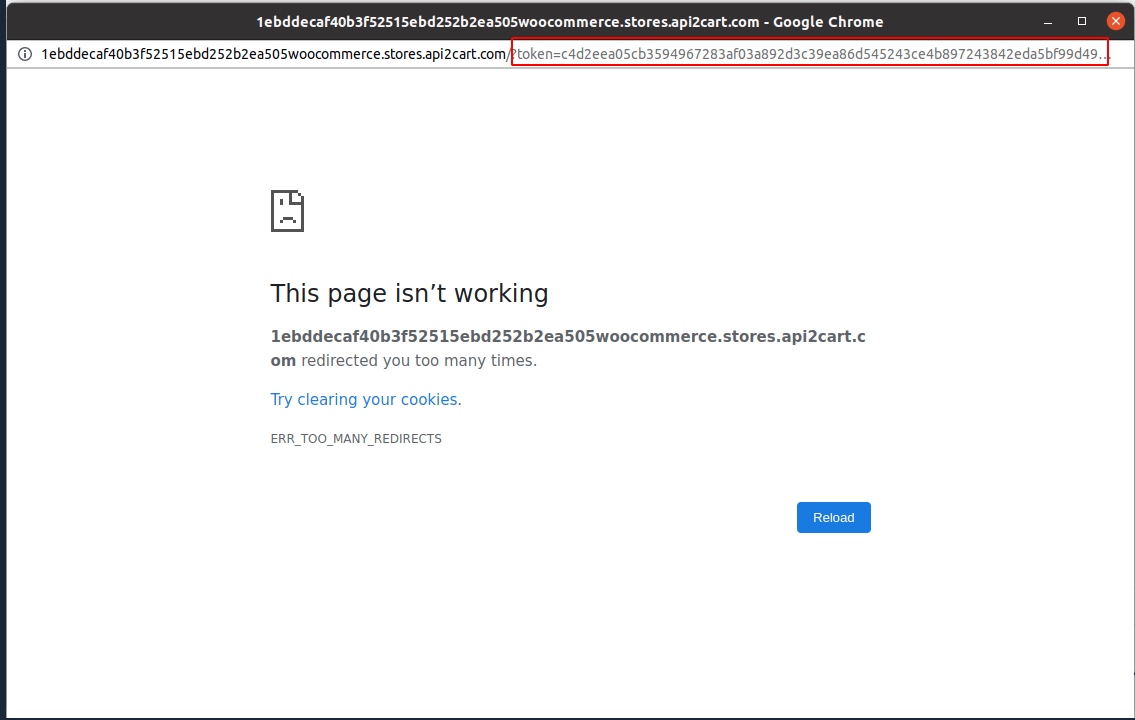
Next, the window opens with a page you specified in the App URL. You need to copy the token from the URL.
3. Here you form the URL for installing the application. Note: You need to obtain approval from the Wix and list of your application on the Wix Marketplace.
https://www.wix.com/installer/install?code=<code>&appId=<app_id>&redirectUrl=<redirect_url></redirect_url>
code is the token that you copied in the previous step.
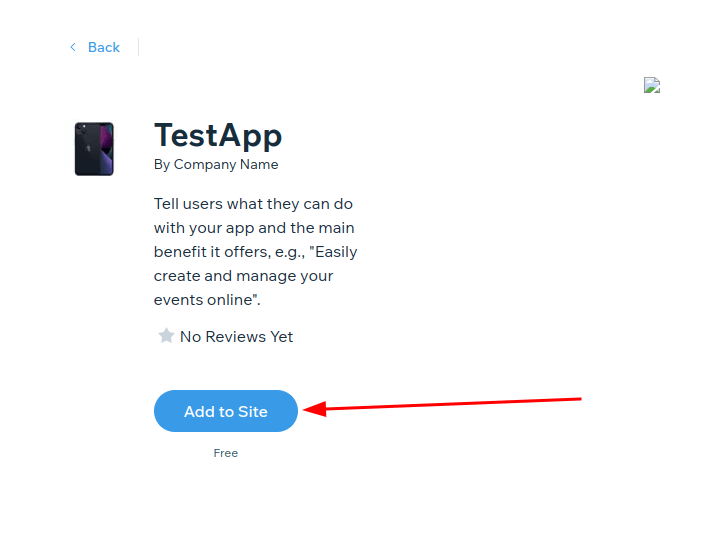
After that, you should follow this URL in a browser and click Add to Site.
Next, there will be a redirect to redirectUrl, where you need to take the code from the URL.
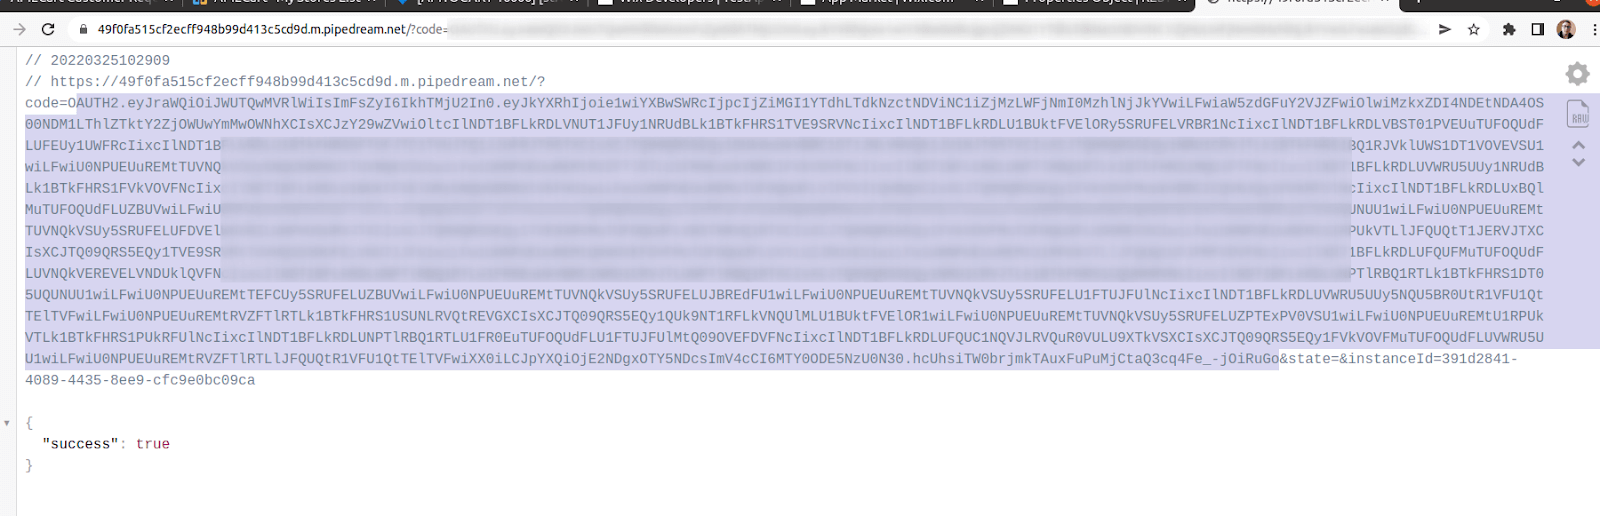
4. After that you need to make the following request:
curl -X POST \
  https://www.wixapis.com/oauth/access \
  -H 'Content-Type: application/json' \
  -d '{
    "grant_type": "authorization_code",
    "client_id": <APP_ID>,
    "client_secret": <APP_SECRET>,
    "code": <AUTH_CODE>
}'
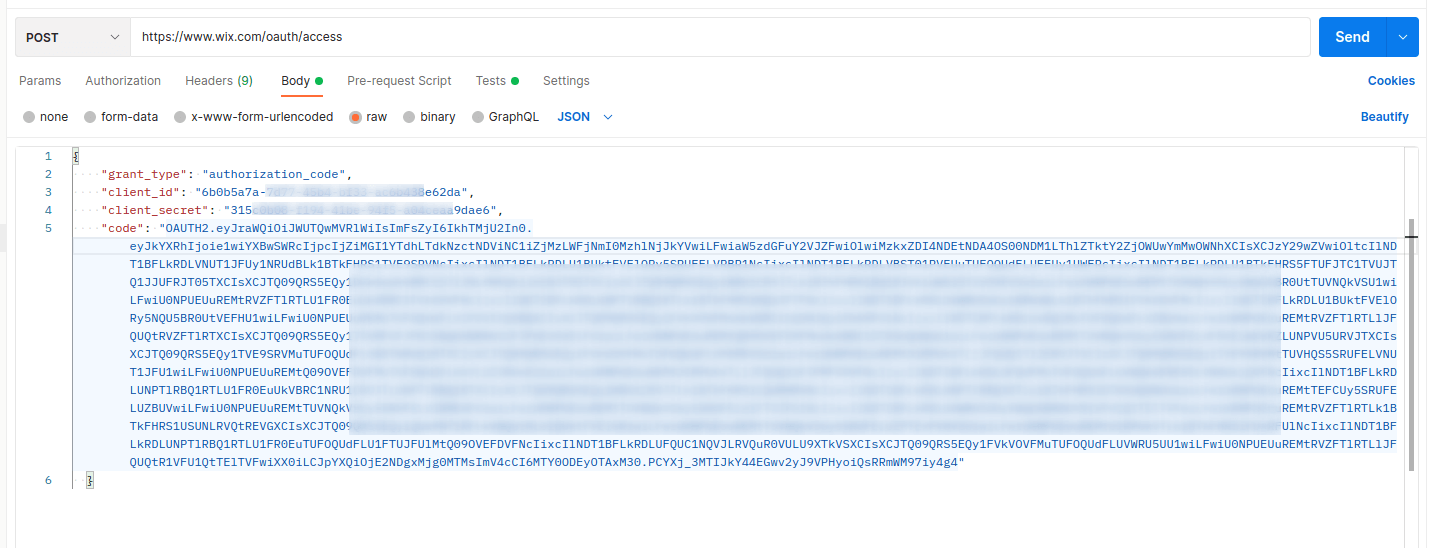
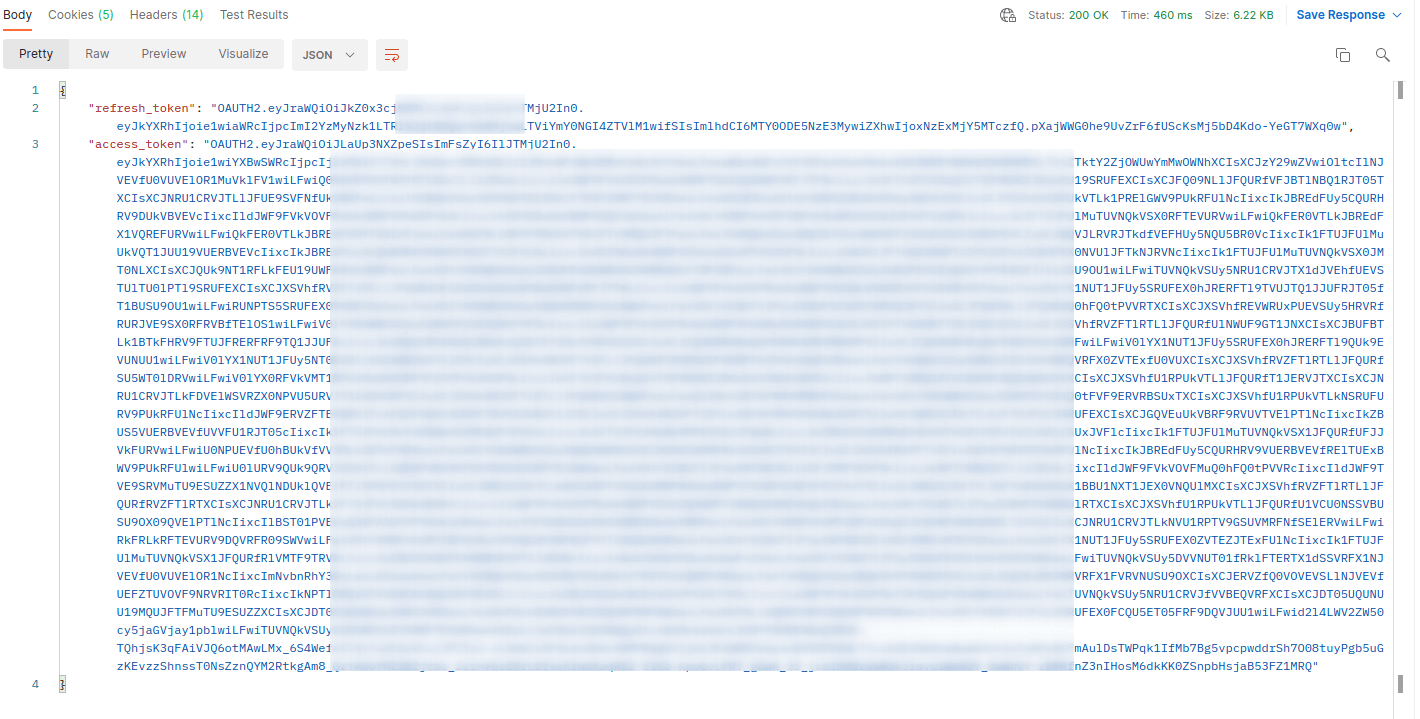
As a result, you get refresh_token.
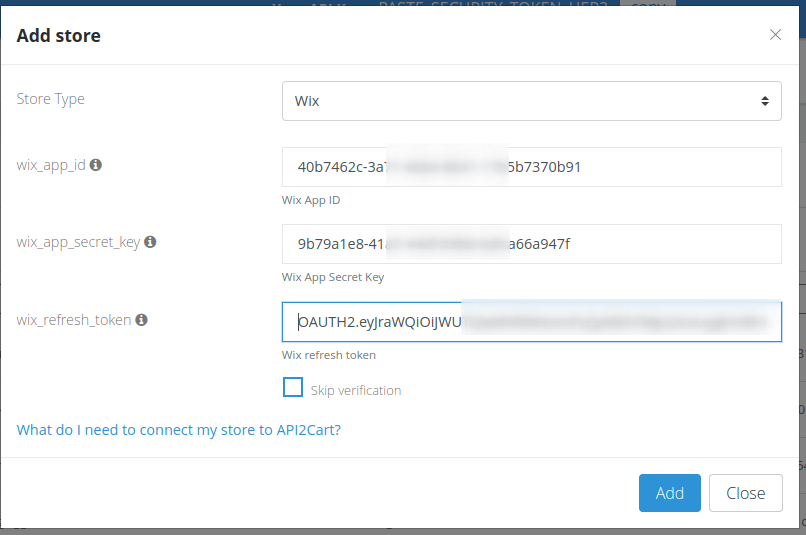
5. In order to add a store to API2Cart you need to specify the following fields:
To integrate with Shift4Shop via the REST API, you need to create and authorize an application with necessary scopes for the store. To do this, you need to have a Shift4Shop developer account https://developer.3dcart.com/".
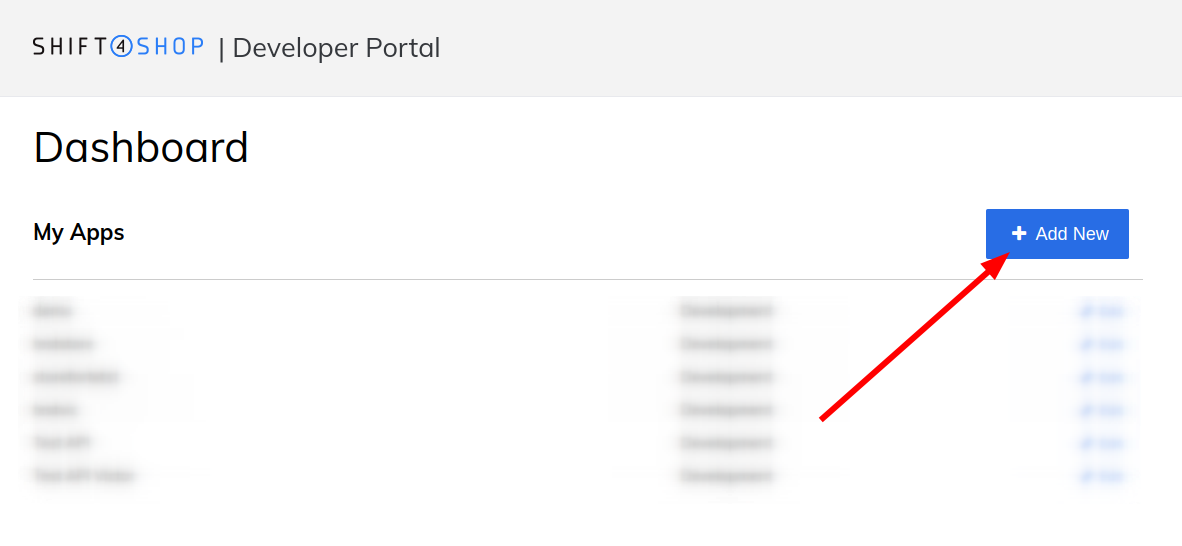
In the dashboardhttps://devportal.3dcart.com/dashboard.asp you need to create a new application.
Choose the necessary scopes.
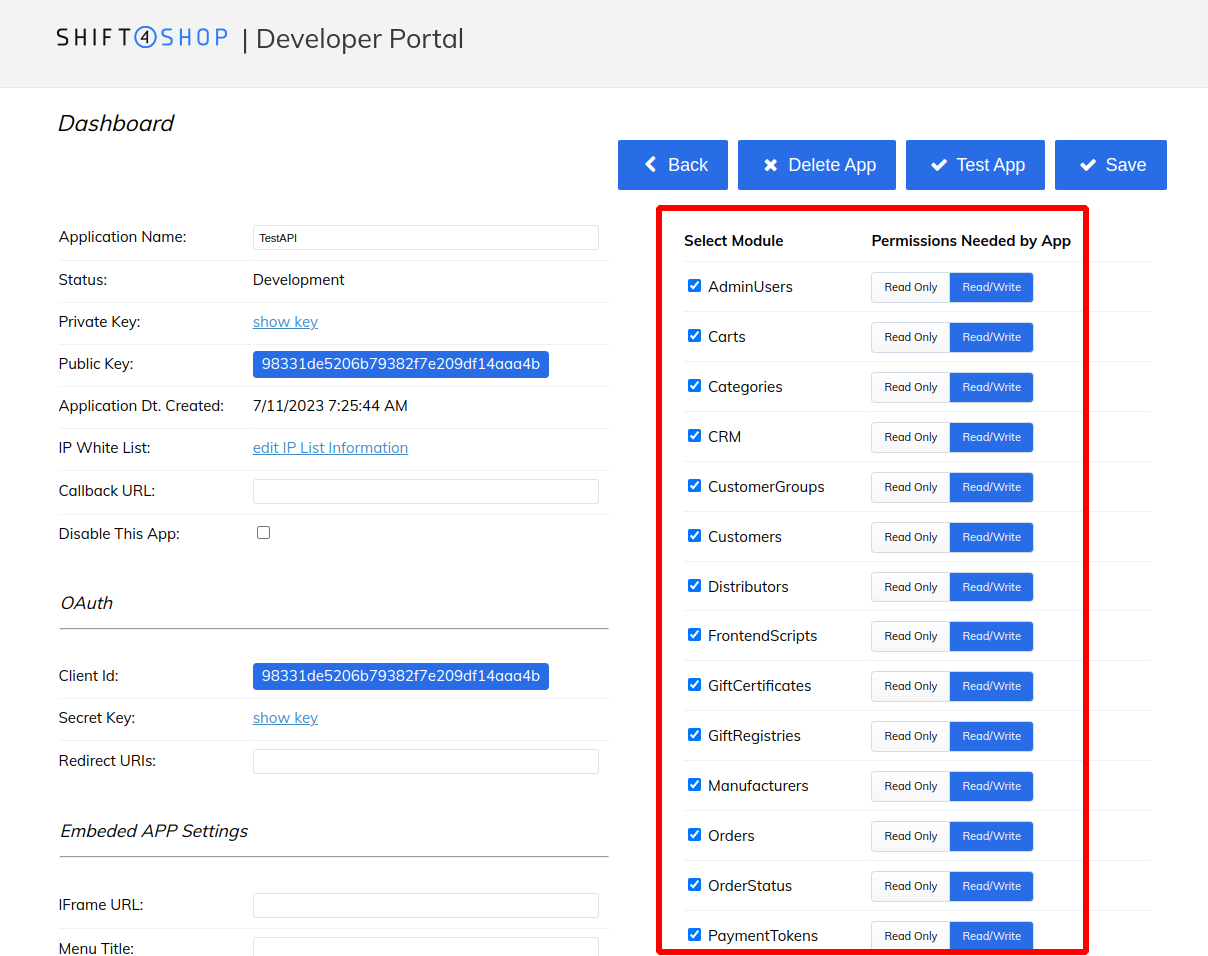
It is recommended to select all scopes, because after adding the store they cannot be changed.

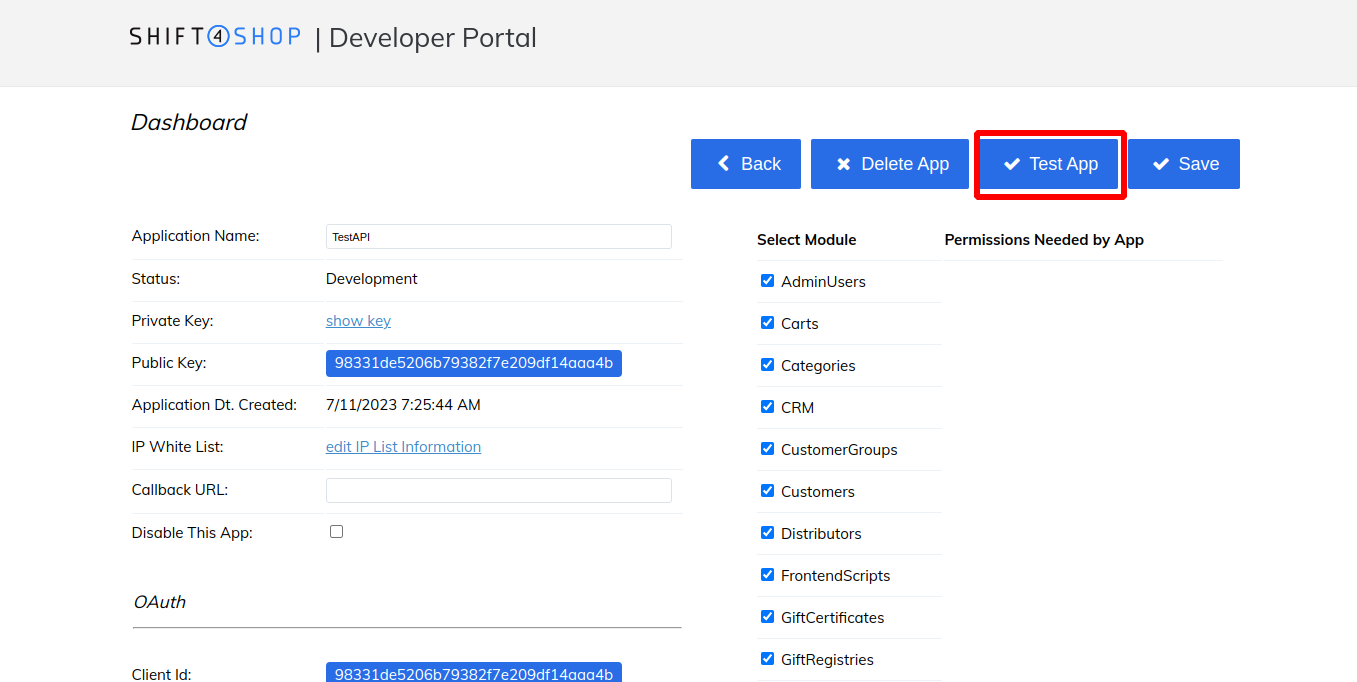
Next, you need to authorize this application in your store.
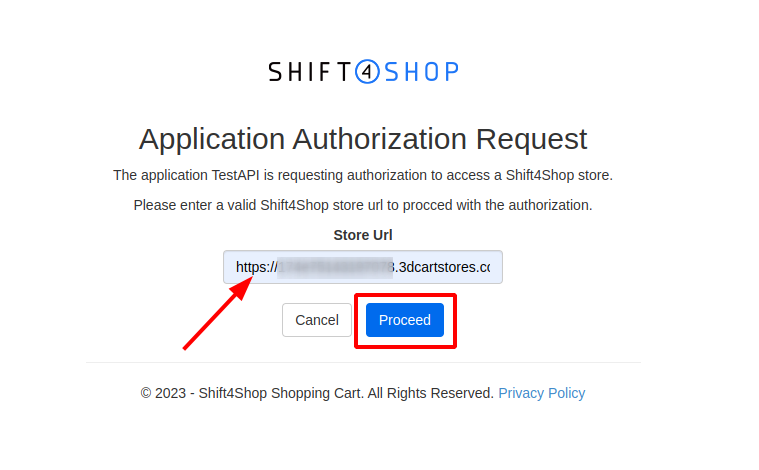
After that, you will be redirected to a page where you will need to specify the URL of the Shift4Shop store.
Next, you will be redirected to a page where you need to accept the terms and authorize the application on the store.
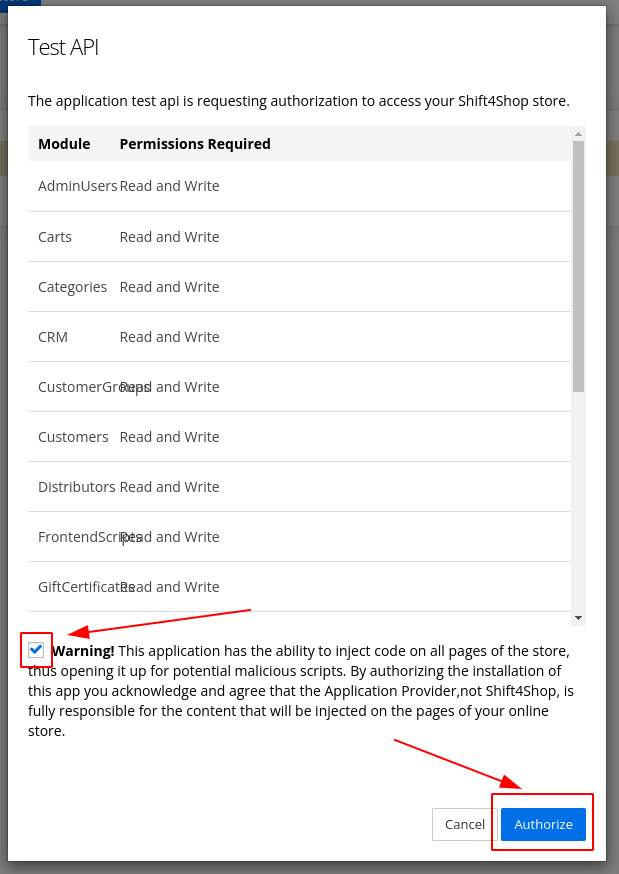
After that, information about the store will appear on the application page in the dashboard.
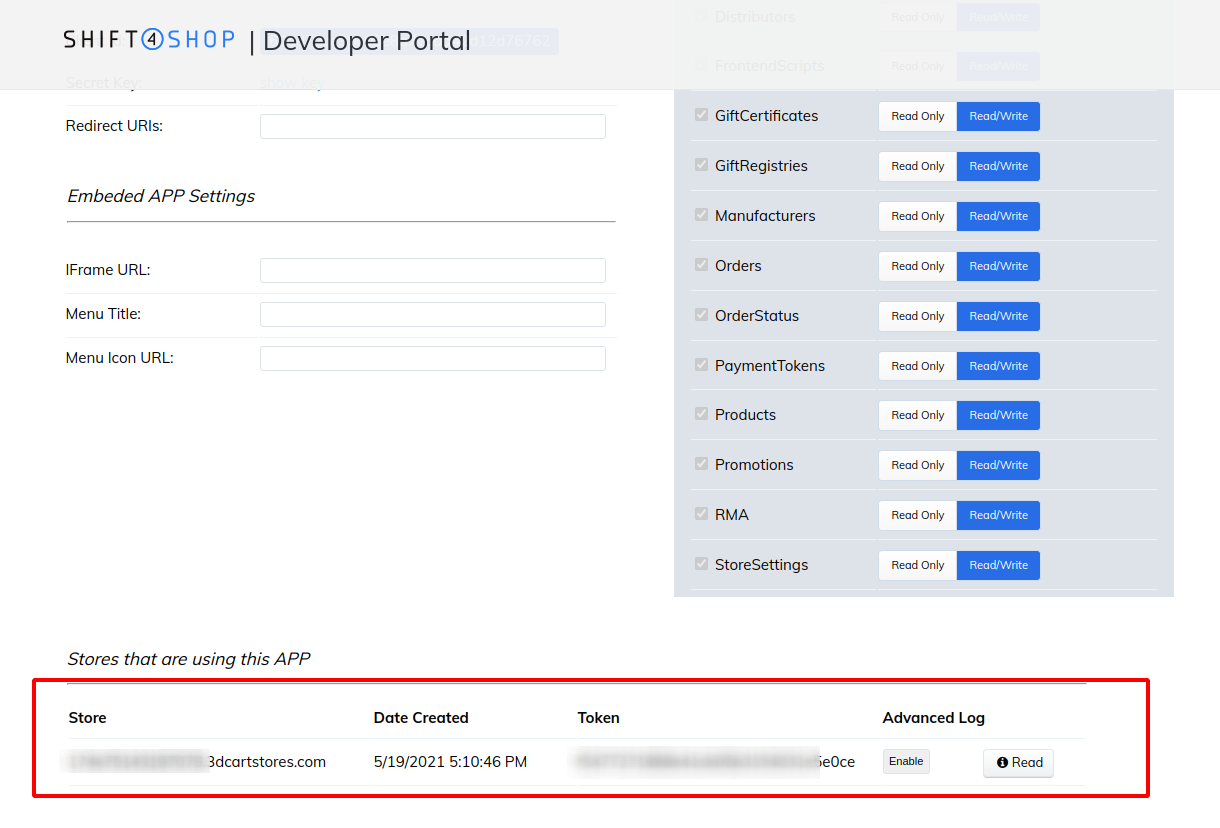
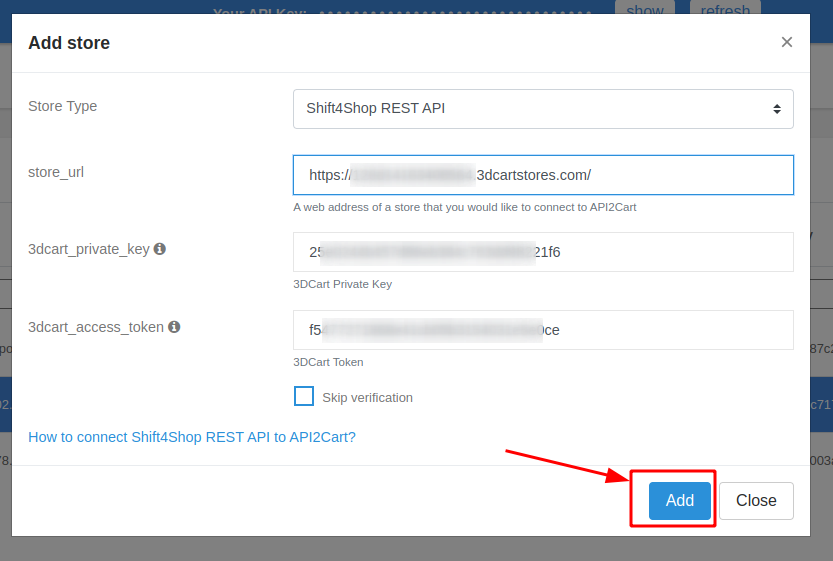
To connect Shift4Shop to API2Cart, you need a private_key and an access_token credentials.


To connect Lightspeed store to API2Cart you need to specify the following credentials:
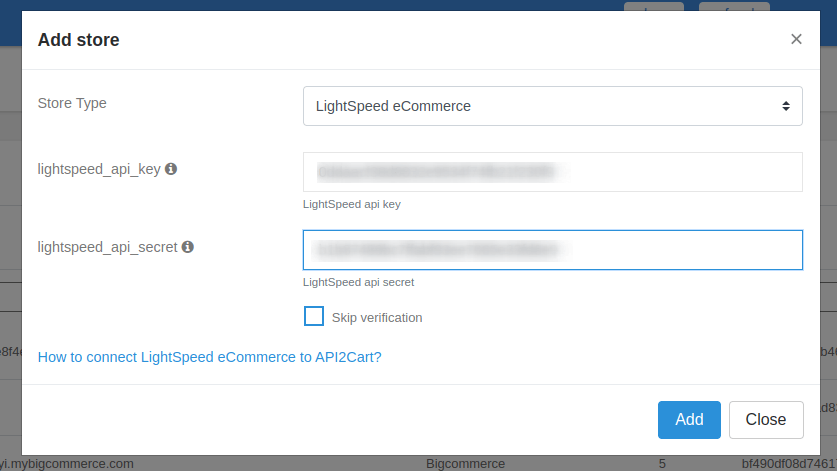
There are two ways to get them:
When the store owner installs your App, credentials to the store will come to your callback URL (language, shop id, signature, timestamp, token, and cluster_id). From all the credentials you need only a token.
Now you have credentials needed for adding Lightspeed store to API2Cart.
More info you can find on LightSpeed docs.
Create a client
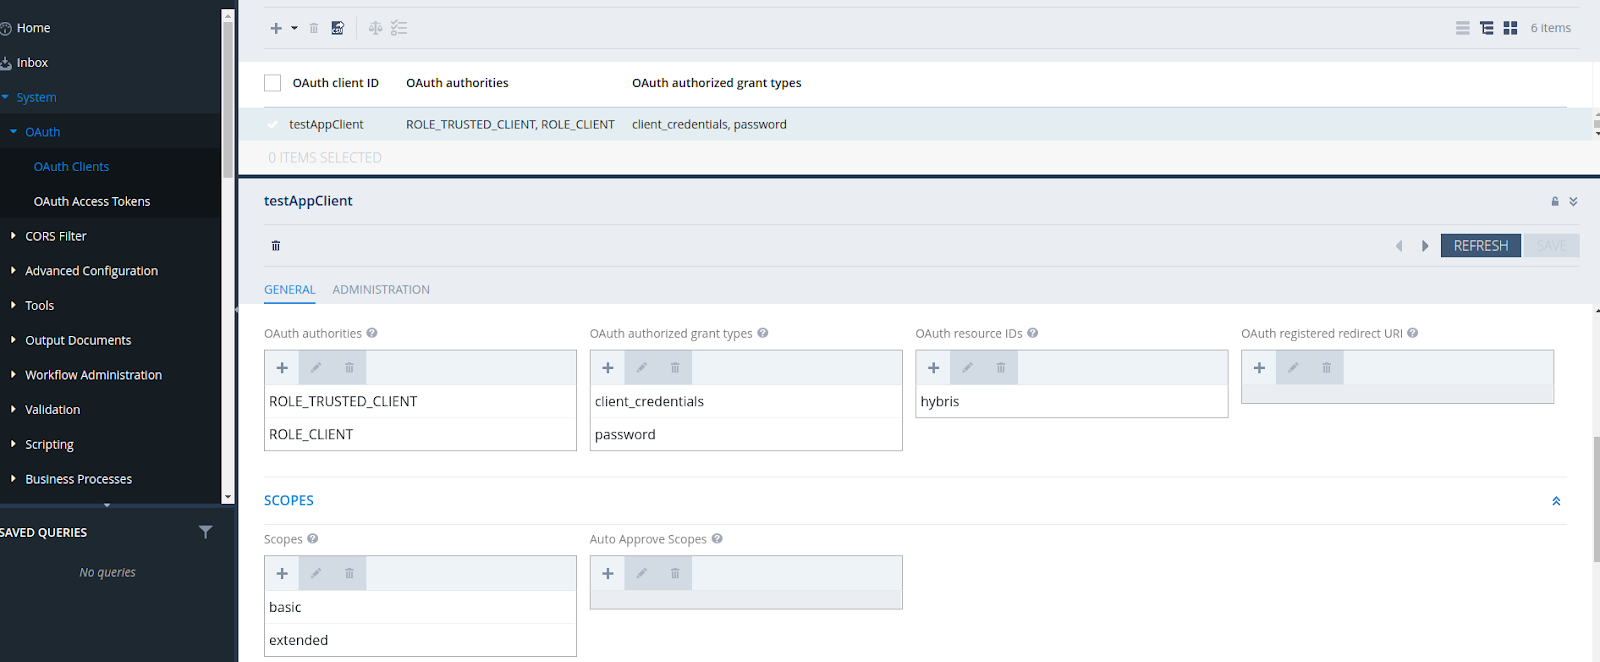
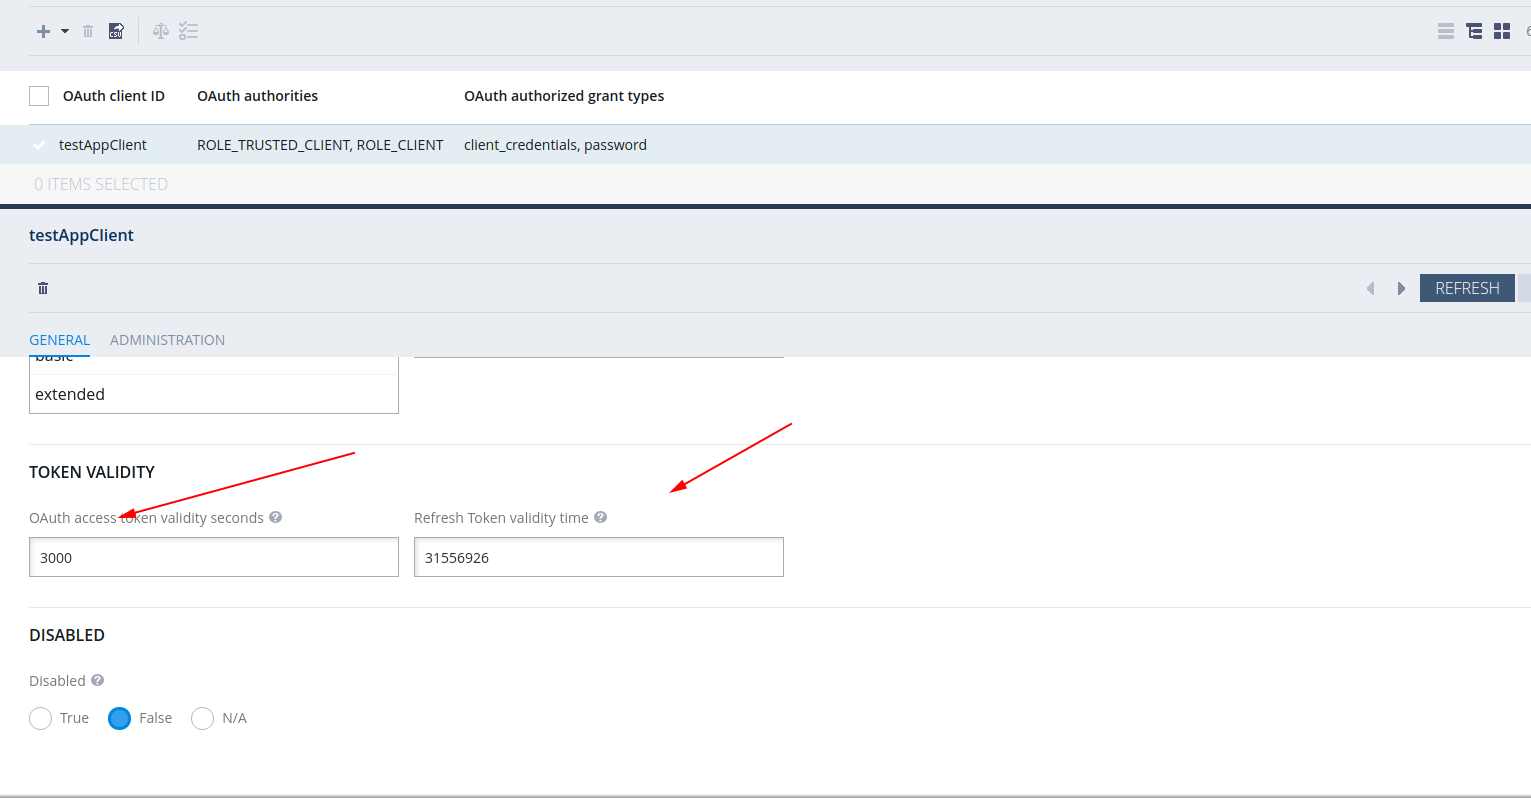
Set token lifetime
To work with orders endpoint, you need to add a store with the parameters hybris_username, hybris_password.
Also, the user must belong to groups such as customersupportagentgroup and customermanagergroup.
To work with warehouses and get store data via cart.info, the admin user must also belong to a group warehouseadministratorgroup.
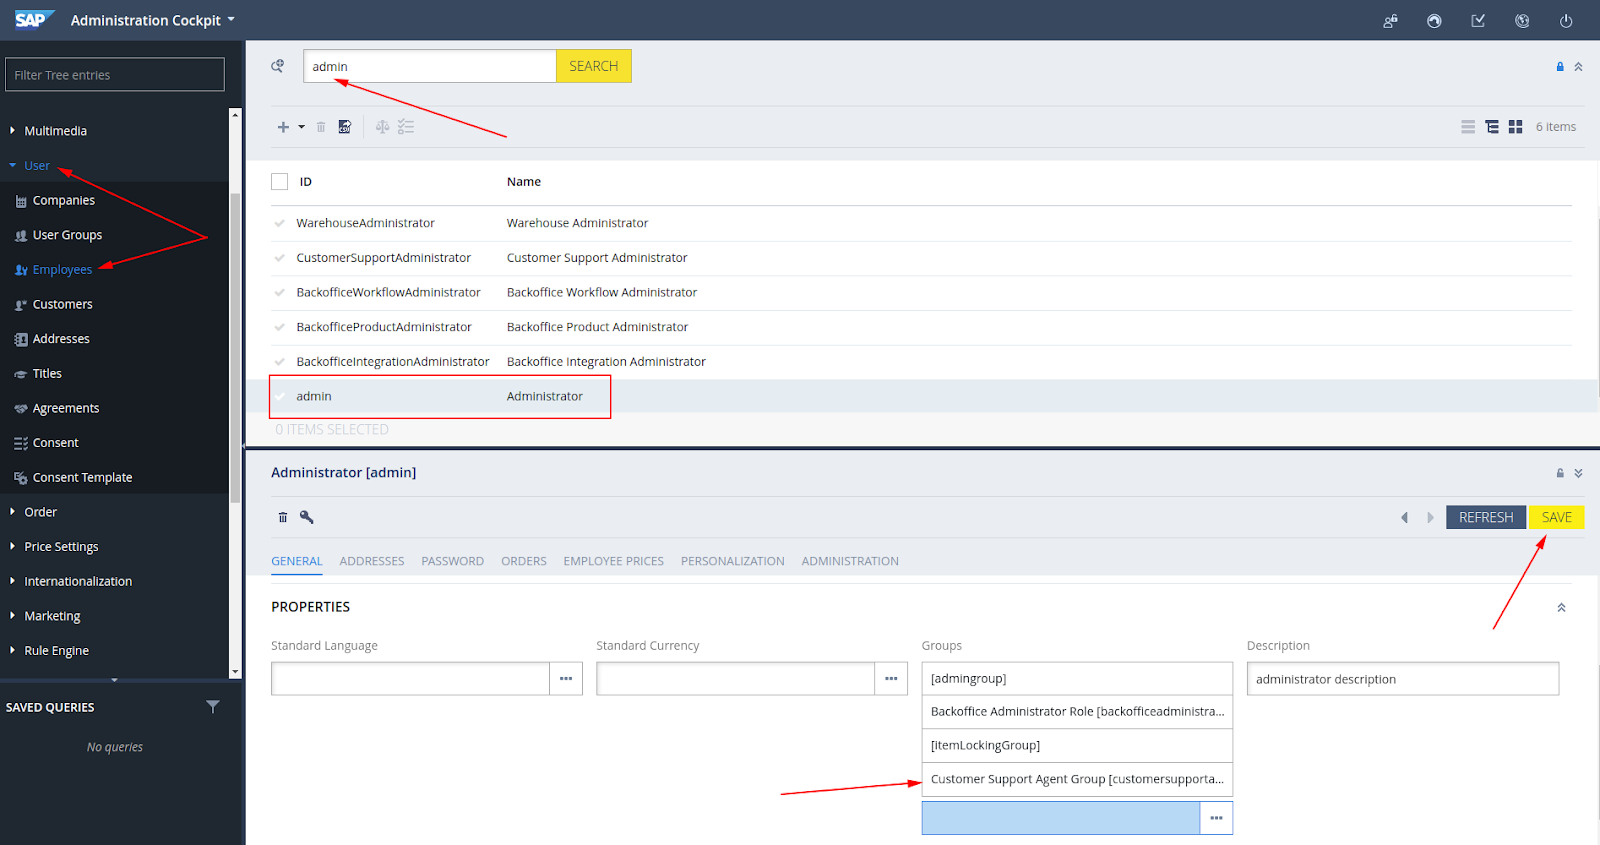
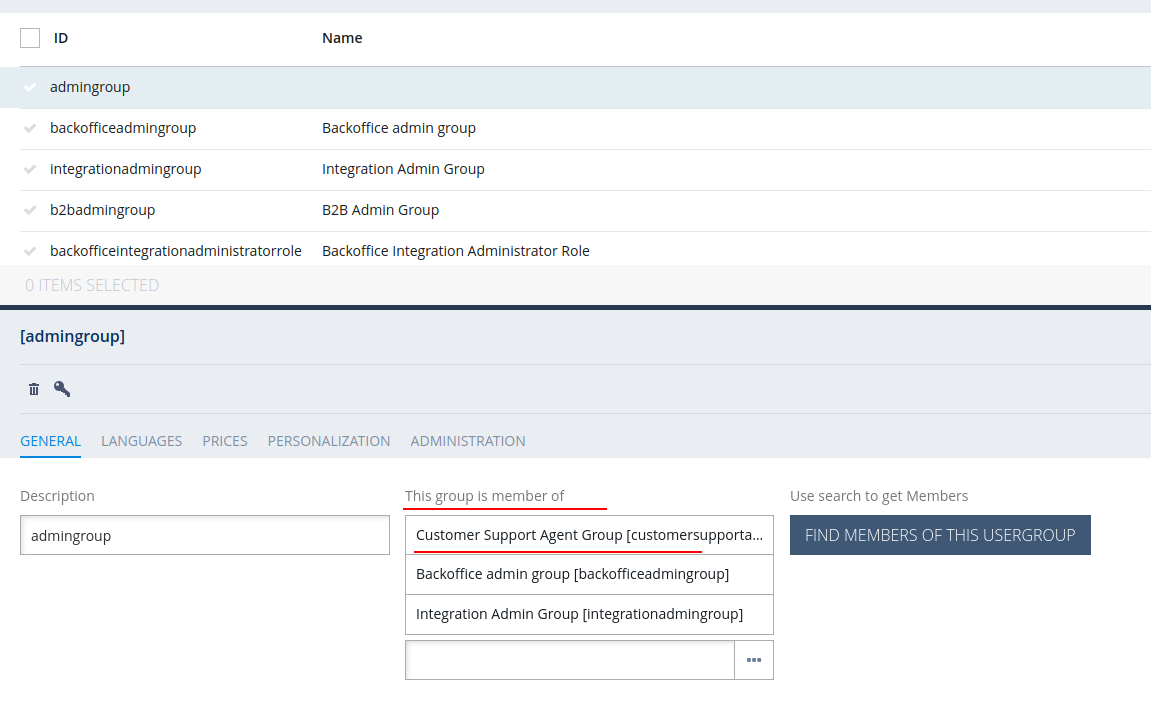
This can be done by simply assigning the user to a group, or if the user is already in a group and there is a need to expand its capabilities, then you can add its subgroup to the group.
If everything is done correctly, you can add a store.

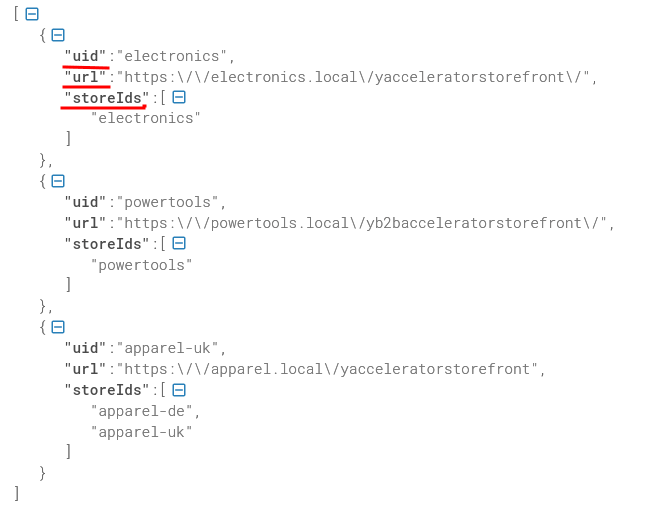
The parameter hybris_websites is an array of objects in a JSON string with the following structure:
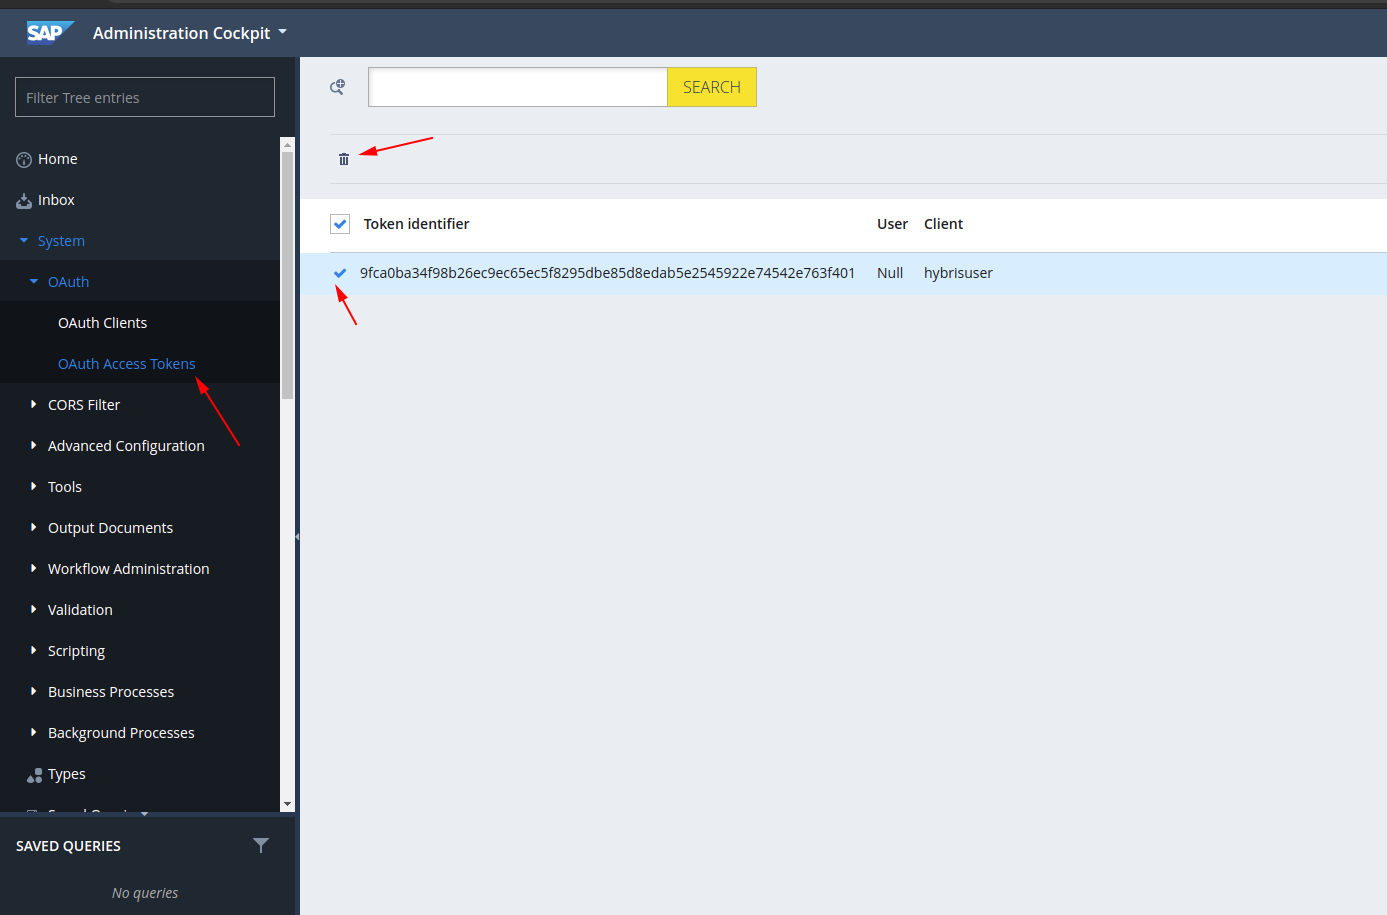
If, when trying to add a store, an error occurs due to incorrect permissions, for example, due to the absence of a group, it is necessary to delete the incorrectly generated OAuth Access Token. If you try to regenerate it, Hybris will still give the same token until it expires.
 The seller account that is planned to be connected to API2Cart must have an active "Professional" selling plan at Amazon.
We recommend reading the original guide from the Amazon Selling Partner API Developer Guide.
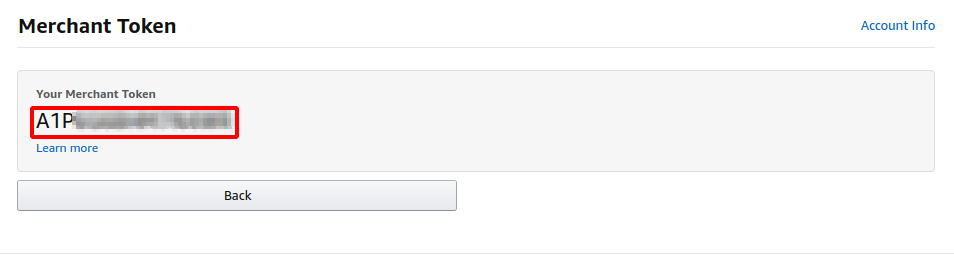
1. amazon_seller_id - can be seen in Sellercentral -> Settings -> Account Info -> Business Information -> Merchant Token. Direct link: https://sellercentral.amazon.com/sw/AccountInfo/MerchantToken/step/MerchantToken
 2. To determine which value should be substituted into amazon_sp_aws_region you need to use the table Selling Partner API endpoints.
| Selling region | AWS Region |
| North America (Canada, US, Mexico, and Brazil marketplaces) | us-east-1 |
| Europe (Spain, UK, France, Belgium, Netherlands, Germany, Italy, Sweden, South Africa, Poland, Saudi Arabia, Egypt, Turkey, United Arab Emirates, and India marketplaces) | eu-west-1 |
| Far East (Singapore, Australia, and Japan marketplaces) | us-west-2 |
For example, if the seller sells in the US, you must select us-east-1.
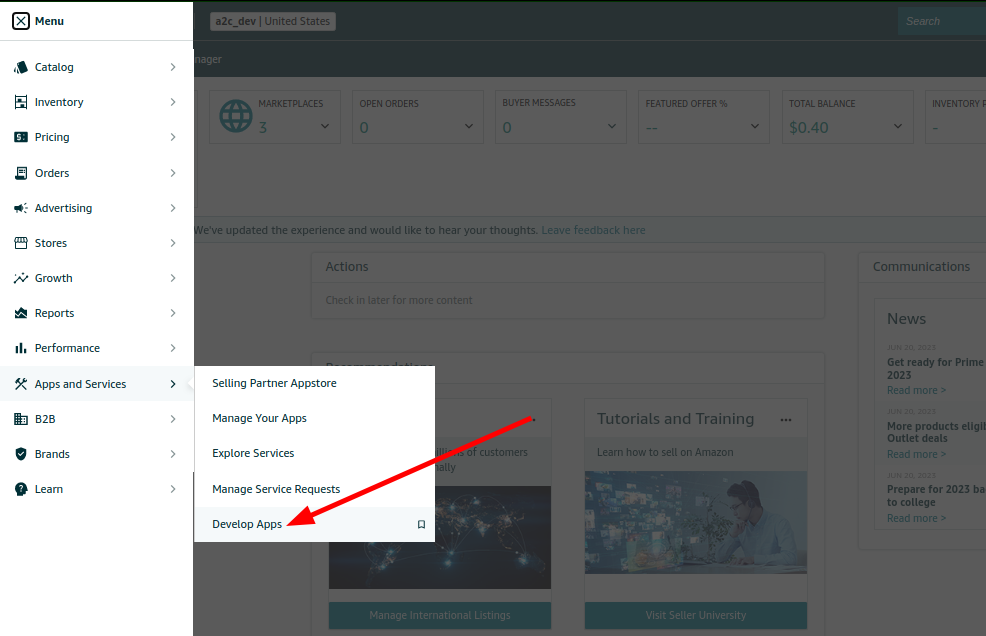
3. To get amazon_sp_client_id and amazon_sp_client_secret you need to go to an Amazon seller account registered as a developer. If there is no such an account, you have to register a seller account, and then register in it as a developer here - Register as a developer.
Go to Developer Central and add a new client.
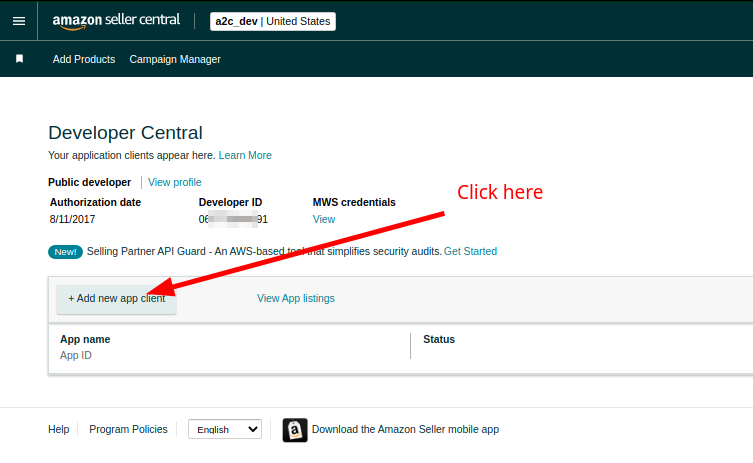

Click “View” to see amazon_sp_client_id and amazon_sp_client_secret.
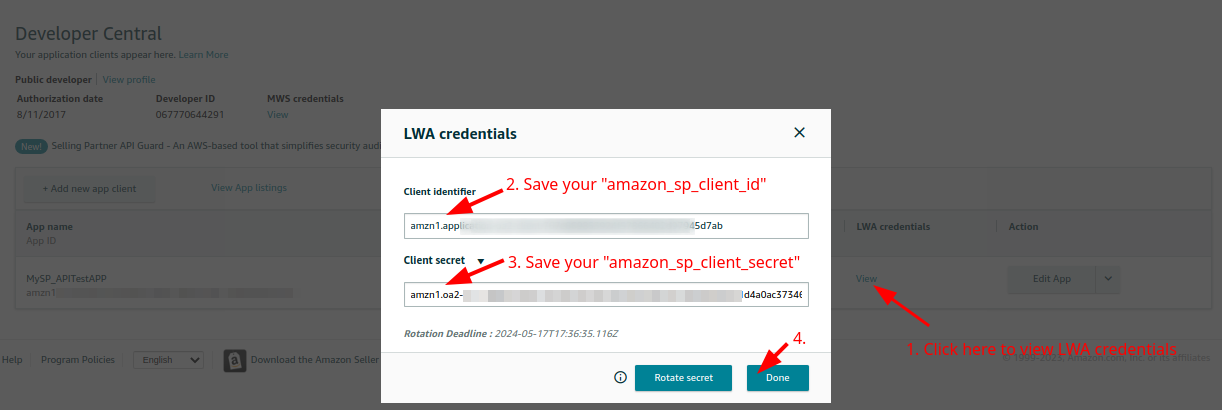
Please note that the lifetime of amazon_sp_client_id and amazon_sp_client_secret credentials is limited to 180 days. Therefore, you should periodically update them in the "Amazon developer console" and then in our system using the account.config.update method.
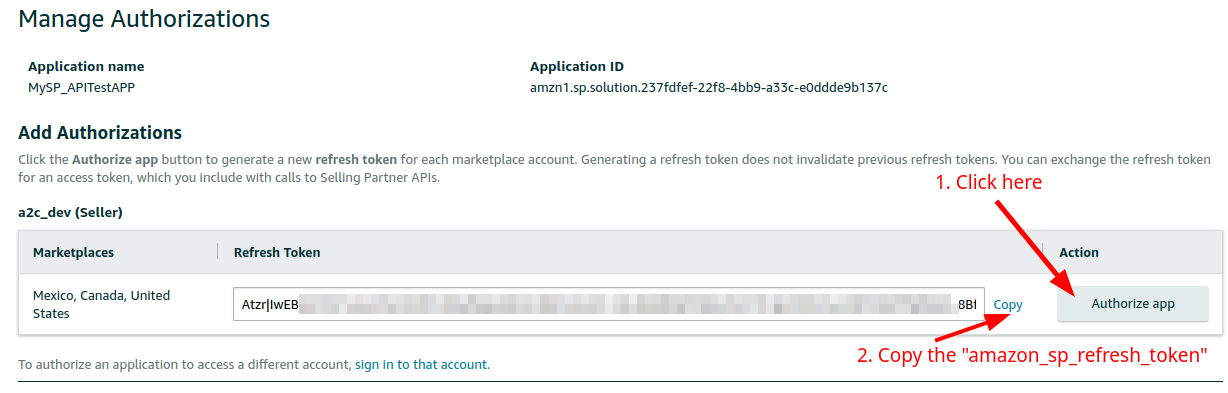
4. To get the last parameter - amazon_sp_refresh_token you need to implement OAuth authentication in one of the following ways:Let's consider the 3rd way, it is the most convenient when you need to quickly get an amazon_sp_refresh_token to test the work.

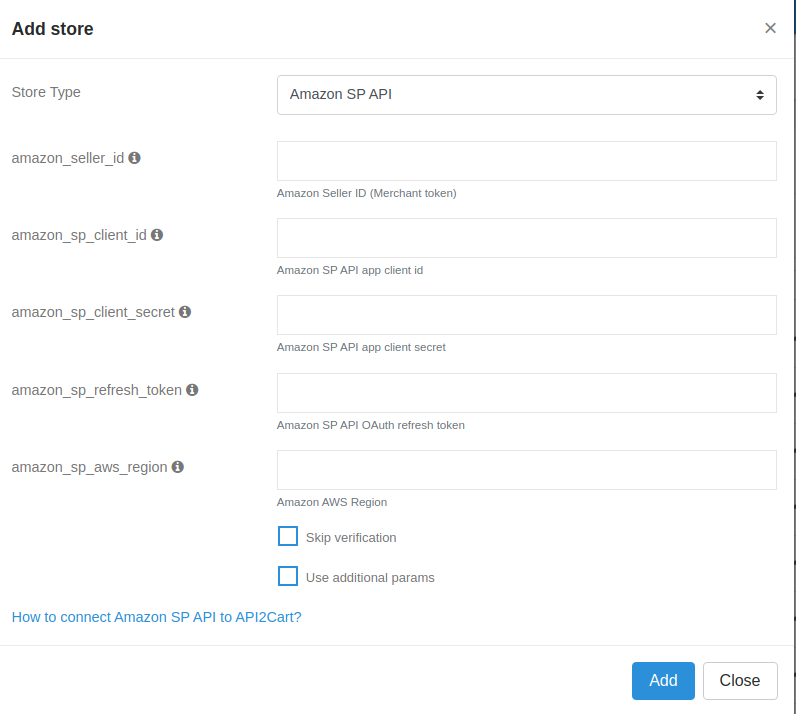
 5. Now, when you have all the necessary credentials, you can add a store in API2Cart.
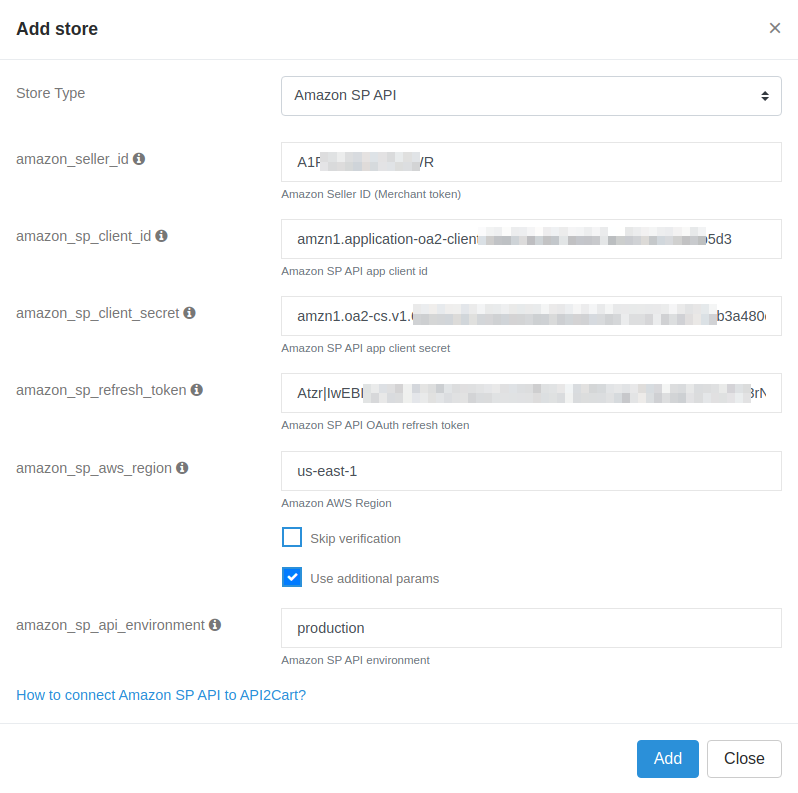 Important details:

To connect CommerceHQ store to API2Cart and start working with the data from it, you need to register a new account.
To add the store built on CommerceHQ, you will need to have the Store URL, commercehq_api_key and commercehq_api_password.
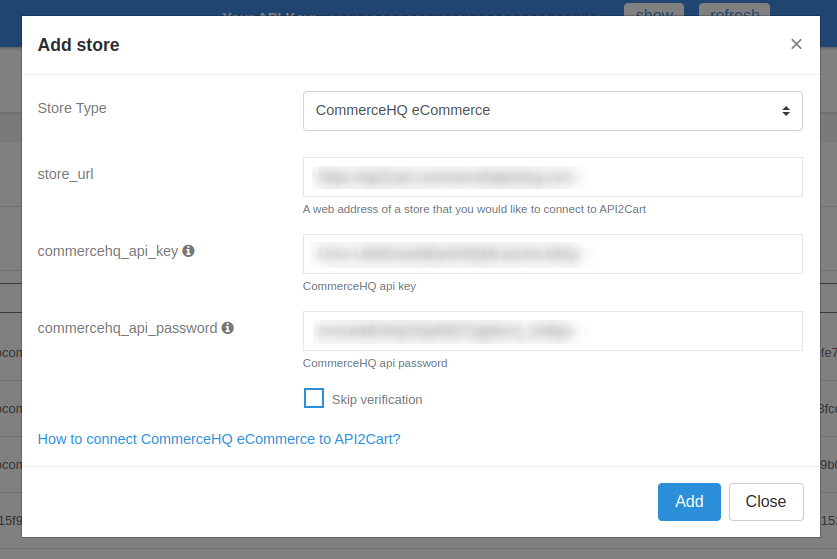
To get commercehq_api_key and commercehq_api_password, you have to create a Private App in CommerceHQ admin panel.
For that go to Dashboard, choose Apps Store in the menu, press the button Add a Private App.
After the creation of Private App, you will see the required data for connecting CommerceHQ store to API2Cart.
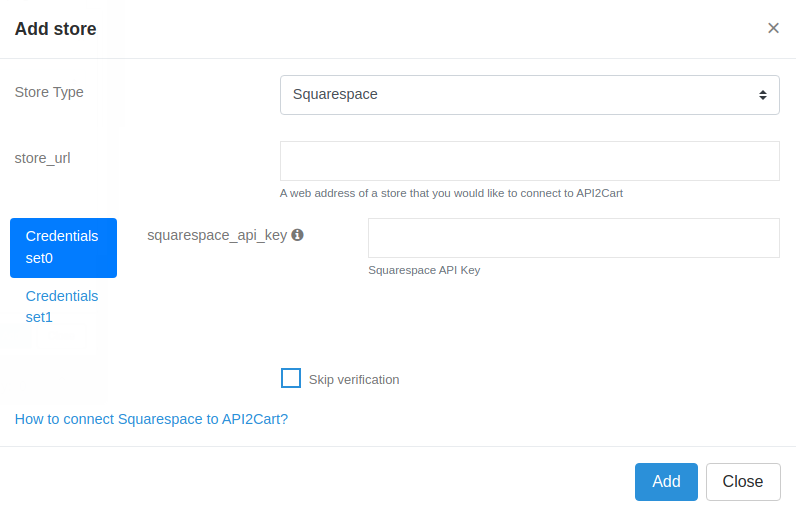
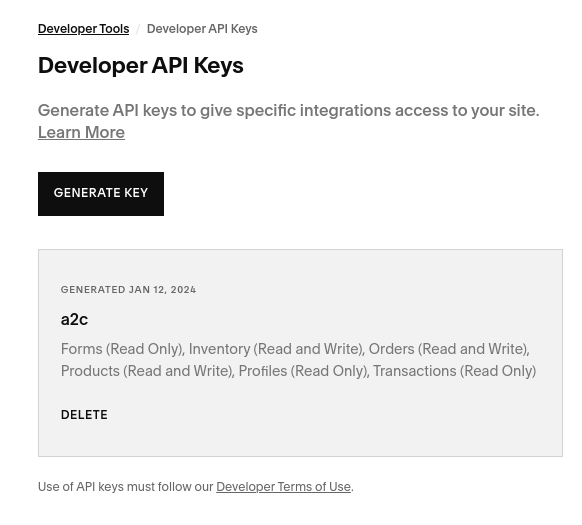
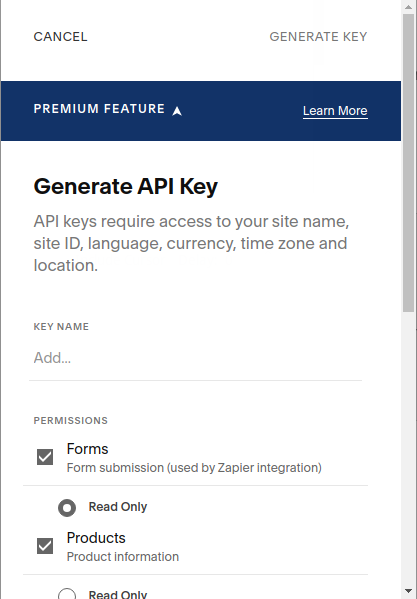
The first method, using the squarespace_api_key parameter, does the following:
It would be best if you went to the Squarespace administrator panel. Click on 'Settings,' select the 'Advanced' option from the menu, click 'Developer API Keys,' and then 'Create Key.'
client_id - obtained in step 1redirect_uri - callback URL for receiving POST requests with datascope - required scopes (e.g., website.orders, website.orders.read, website.transactions.read, website.inventory, website.inventory.read, website.products, website.products.read)state - any value for CSRF protection, to be used in step 3access_type - set as "offline"code, which is needed for the next step.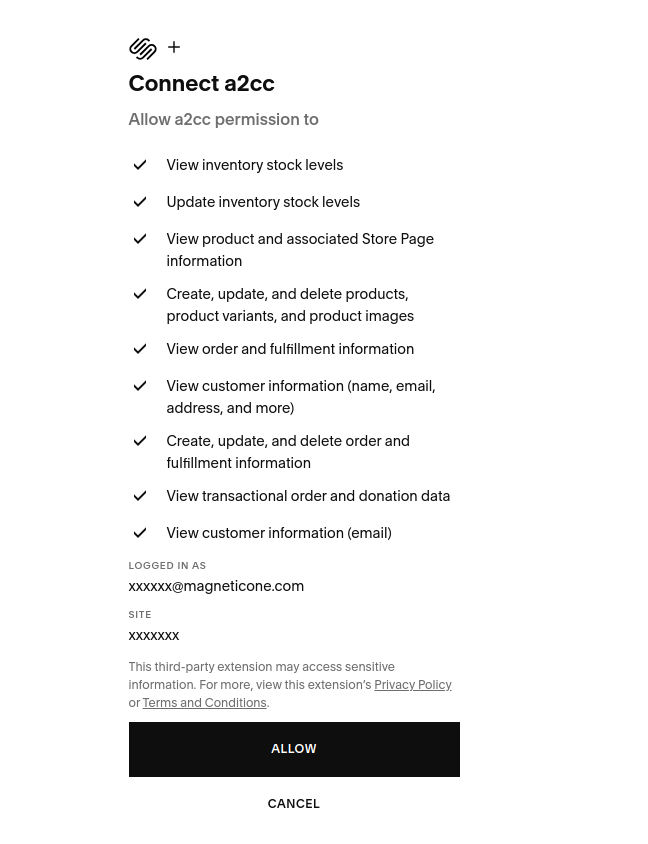
grant_type - set to "authorization_code" for the first request and "refresh_token" for token refreshcode - the value obtained in step 2redirect_uri - the URL to which the request with parameters will be sentrefresh_token - specify the refresh_token in case of token refresh and grant_type=refresh_tokenaccess_token and refresh_token.squarespace_client_id - client_id from step 1squarespace_client_secret - client_secret from step 1squarespace_access_token - access_token from step 3squarespace_refresh_token - refresh_token from step 3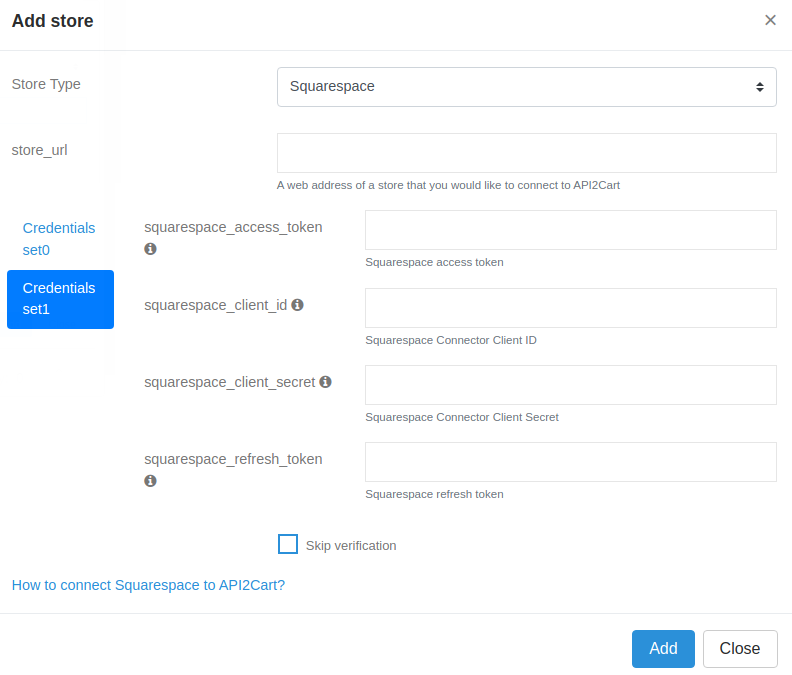
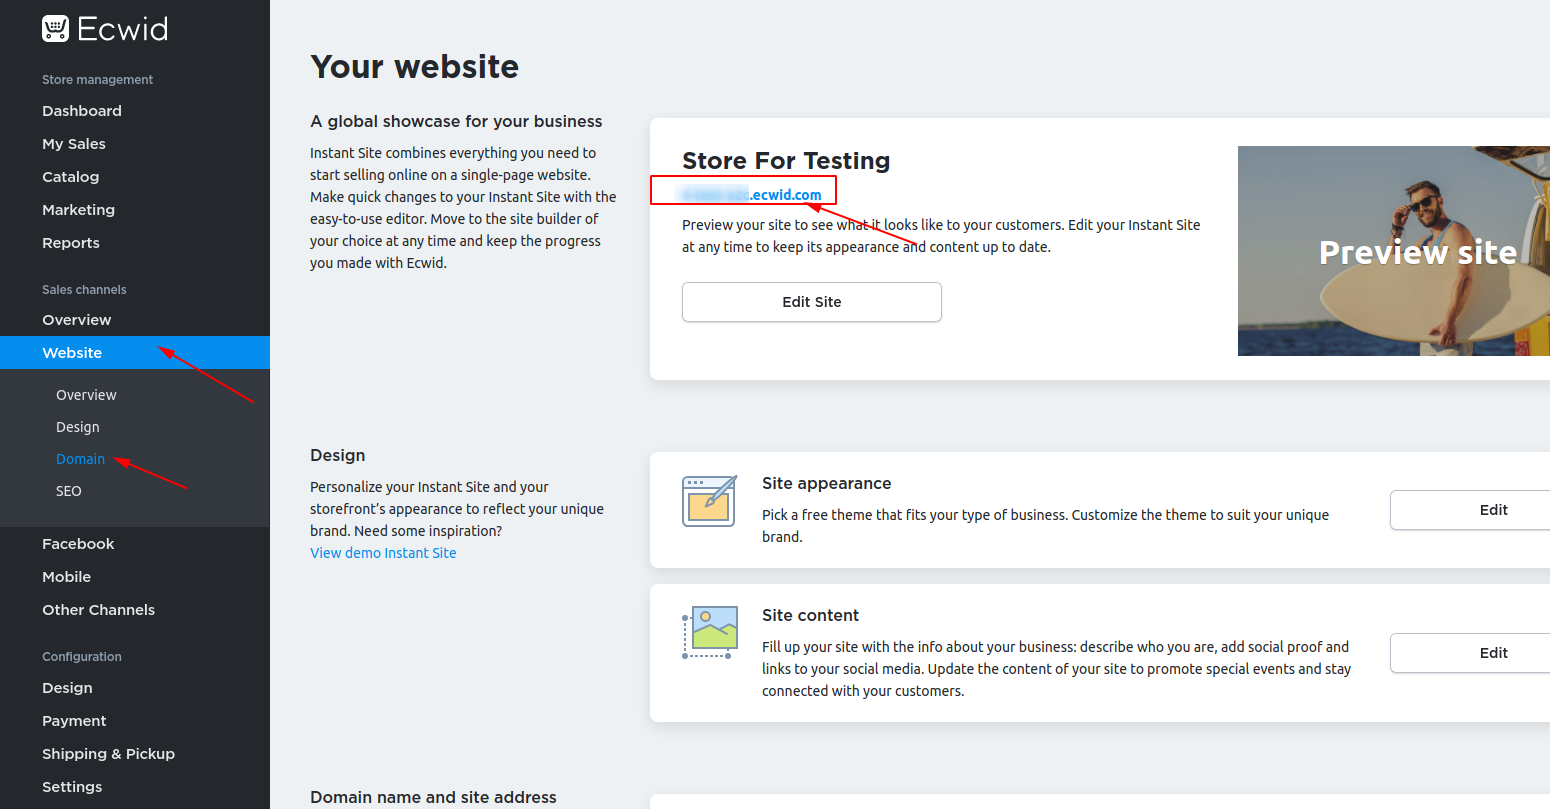
To connect Ecwid store via API2Cart, you need to register and list your branded External APP on Ecwid App Marketplace. It will only serve to receive OAuth Access Token which is later on used to add a store to the API2Cart system.
Find out what you need to register here.
During the registration process, you will need to specify OAuth Scopes - the resources that will be accessed through Ecwid API. That will directly affect which of our methods will work through the Access Token that your App receives.
Why do you need to register your App?
If API2Cart lists its App on the Ecwid marketplace, then the store owner will install the API2Cart App, not yours
Ecwid API works only on a paid subscription. For more details click here.
However, you can specify that you need such an account for testing and the Ecwid team will provide you with a paid account for free for development and testing purposes.
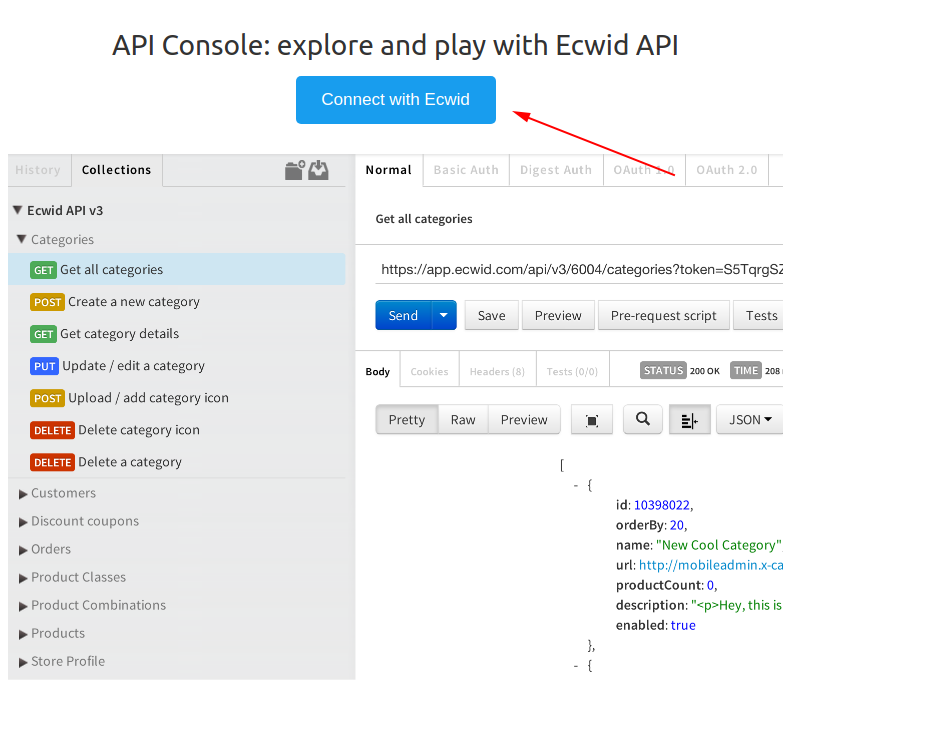
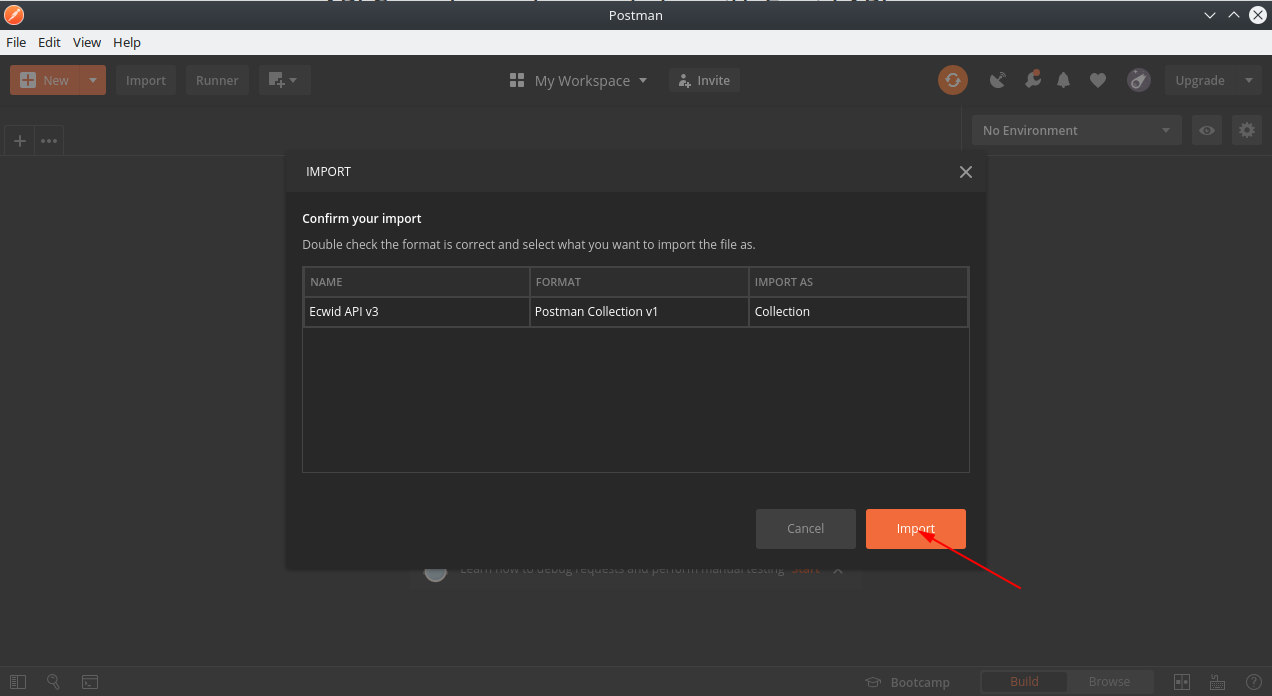
If you have an Ecwid store with a paid subscription, you can get an Access Token without waiting for the approval of your APP. To do this, you need to install the "Play with Ecwid API and Postman" App.

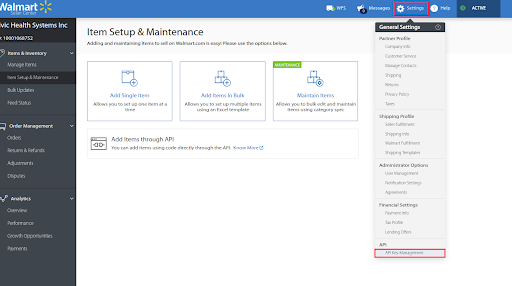
To connect Walmart store you will need:
Log in to the seller account and go to the API Key Management section. (Or you can switch to https://developer.walmart.com/ and log in there under your account).
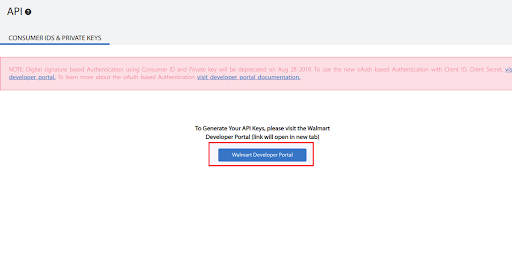
There you can get access to existing keys for production and sandbox environments.

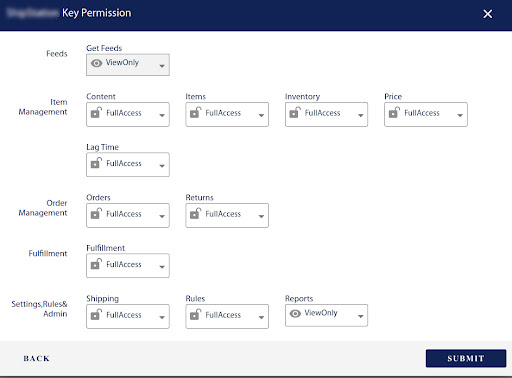
You can also generate a new pair of client id and client secret, providing full access for this key.
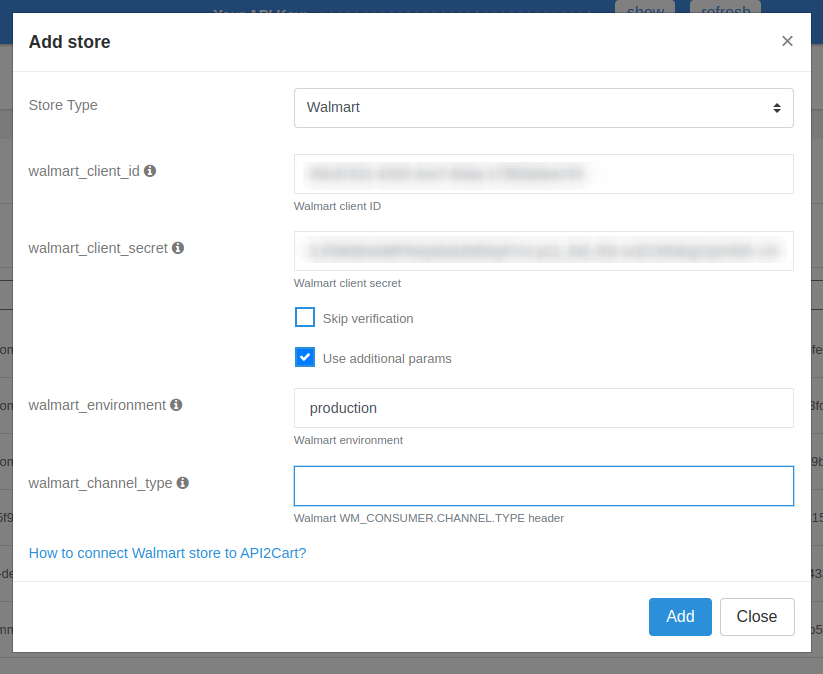
Use Client Id and Client Secret when adding store (walmart_client_id and walmart_client_secret parameters).
Parameter walmart_environment you can leave empty or specify the value production if the production key is used. In case the sandbox key is used be sure to specify the sandbox value for walmart_environment parameter.
This API is no longer supported by Etsy, use Etsy API V3 instead.
To connect Etsy account to API2Cart you’ll need to either:
https://www.etsy.com/developers/register
Once you register an account and you will receive following credentials for your app:
KEYSTRING
SHARED SECRET
Consumer Key - KEYSTRING from step 1
Consumer Secret - SHARED SECRET from step 1
Response body will look like “login_url=URL”
You should urldecode URL and provide it to the account owner.
Using Oauth 1.0 authorization
Consumer Key - KEYSTRING from step 1
Consumer Secret - SHARED SECRET from step 1
Access Token=(oauth_token from URL from step 2)
Token Secret=(oauth_token_secret from URL from step 2)
Verifier=(VERIFICATION CODE from step 2)
Response should look like
oauth_token=<ACCESS TOKEN>&oauth_token_secret=<TOKEN SECRET>

Shared Secret - SHARED SECRET from step 1
Access Token - ACCESS TOKEN from step 4
Secret Token - TOKEN SECRET from step 4
To upload the bridge to Magento Commerce cloud stores and make it available on the URL, the store developer should do the following steps:
1) Add the bridge folder to the project root directory via GIT:

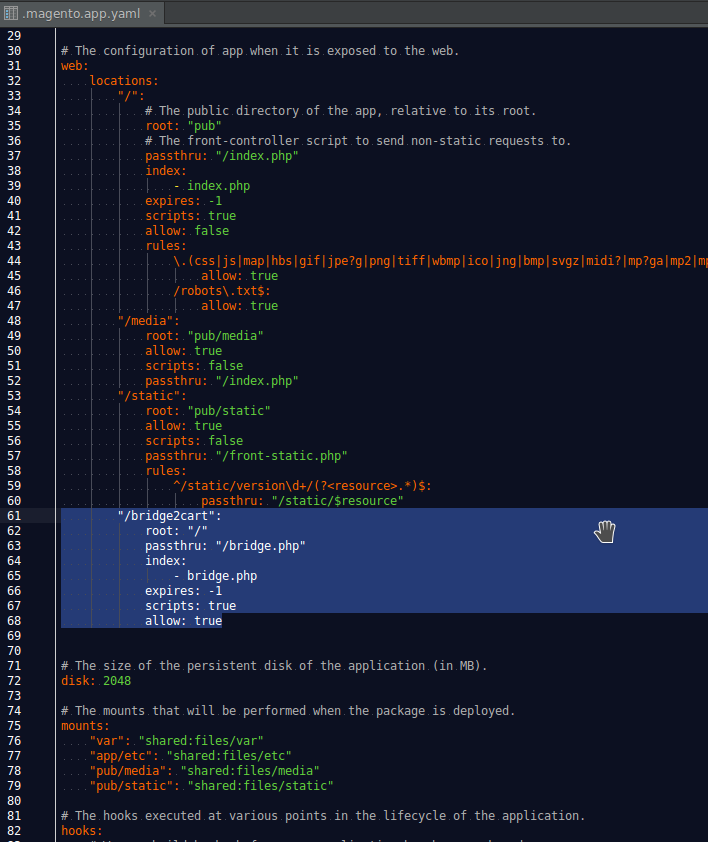
2) Edit the file .magento.app.yaml:
Add the following configurations:
"/bridge2cart":
root: "/"
passthru: "/bridge.php"
index:
bridge.php
expires: -1
scripts: true
allow: true
3) Push changes to the repository and merge them to master.
First, go to the Account Manager page (https://account.demandware.com/dw/account/Home), generate dw_client_id (Client Id) and dw_api_pass (Api Password).
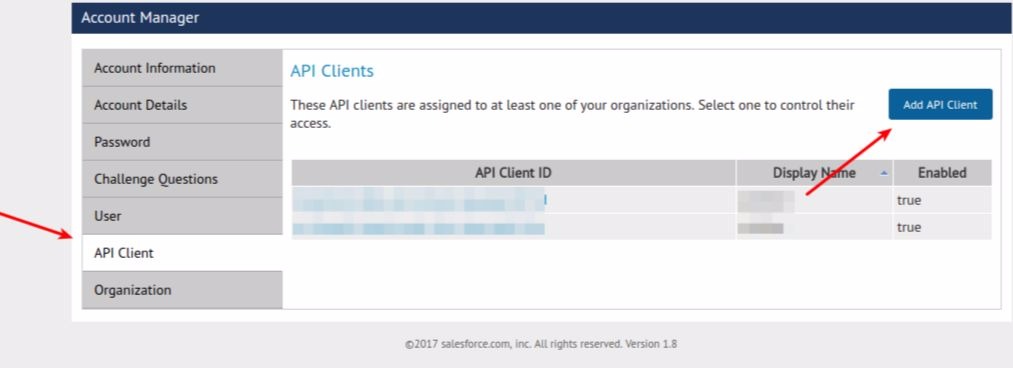
Please provide the API client name and password, and select your organization.
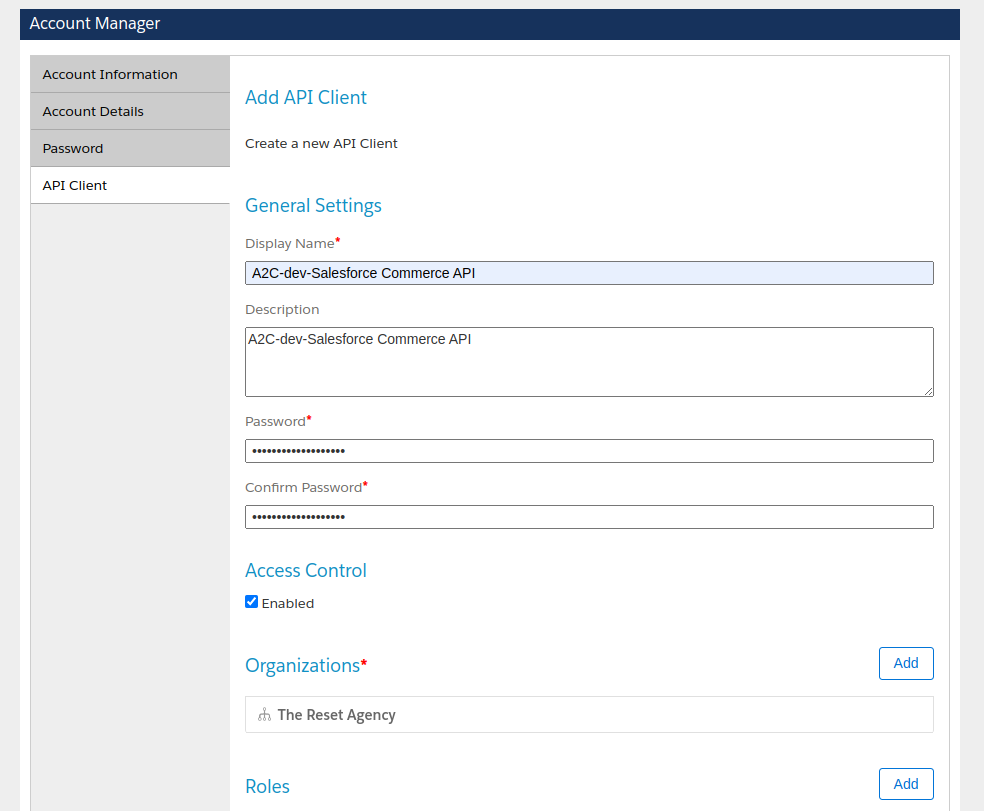
Add the necessary roles for your API client and allowed scopes.
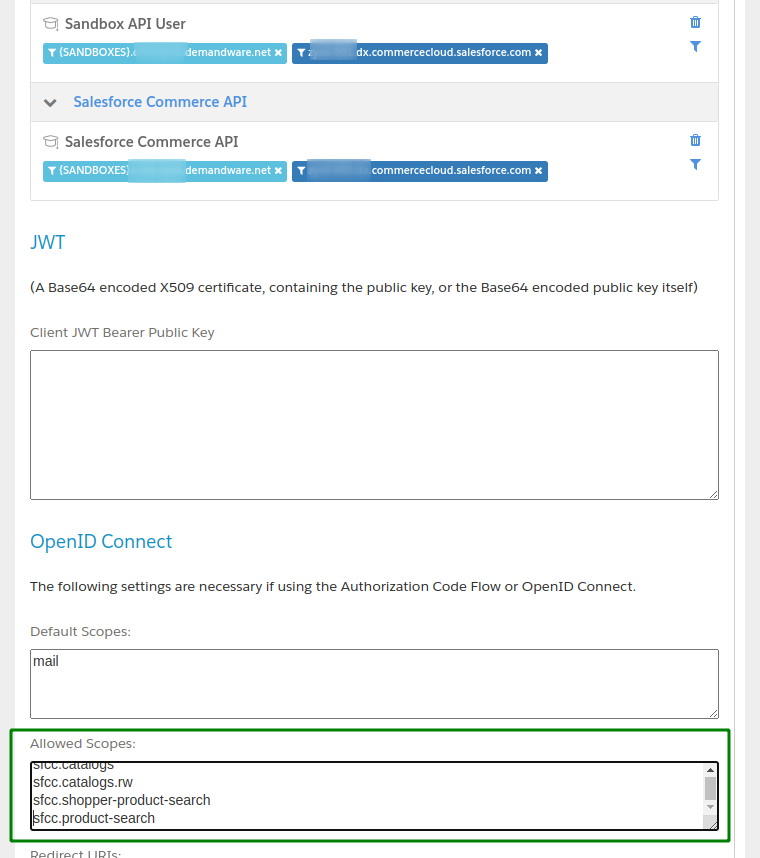
You can find a list of scopes here: https://developer.salesforce.com/docs/commerce/commerce-api/guide/auth-z-scope-catalog
Select "client_secret_post" for the Token Endpoint Auth Method field.
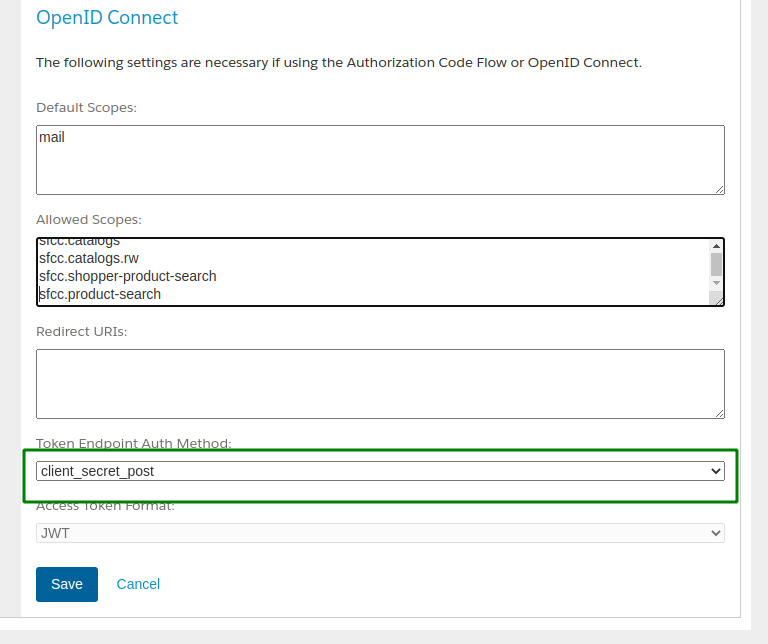
For the Redirect URIs field, specify your Redirect URI.
For a detailed guide on creating an API Сlient in Demandware, you can find it at the following link.
The API Сlient ID and password created during setup will be used as parameters "demandware_client_id" and "demandware_api_password" when adding a store on Api2Cart.
Then, add permissions for API2Cart API, so that our API could retrieve data from the store. Go to your Admin panel: Administration > Open Commerce API Setting > Select type: Shop & Data > Select context: Global

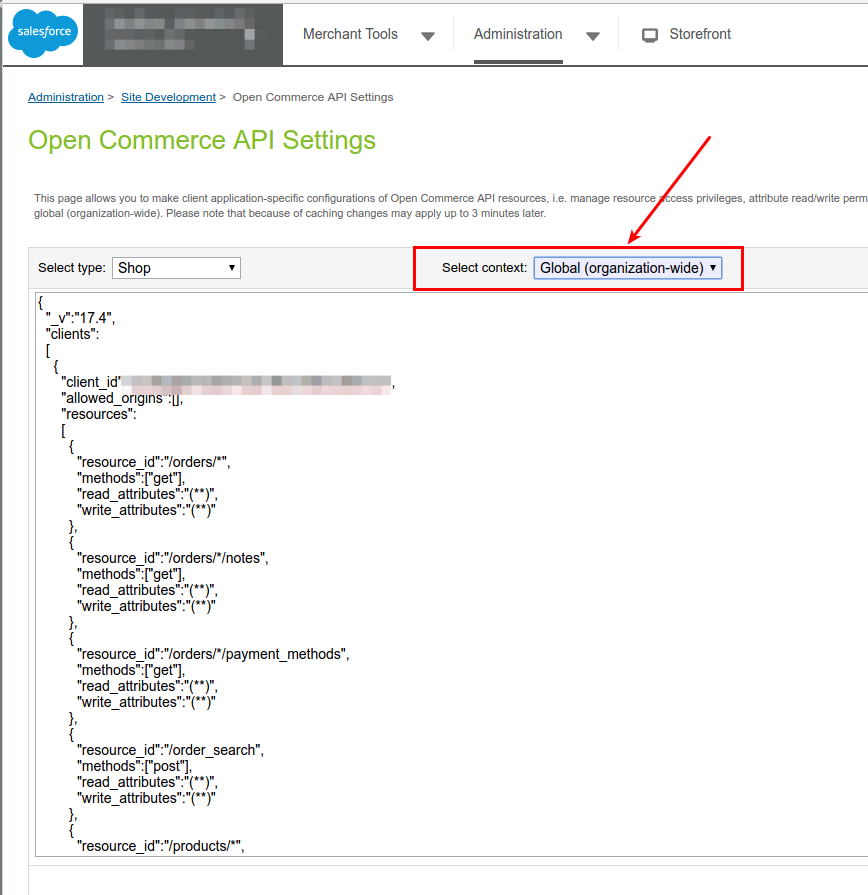
Then, specify client application-specific configurations:
Global permissions
  {
    "_v":"22.6",
    "clients":[
       {
          "client_id":"YOUR_CLIENT_ID",
          "allowed_origins": [

          ],
          "resources":[
             {
                "resource_id":"/products/*/prices",
                "methods":["get"],
                "read_attributes":"(**)",
                "write_attributes":"(**)",
                "config":{
                   "product.prices.price_book_ids":"PRICE_BOOK_ID_1,PRICE_BOOK_ID_2,...,PRICE_BOOK_ID_N"
                }
             },
             {
                "resource_id":"/**",
                "methods":[
                   "put",
                   "get",
                   "post",
                   "patch"
                ],
                "read_attributes":"(**)",
                "write_attributes":"(**)"
             }
          ]
       }
    ]
  }
Or per resource permissions
  {
  "_v": "22.6",
  "clients": [
    {
      "client_id": "YOUR_CLIENT_ID",
      "allowed_origins": [],
      "resources": [
        {
          "resource_id": "/products/*/prices",
          "methods": [ "get" ],
          "read_attributes": "(**)",
          "write_attributes": "(**)",
          "cache_time": 0,
          "config": {
             "_comment": "Add a comma-separated list of the price book ids currently active in the organization",
             "product.prices.price_book_ids": "REPLACE_ME_WITH_PRICE_BOOK_IDS"
          }
        },
        {
          "resource_id": "/baskets",
          "methods": [ "post" ],
          "read_attributes": "(**)",
          "write_attributes": "(**)"
        },
        {
          "resource_id": "/baskets/*",
          "methods": [ "get", "patch", "delete" ],
          "read_attributes": "(**)",
          "write_attributes": "(**)"
        },
        {
          "resource_id": "/baskets/*/billing_address",
          "methods": [ "put" ],
          "read_attributes": "(**)",
          "write_attributes": "(**)"
        },
        {
          "resource_id": "/baskets/*/coupons",
          "methods": [ "post" ],
          "read_attributes": "(**)",
          "write_attributes": "(**)"
        },
        {
          "resource_id": "/baskets/*/coupons/*",
          "methods": [ "delete" ],
          "read_attributes": "(**)",
          "write_attributes": "(**)"
        },
        {
          "resource_id": "/baskets/*/customer",
          "methods": [ "put" ],
          "read_attributes": "(**)",
          "write_attributes": "(**)"
        },
        {
          "resource_id": "/baskets/*/gift_certificate_items",
          "methods": [ "post" ],
          "read_attributes": "(**)",
          "write_attributes": "(**)"
        },
        {
          "resource_id": "/baskets/*/items",
          "methods": [ "post" ],
          "read_attributes": "(**)",
          "write_attributes": "(**)"
        },
        {
          "resource_id": "/baskets/*/items/*",
          "methods": [ "patch", "delete" ],
          "read_attributes": "(**)",
          "write_attributes": "(**)"
        },
        {
          "resource_id": "/baskets/*/notes",
          "methods": [ "post", "get" ],
          "read_attributes": "(**)",
          "write_attributes": "(**)"
        },
        {
          "resource_id": "/baskets/*/payment_instruments",
          "methods": [ "post" ],
          "read_attributes": "(**)",
          "write_attributes": "(**)"
        },
        {
          "resource_id": "/baskets/*/payment_instruments/*",
          "methods": [ "patch", "delete" ],
          "read_attributes": "(**)",
          "write_attributes": "(**)"
        },
        {
          "resource_id": "/baskets/*/payment_methods",
          "methods": [ "get" ],
          "read_attributes": "(**)",
          "write_attributes": "(**)"
        },
        {
          "resource_id": "/baskets/*/shipments",
          "methods": [ "post" ],
          "read_attributes": "(**)",
          "write_attributes": "(**)"
        },
        {
          "resource_id": "/baskets/*/shipments/*",
          "methods": [ "patch" ],
          "read_attributes": "(**)",
          "write_attributes": "(**)"
        },
        {
          "resource_id": "/baskets/*/shipments/*/shipping_address",
          "methods": [ "put" ],
          "read_attributes": "(**)",
          "write_attributes": "(**)"
        },
        {
          "resource_id": "/baskets/*/shipments/*/shipping_method",
          "methods": [ "put" ],
          "read_attributes": "(**)",
          "write_attributes": "(**)"
        },
        {
          "resource_id": "/baskets/*/shipments/*/shipping_methods",
          "methods": [ "get" ],
          "read_attributes": "(**)",
          "write_attributes": "(**)"
        },
        {
          "resource_id": "/baskets/*",
          "methods": [ "post" ],
          "read_attributes": "(**)",
          "write_attributes": "(**)"
        },
        {
          "resource_id": "/customers",
          "methods": [ "post" ],
          "read_attributes": "(**)",
          "write_attributes": "(**)"
        },
        {
          "resource_id": "/customers/auth",
          "methods": [ "post" ],
          "read_attributes": "(**)",
          "write_attributes": "(**)"
        },
        {
          "resource_id": "/customers/password_reset",
          "methods": [ "post" ],
          "read_attributes": "(**)",
          "write_attributes": "(**)"
        },
        {
          "resource_id": "/customers/*",
          "methods": [ "get", "patch" ],
          "read_attributes": "(**)",
          "write_attributes": "(**)"
        },
        {
          "resource_id": "/customers/*/addresses",
          "methods": [ "get", "post" ],
          "read_attributes": "(**)",
          "write_attributes": "(**)"
        },
        {
          "resource_id": "/customers/*/addresses/*",
          "methods": [ "get", "patch", "delete" ],
          "read_attributes": "(**)",
          "write_attributes": "(**)"
        },
        {
          "resource_id": "/customers/*/baskets",
          "methods": [ "get" ],
          "read_attributes": "(**)",
          "write_attributes": "(**)"
        },
        {
          "resource_id": "/customers/*/orders",
          "methods": [ "get" ],
          "read_attributes": "(**)",
          "write_attributes": "(**)"
        },
        {
          "resource_id": "/customers/*/password",
          "methods": [ "put" ],
          "read_attributes": "(**)",
          "write_attributes": "(**)"
        },
        {
          "resource_id": "/customers/*/payment_instruments",
          "methods": [ "get", "post" ],
          "read_attributes": "(**)",
          "write_attributes": "(**)"
        },
        {
          "resource_id": "/customers/*/payment_instruments/*",
          "methods": [ "get", "delete" ],
          "read_attributes": "(**)",
          "write_attributes": "(**)"
        },
        {
          "resource_id": "/orders",
          "methods": [ "post" ],
          "read_attributes": "(**)",
          "write_attributes": "(**)"
        },
        {
          "resource_id": "/orders/*",
          "methods": [ "get", "patch" ],
          "read_attributes": "(**)",
          "write_attributes": "(**)"
        },
        {
          "resource_id": "/orders/*/notes",
          "methods": [ "get", "post" ],
          "read_attributes": "(**)",
          "write_attributes": "(**)"
        },
        {
          "resource_id": "/orders/*/payment_methods",
          "methods": [ "get" ],
          "read_attributes": "(**)",
          "write_attributes": "(**)"
        },
        {
          "resource_id": "/orders/*/payment_instruments",
          "methods": [ "post" ],
          "read_attributes": "(**)",
          "write_attributes": "(**)"
        },
        {
          "resource_id": "/order_search",
          "methods": [ "post" ],
          "read_attributes": "(**)",
          "write_attributes": "(**)"
        },
        {
          "resource_id": "/products/*",
          "methods": [ "get" ],
          "read_attributes": "(**)",
          "write_attributes": "(**)"
        },
        {
          "resource_id": "/products/*/availability",
          "methods": [ "get" ],
          "read_attributes": "(**)",
          "write_attributes": "(**)",
          "cache_time": 0
        },
        {
          "resource_id": "/site",
          "methods": [ "get" ],
          "read_attributes": "(**)",
          "write_attributes": "(**)"
        },
        {
          "resource_id": "/categories/*",
          "methods": [ "get" ],
          "read_attributes": "(**)",
          "write_attributes": "(**)"
        }
      ]
    }
  ]
}
Global permissions
{
  "_v":"22.6",
  "clients":[
     {
        "client_id":"YOUR_CLIENT_ID",
        "resources":[
           {
              "resource_id":"/**",
              "methods":[
                 "put",
                 "get",
                 "post",
                 "patch"
              ],
              "read_attributes":"(**)",
              "write_attributes":"(**)"
           }
        ]
     }
  ]
}
Or per resource permissions
      {
  "_v": "22.6",
  "clients": [
    {
      "client_id": "YOUR_CLIENT_ID",
      "resources": [
        {
          "resource_id": "/sites",
          "methods": [
            "get"
          ],
          "read_attributes": "(**)",
          "write_attributes": "(**)"
        },
        {
          "resource_id": "/sites/**",
          "methods": [
            "get"
          ],
          "read_attributes": "(**)",
          "write_attributes": "(**)"
        },
        {
          "resource_id": "/catalog_search",
          "methods": [
            "post"
          ],
          "read_attributes": "(**)",
          "write_attributes": "(**)"
        },
        {
          "resource_id": "/product_search",
          "methods": [
            "post"
          ],
          "read_attributes": "(**)",
          "write_attributes": "(**)"
        },
        {
          "resource_id": "/products/*",
          "methods": [
            "get",
            "patch"
          ],
          "read_attributes": "(**)",
          "write_attributes": "(**)"
        },
        {
          "resource_id": "/products/*/variant_search",
          "methods": [
            "post"
          ],
          "read_attributes": "(**)",
          "write_attributes": "(**)"
        },
        {
          "resource_id": "/products/*/variations",
          "methods": [
            "get"
          ],
          "read_attributes": "(**)",
          "write_attributes": "(**)"
        },
        {
          "resource_id": "/products/*/variation_attributes",
          "methods": [
            "get"
          ],
          "read_attributes": "(**)",
          "write_attributes": "(**)"
        },
        {
          "resource_id": "/customer_lists/**",
          "methods": [
            "get",
            "post"
          ],
          "read_attributes": "(**)",
          "write_attributes": "(**)"
        },
        {
          "resource_id": "/inventory_lists/*",
          "methods": ["patch"],
          "read_attributes": "(**)",
          "write_attributes": "(**)"
        },
        {
          "resource_id": "/inventory_lists/*/product_inventory_records/*",
          "methods": ["patch", "put", "get"],
          "read_attributes": "(**)",
          "write_attributes": "(**)"
        },
        {
           "resource_id":"/system_object_definitions/**",
           "methods":["get", "put" , "patch", "post", "delete"],
           "read_attributes":"(**)",
           "write_attributes":"(**)"
        }
      ]
    }
  ]
}
The installation process will begin and show a message when it’s finished. You can optionally click on “Refresh” button to see whether the extension is installed or not.
The page will reload, and you should see the new module in a list of your modules.
After a successful installation, in the "Add-ons" page you will see the API2Cart plugin.
Categories API methods allow you to manage categories in the store. It is possible to:
Run category.add method, to add customers to the store, and provide all necessary parameters.
public function apiAdd($params)
{
  $params = array(
    'name' => 'Shoes'
  );

  return $api->request('category.add', $params);
}
If you want to update the category, call category.list method to get category id.
public function apiList($params)
{
  $params = array(
    'start'  => 2,
    'count'  => 2,
  );

  return $api->request('category.list', $params);
}
When you get your category id, you are able to perform category.update method.
public function apiUpdate($params)
{
  $params = array(
    'id'         => 20,
    'avail'      => 'false',
    'meta_title' => 'meta title for category'
  );

  return $api->request('category.update', $params);
}
If you want to assign your product to some category, simply call product.list method and category.list method to get product id and category id.
After that, run category.assign method.
public function apiAssign($params)
{
  $params = array(
    'product_id'     => 69,
    'category_id'    => 20,
  );

  return $api->request('category.assign', $params);
}
For more methods jump into documentation.
Customer API methods allow you to manage customers in the store. It is possible to:
Run customer.add method, to add customers to the store, and provide all necessary parameters.
public function apiAdd($params)
{
  $params = array(
    'email'      => '[email protected]',
    'first_name' => 'John',
    'last_name'  => 'Smith',
  );

  return $api->request('customer.add', $params);
}
If you want to update the customer, call customer.list method to retrieve customer id.
public function apiList($params)
{
  $params = array(
    'start' => 0,
    'count' => 5
  );

  return $api->request('customer.list', $params);
}
When you get your customer id, you are able to perform customer.update method.
public function apiUpdate($params)
{
  $params = array(
    'id'         => 11,
    'first_name' => 'Jack',
    'last_name'  => 'Smith',
  );

  return $api->request('customer.update', $params);
}
For more methods jump into documentation.
Order API methods allow you to manage orders in the store. It is possible to:
Run order.add method to add orders to the store, and provide all necessary parameters.
public function apiAdd($params)
{
  $params = array(
    'customer_email'         => '[email protected]',
    'order_status'           => 'Complete',
    'bill_first_name'        => 'Adam',
    'bill_last_name'         => 'Smith',
    'bill_address_1'         => 'Green str. 35',
    'bill_city'              => 'Chicago',
    'bill_postcode'          => '12345',
    'bill_state'             => 'IL',
    'bill_country'           => 'US',
    'total_price'            => '23.56',
    'order_item_id_1'        => 8,
    'order_item_name_1'      => 'Bag',
    'order_item_model_1'     => 'bag_01',
    'order_item_price_1'     => 89,
    'order_item_quantity_1'  => 3,
  );

  return = $api->request('order.add', $params);
}
If you want to update an order, call order.list method to get order id.
public function apiList($params)
{
  $params = array(
    'start'  => 0,
    'count'  => 5,
    'params' => 'id,customer,status'
  );

  return $api->request('order.list', $params);
}
When you get your order id, you are able to update comment and order status by calling order.update method
public function apiUpdate($params)
{
  $params = array(
    'order_id'     => 11,
    'order_status' => 'Pending',
    'comment'      => 'Order comment'
  );

  return $api->request('order.update', $params);//returns the number of updated orders
}
Note: You are able to count orders in the store by calling order.count method.
For more methods jump into documentation.
Product API methods allow you to manage products in the store. It is possible to:
Run product.add method, in order to add new products to the store, and provide all necessary parameters.
public function apiAdd($params)
{
  $params = array(
    'name'        => 'Bag',
    'model'       => 'bag_01',
    'description' => 'This is new product',
    'price'       => 99.9,
    'quantity'    => 12,
    'manufacturer'=> 'Test',
  );

  return $api->request('product.add', $params);
}
Note: You may add image, tax, manufacturer, option, variant or other info to the product by calling these methods: product.image.add, product.variant.add, product.manufacturer.add, product.tax.add, product.option.add, product.option.value.add, product.option.assign, product.option.value.assign
For more methods jump into documentation.
If you want to update the product, call product.list method to retrieve product id.
public function apiList($params)
{
  $params = array(
    'start'  => 0,
    'count'  => 50,
    'params' => 'id,name,price',
  );

  return $api->request('product.list', $params);
}
When you get product id, you are able to update price and inventory(quantity) for this product, simply calling product.update method.
public function apiUpdate($params)
{
  $params = array(
    'id' => 69,
    'price' => 89,
  );

  return $api->request('product.update', $params);
}
Note: You may update variant, image and product option value by calling the following methods: product.variant.update, product.image.update, product.option.value.update
For more API methods visit our documentation.
The process of connecting the store to API2Cart depends on the type of shopping cart. There are two major types: Hosted (3dcart, Volusion, Shopify) and Open-source (PrestaShop, WooCommerce, OpenCart, etc.) Get the type of carts here.
For Hosted Carts
You are able to add your stores in 2 ways:
public function apiCreate()
{
  $params = array(
    'cart_id'      => 'BigcommerceApi',
    'store_url'    => 'https://example.com',
    'verify'       => 'false',//set this param=false for test only
    'store_key'    => 'ab37fc230bc5df63a5be1b11220949be',//for self-hosted cart only
    'AdminAccount' => 'admin',
    'ApiPath'      => 'https://example.com/api/v1',
    'ApiKey'       => '6b89704cd75738cb0f9f6468d5462aba',
  );

  return $api->request('account.cart.add', $params);
}
Note: Store key is generated automatically for hosted carts (Shopify, Bigcommerce, Volusion, etc.)
For Open-source Carts.
When talking about Open-source platforms, it’s worth mentioning that API2Cart connects to such type of solutions through connection bridge.
You are able to add your stores in 2 ways:
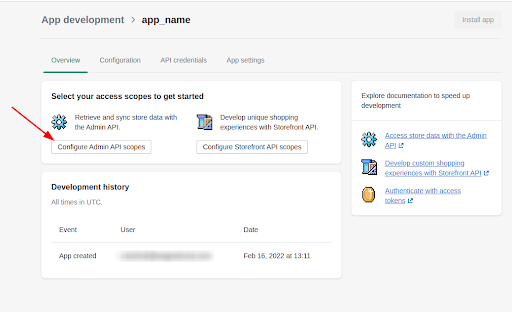
To connect Shopify store to API2Cart you need to specify the following credentials:
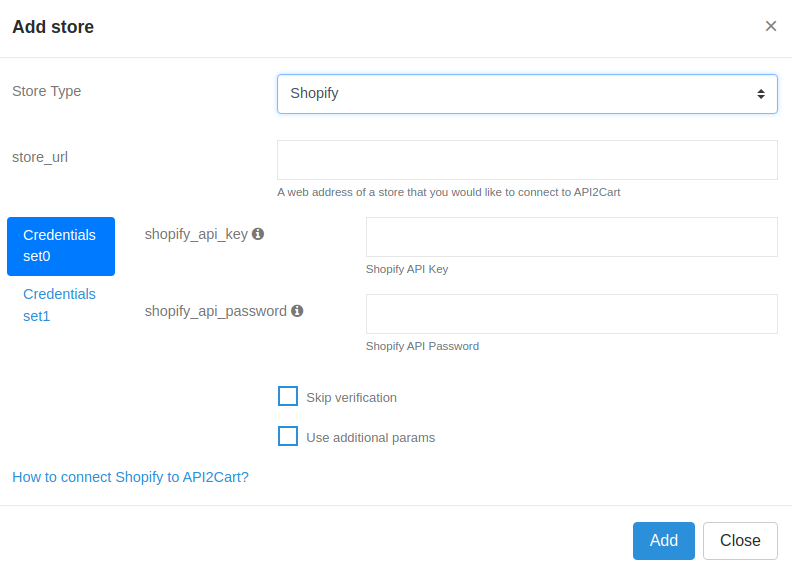
Required credentials:
Note. Private apps are deprecated and can`t be created as of January 2022. Custom apps are used instead
To receive shopify_access_token you need to create a Custom app. There are 2 ways:

Let's consider the 2nd way.
In Shopify admin
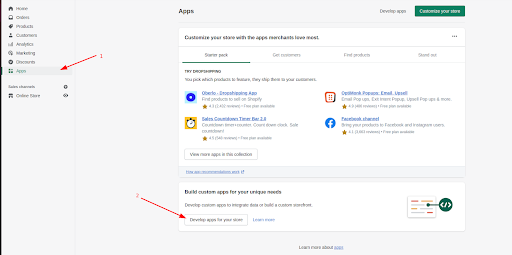
Open Apps section and press Develop apps for your store.
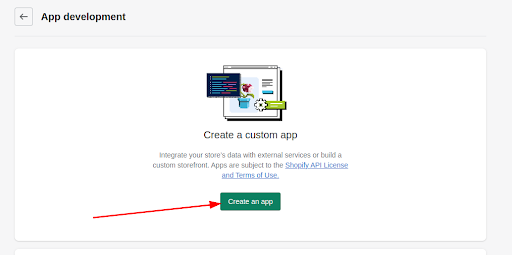
Press Allow custom app development.


Next step - Create Custom app.
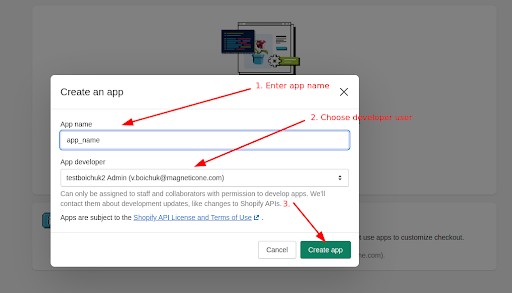
Choose scopes and permissions to the store data.
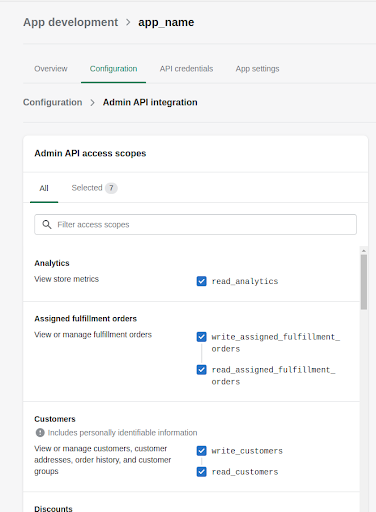
Webhook Subscriptions Event version - leave without any changes.
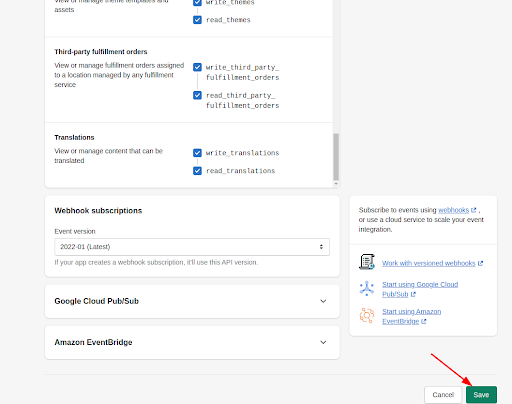
Next, open Overview tab and Install the app.
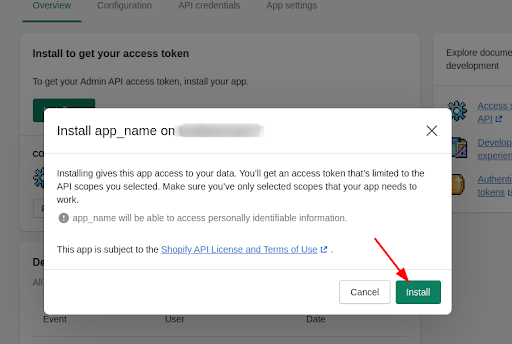
Access token and shared secret will be available in API credentials section.
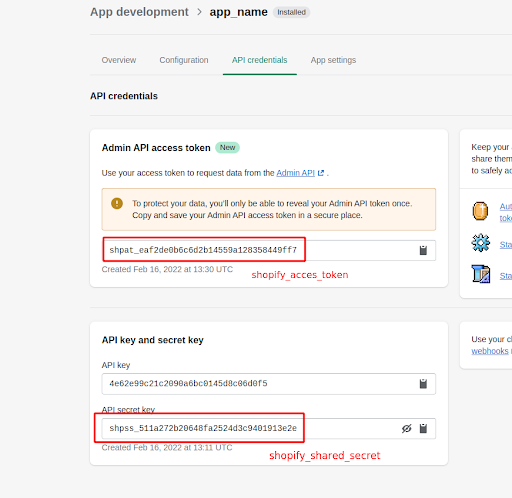
Please note that Access token could be seen just once. If you lose it you will need to create another App.
Use needed credentials to connect the store.
You can find additional information in Shopify guide.
https://shopify.dev/apps/auth/admin-app-access-tokens.
If you are interested in oAuth authorization proceed with the first way via Partner dashboard. Here is a Shopify guide https://shopify.dev/apps/auth/oauth/getting-started .
1. Log into the store.
2. Copy store URL from your browser address bar.
3. Go to Advanced Settings.
4. Click API Accounts.
5. Click Create API Account.
6. Type the name of the user in the Username box.
7. There you will find API Path box. Copy the part of the value that placed between api.bigcommerce.com and /v3/ as shown.
8. Click Content - modify, Checkout Content - modify, Customers - modify, Customers Login - login, Information Settings - modify, Marketing - modify, Orders - modify, Order Transactions - modify, Products - modify, Themes - modify, Carts - modify.
9. Click the Save button. There will appear a window BigCommerce API Credential with Client ID and Access Token.
10. Add BigCommerce store to your API2Cart account, using credential you've got in steps 2, 7 and 9.
This API is no longer supported by 3DCart, use Shift4Shop instead.
When signing up for API2Cart account, you are asked to provide name, e-mail address, password.
When adding a new store, you are asked to provide API key and store URLs. You may also be asked to provide your direct database connection to speed up the process. We take appropriate security measures to protect your information. Find out more about our Privacy Policy.
In most cases the system automatically defines the prefix of specific shopping cart and uses it. However if you have several shopping carts of one type, the automatic defining will not work. In this case you should use the method account.cart.add and define the prefix of your shopping cart with a parameter db_tables_prefix.
In order to see all additional parameters that are unique for your shopping cart, call product.list API method with the params=force_all parameter. Or set the necessary fields separated by comma in parameter "params" (params=length,depth).
See the full list below (in alphabetic order):
| 3dcart | API Key |
| Amazon | MWS Auth Token, Seller ID, Marketplace IDs, Secret Key, Access Key ID |
| AceShop | Bridge files uploaded to store folder |
| AspDotNetStorefront | Admin User and Password |
| Bigcommerce | Client ID, Access Token, Context |
| CS-Cart | Bridge files uploaded to store folder / plugin |
| CubeCart | Bridge files uploaded to store folder |
| Demandware | API Client ID, API Password, User Name, User Password, Environment Type |
| Ebay | App ID, Shared Secret, Refreshed Token, Environment, Global ID |
| Ecwid | Store ID, Access Token |
| Etsy | KeyString, Shared Secret, Access Token, Secret Token |
| Gambio | Bridge files uploaded to store folder |
| Hybris | Client ID, Client Secret, User Name, User Password |
| Interspire | Bridge files uploaded to store folder |
| JooCart | Bridge files uploaded to store folder |
| LightSpeed eCommerce | API Key, API Secret |
| Loaded Commerce | Bridge files uploaded to store folder |
| Magento | Bridge files uploaded to store folder / plugin |
| MijoShop | Bridge files uploaded to store folder |
| Neto | API Key, User Name |
| OpenCart | Bridge files uploaded to store folder |
| osCMax | Bridge files uploaded to store folder |
| osCommerce | Bridge files uploaded to store folder |
| Oxid | Bridge files uploaded to store folder |
| Pinnacle Cart | Bridge files uploaded to store folder |
| PrestaShop | Bridge files uploaded to store folder / plugin |
| Shop-Script Premium | Bridge files uploaded to store folder |
| Shopify | API Key, API Password, Access Token, Shared Secret |
| Shopware | Bridge files uploaded to store folder |
| Squarespace | API Key |
| TomatoCart | Bridge files uploaded to store folder |
| Ubercart | Bridge files uploaded to store folder |
| VirtueMart | Bridge files uploaded to store folder |
| Volusion | Login and API Password |
| Walmart | Client ID, Client Secret |
| WooCommerce | Bridge files uploaded to store folder / plugin |
| WebAsyst Shop-Script | Bridge files uploaded to store folder |
| WPEcommerce | Bridge files uploaded to store folder |
| XCart | Bridge files uploaded to store folder |
| Xtcommerce | Bridge files uploaded to store folder |
| Xtcommerce Veyton | Bridge files uploaded to store folder |
| Zencart | Bridge files uploaded to store folder |
For more information about how to get your API Key/Token follow this link.
It is one of the FTP parameters that defines a precise store location at the host.
You do not need to pay VAT if you are a business with a valid VAT ID. To avoid being charged VAT, enter your VAT id in the corresponding field. If you have paid the VAT, send an e-mail to [email protected] with your order id and VAT id specified. Our accounting department will refund you the VAT.
Please note that private individuals cannot have VAT refunded. Provide the legal body details when making the payment to avoid being charged VAT.
According to international rules, every API2Cart account refill is accompanied with tax collection. To be more specific, PayPro, the company handling taxes from API2Cart, collects VAT from Canada and EU countries.
For EU, VAT is collected according to the international rules of VAT and then sent to the state the purchaser is from.
For Canada, the GST/HST is collected and paid to the Government of Canada. However, according to the Canadian law, you can get a compensation from the State by providing GST number of the company receiving the payment, i.e. API2Cart. Please, contact our support team via a chat or email ([email protected]) to request the GST number.
Every EU country has its specific VAT percentage that can be seen after the country is chosen. You do not need to pay VAT if you are a business with a valid VAT ID. If you have paid the vat, provide us with your valid VAT id and our accounting department will refund you the VAT. Private individuals cannot have VAT refunded.
Fixed VAT is collected with each recurring payment. Here you can find more information about VAT rates for different countries. The residences of the countries not included into the list won’t be charged while refilling API2Cart account. After each successful payment, PayPro is sending an invoice to the customers email indicated on the order page.
Find out how to avoid paying VAT.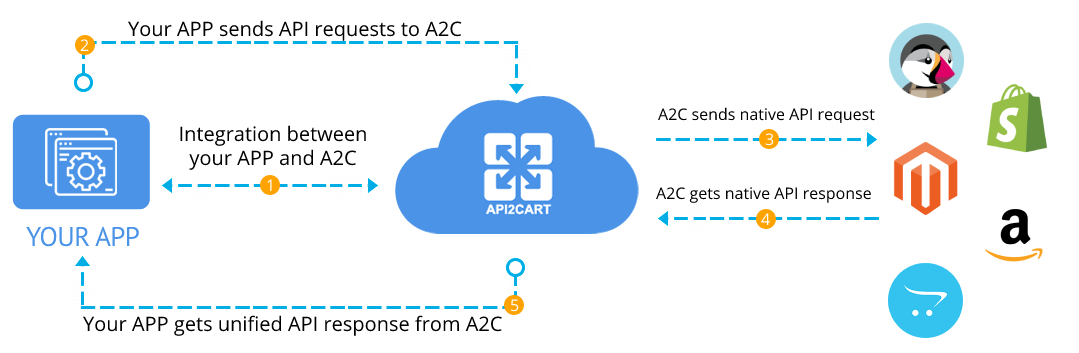
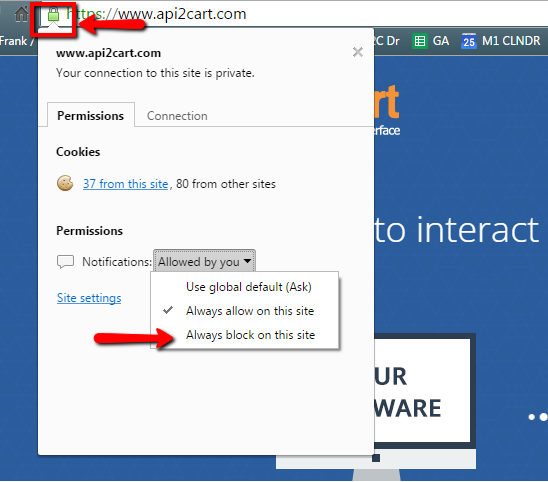
You can disable automatic notifications from API2Cart in the two different ways:
API2Cart service takes serious measures to protect our clients personal and store information.
Sensitive data is protected from unauthorized access. We guarantee not to share your personal account data and keep it confidential. Terms of service security and information protection are provided by our Privacy Policy.
Bridge file. To be able to work with some shopping platforms, it is necessary to install the connection bridge to the store’s root folder. The list of all the platforms that require the bridge installing you can find here.
A connection bridge is the most secure method to access store data. The data received will be used only for providing the work of API2Cart API methods. API2Cart doesn't collect and save any data retrieved from the stores. As an exception, we save the credentials needed for making API requests to the stores. Also, we are caching the store configuration (e.g., the list of supported currencies, time zones, etc.) as it helps reduce the number of requests to the stores.
Here, you can find a video tutorial on how to download bridge for bridge platforms easily. A similar tutorial for all the rest platforms can be found here. The bridge can be downloaded automatically with the help of the bridge.download method. More details related to the bridge you can find here.
Technical side of bridge security
IMPORTANT: For each request from API2Cart to the bridge, we form the signature based on request parameters and srore_key. When the request comes to the bridge, the signature is calculated on the bridge and compared with the one sent from API2Cart. If it matches then the request will be performed. Otherwise, the bridge will present an error. That is the way we do the authorization.
FTP credentials are used to upload a bridge in order to specify connection with self-hosted platforms. When adding a store to API2Cart using FTP, credentials are used only for bridge uploading, and they are not stored in our system.
In order to investigate issues and troubleshoot reported problems or install the connection bridge file, API2Cart support technicians may require access to the online store, web server and database.
It is recommended to temporarily change the password of the admin account before providing a technician with access to your online store. Once your issue is resolved, you should change the passwords of all the provided accounts as soon as possible. The technician will make it clear to you what access exactly we need to solve your problem. More details on which accesses API2Cart techs may ask can be found here.
We highly respect API2Cart customers’ privacy. We have adopted all the necessary measures so that you could be confident about how we protect and manage personal information. For more information please get familiar with the Privacy Policy of our company.
In order to investigate issues and to troubleshoot reported problems, or download the connection bridge file API2Cart support technicians may require access to online store, web server and database.
We understand that this kind of access information is sensitive, and are best kept to a need-to-know basis. With this in mind, we will only require access to your online store where it is absolutely necessary.
We have taken every precaution to ensure that our systems which store access information is highly secure. However, there are additional precautions that we advise our customers take before providing us with access credentials.
In all cases where we require access to online store, we will make it clear to you exactly what access is needed, and why.
Depending on the task which needs to be performed, an API2Cart technician may require access to your online store. We strongly advise you to change the password of Admin/FTP accounts being provided with a random password for API2Cart support for the duration of the issue, with only the essential permissions to your online store.
More often than not, we will require access to an administrator account on your online store. Follow the steps outlined in the Access to your online store section of this article.
In order to investigate the problems, API2Cart support may require access to the files of your online store installation. Follow the steps outlined in the Access to your online store section of this article.
Make sure that this account is a user-level account that has access to the directory in which your online store is installed, unless our technician specifically requests an unrestricted access account (see below).
If a technician asks for 'root access' to your server (a root account with unrestricted permissions), please do not be alarmed. Only in the rarest of cases will we ask for such access - i.e. when our ability to diagnose and resolve your issue absolutely requires it (such as generating or monitoring server logs, or making server configuration changes).
When providing us with root/unrestricted access to your server, it is imperative that you follow the temporary account creation steps outlined in the Access to your online store section of this article.If your systems are protected by IP address authentication (e.g. if you have a firewall), please let us know and we will provide you with the list of our office IP addresses to allow through.
Web browsers request for information from the server, and when it is performed, it sends an Accept header. In case if the server is not able to send that data in the requested format in the Accept header, then the server sends the 406 Not Acceptable error.
The 406 error can appear accordingly to your mod_security rule on the server. Mod_security is a security module of Apache web server, usually permitted automatically on all hosting profiles. In case if a site, page or even function violates one of the rules, server can send the 406 error.
You can turn mod_security off. Also, there is a possibility to disable a specific rule or each domain individually. Thus, if you wish to disable mod_security, go to mod_security using modsec manager plugin in control panel.
Note: There may not be the option of turning mod_security on/off in your cPanel or dedicated servers. In such cases, use command line using SSH or contact tech support to enable/disable this option.
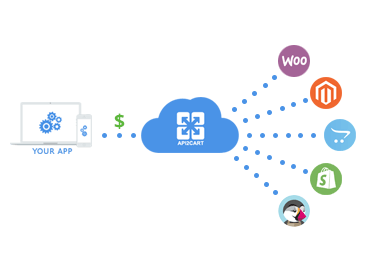
With API2Cart shopping platforms integration is easy
Integrate once, save 4-8 weeks and thousands of dollars on each integration.
Never worry about maintaining separate connections.
300 Multiple Choices - indicates multiple options for the resource that the client may follow.
301 Moved Permanently - This and all future requests should be directed to the given URL
302 Found - required the client to perform a temporary redirect (the original describing phrase was "Moved Temporarily")
303 See Other - The response to the request can be found under another URL using a GET method.
304 Not Modified - Indicates that the resource has not been modified since the version specified by the request headers If-Modified-Since or If-Match
306 Switch Proxy - No longer used.Originally meant "Subsequent requests should use the specified proxy."
307 Temporary Redirect (since HTTP/1.1) - In this case, the request should be repeated with another URL; however, future requests should still use the original URL.
308 Permanent Redirect - the request, and all future requests should be repeated using another URL.
400 Bad Request - the request cannot be fulfilled due to bad syntax.
401 Unauthorized - similar to 403 Forbidden, but specifically for use when authentication is required and has failed or has not yet been provided.
402 Payment Required - reserved for future use.
403 Forbidden - the request was a valid request, but the server is refusing to respond to it.
404 Not Found - the requested resource could not be found but may be available again in the future.
405 Method Not Allowed - a request was made of a resource using a request method not supported by that resource
406 Not Acceptable - the requested resource is only capable of generating content not acceptable according to the Accept headers sent in the request.
407 Proxy Authentication Required - the client must first authenticate itself with the proxy.
408 Request Timeout - the server timed out waiting for the request.
409 Conflict - indicates that the request could not be processed because of conflict in the request, such as an edit conflict in the case of multiple updates.
410 Gone - indicates that the resource requested is no longer available and will not be available again.
411 Length Required - the request did not specify the length of its content, which is required by the requested resource.
412 Precondition Failed - the server does not meet one of the preconditions that the requester put on the request.
413 Request Entity Too Large - the request is larger than the server is willing or able to process.
414 Request-URI Too Long - the URI provided was too long for the server to process.
415 Unsupported Media Type - the request entity has a media type which the server or resource does not support.
416 Requested Range Not Satisfiable - the client has asked for a portion of the file, but the server cannot supply that portion.
417 Expectation Failed - the server cannot meet the requirements of the Expect request-header field.
418 I'm a teapot - this code was defined in 1998 as one of the traditional IETF April Fools' jokes, in RFC 2324, Hyper Text Coffee Pot Control Protocol, and is not expected to be implemented by actual HTTP servers.
419 Authentication Timeout - not a part of the HTTP standard, 419 Authentication Timeout denotes that previously valid authentication has expired.
420 Method Failure - not part of the HTTP standard, but defined by Spring in the HttpStatus class to be used when a method failed.
420 Enhance Your Calm - not part of the HTTP standard, but returned by version 1 of the Twitter Search and Trends API when the client is being rate limited.
422 Unprocessable Entity - the request was well-formed but was unable to be followed due to semantic errors.
423 Locked - еhe resource that is being accessed is locked.
424 Failed Dependency - еhe request failed due to failure of a previous request.
425 Unordered Collection - defined in drafts of "WebDAV Advanced Collections Protocol", but not present in "Web Distributed Authoring and Versioning (WebDAV) Ordered Collections Protocol".
426 Upgrade Required - the client should switch to a different protocol such as TLS/1.0.
428 Precondition Required - the origin server requires the request to be conditional.
429 Too Many Requests - the user has sent too many requests in a given amount of time.
431 Request Header Fields Too Large - the server is unwilling to process the request because either an individual header field, or all the header fields collectively, are too large.
440 Login Timeout - a Microsoft extension. Indicates that your session has expired.
444 No Response - used in Nginx logs to indicate that the server has returned no information to the client and closed the connection.
449 Retry With - a Microsoft extension. The request should be retried after performing the appropriate action.
450 Blocked by Windows Parental Controls - a Microsoft extension. This error is given when Windows Parental Controls are turned on and are blocking access to the given webpage.
451 Unavailable For Legal Reasons - defined in the internet draft "A New HTTP Status Code for Legally-restricted Resources".
451 Redirect - used in Exchange ActiveSync if there either is a more efficient server to use or the server cannot access the users' mailbox.
494 Request Header Too Large - Nginx internal code similar to 431 but it was introduced earlier.
495 Cert Error - Nginx internal code used when SSL client certificate error occurred to distinguish it from 4XX in a log and an error page redirection.
496 No Cert - Nginx internal code used when client didn't provide certificate to distinguish it from 4XX in a log and an error page redirection.
497 HTTP to HTTPS - Nginx internal code used for the plain HTTP requests that are sent to HTTPS port to distinguish it from 4XX in a log and an error page redirection.
499 Client Closed Request - used in Nginx logs to indicate when the connection has been closed by client while the server is still processing its request, making server unable to send a status code back.
500 Internal Server Error - a generic error message, given when an unexpected condition was encountered and no more specific message is suitable.
501 Not Implemented - the server either does not recognize the request method, or it lacks the ability to fulfill the request.
502 Bad Gateway - the server was acting as a gateway or proxy and received an invalid response from the upstream server.
503 Service Unavailable - the server is currently unavailable (because it is overloaded or down for maintenance).
504 Gateway Timeout - the server was acting as a gateway or proxy and did not receive a timely response from the upstream server.
505 HTTP Version Not Supported - the server does not support the HTTP protocol version used in the request.
506 Variant Also Negotiates - transparent content negotiation for the request results in a circular reference.
507 Insufficient Storage - the server is unable to store the representation needed to complete the request.
508 Loop Detected - the server detected an infinite loop while processing the request.
509 Bandwidth Limit Exceeded - this status code is not specified in any RFCs. Its use is unknown.
510 Not Extended - further extensions to the request are required for the server to fulfill it.
511 Network Authentication Required - the client needs to authenticate to gain network access.
520 Origin Error - this status code is not specified in any RFCs, but is used by Cloudflare's reverse proxies to signal an "unknown connection issue between CloudFlare and the origin web server" to a client in front of the proxy.
521 Web server is down - this status code is not specified in any RFCs, but is used by Cloudflare's reverse proxies to indicate that the origin web server refused the connection.
522 Connection timed out - this status code is not specified in any RFCs, but is used by Cloudflare's reverse proxies to signal that a server connection timed out.
523 Proxy Declined Request - this status code is not specified in any RFCs, but is used by Cloudflare's reverse proxies to signal a resource that has been blocked by the administrator of the website or proxy itself.
524 A timeout occurred - this status code is not specified in any RFCs, but is used by Cloudflare's reverse proxies to signal a network read timeout behind the proxy to a client in front of the proxy.
598 Network read timeout error - this status code is not specified in any RFCs, but is used by Microsoft HTTP proxies to signal a network read timeout behind the proxy to a client in front of the proxy.
599 Network connect timeout error - this status code is not specified in any RFCs, but is used by Microsoft HTTP proxies to signal a network connect timeout behind the proxy to a client in front of the proxy.
In this case there are several simple steps that you can follow:
Check if you enter the correct APi Key. It can be found on the store management page https://www.api2cart.com/app/stores as well as here https://www.api2cart.com/app/profile.
This kind of error comes when API2Cart can’t create the entity due to shopping cart restriction. For example, if you’re trying to create a user with e-mail that is already registered.
There are two possible reasons for that. Either you have entered the incorrect store_key or the store doesn’t exist. The list of available stores can be found on the following page: https://www.api2cart.com/app/stores.
Please, make sure you have passed an ID of the entity in the API request. Feel free to contact API2Cart Support Team in case if you still have any issues.
If this error occurs, it means that the cart or cart version, where the store is located, is not supported by API2Cart.
Another reason of the error formation is the database structure that has been changed because of the third-party module.
If this error occurs:
If this error occurs:
If this error occurs:
There is a special API method account.failed_webhooks that allows you to list recently failed webhooks. Please note that information about failed webhooks is stored for 24 hours.
If a particular e-commerce platform does not support native webhooks (e.g Magento, Opencart), webhooks functionality is emulated by querying store data periodically. Currently, this period is set to 300 seconds, so you can expect 5 minutes delay when receiving webhooks from some platforms.
We suggest to try one of the publicly available webhook testing services, for example requestbin.com, webhook.site or similar. Use url generated by the service as webhook callback. If webhook still doesn’t work, contact our support for further assistance
Please check if your callback URL accepts POST requests. It should also return 200 OK HTTP response or else webhook will be considered as “failed” and after several attempts will be dropped.